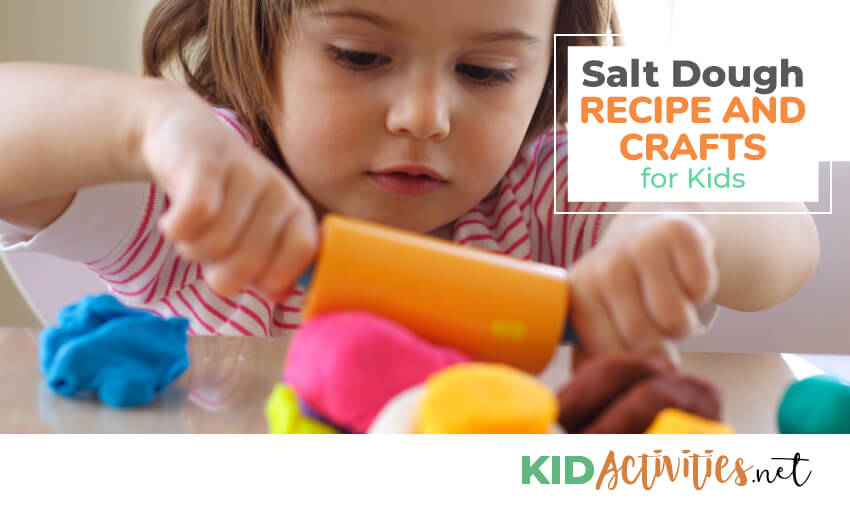
This is a huge list of salt dough recipes and craft ideas for kids. When it comes to keeping the kids occupied it can be hard sometimes to make everyone happy. That’s why we have created this list with an easy salt dough recipe and craft ideas for kids.
You will learn how to make salt dough and preserve it for a few days if you can’t use it all at once. If you homeschool or have a child who struggles with geography you can learn how to make salt dough maps to peak their interest and make learning geography more fun.
Note – Remember that no matter how good it looks, salt dough is not edible. Don’t panic though if your little one decides to take a bite out of an ornament because it won’t make them sick, it’s just extremely salty!
How to make salt dough
The ingredients are simple, and you probably already have them in your pantry.
Salt Dough Ingredients:
- 1 cup of salt
- 2 cups of flour
- ¾ cups of water
Instructions:
Mix the salt and flour together in a large bowl.
Slowly stir in the water and mix well. It works best when you mix it using your hands.
Once it is mixed well put the mixture on parchment or wax paper and knead it together until it is soft and smooth. The longer you knead it, the better the consistency.
While mixing it together the texture will feel like sand from the beach, but the longer you knead it, and roll it in your hands, it will become smooth and easy to work with.
Baking Salt Dough
Although some recipes say the creations can be air dried, the best results come from drying them in the oven. Once you have made your creations, you can place them on a cookie sheet and bake them as you would when you bake cookies. Parchment paper works well on the cookie sheets while baking them, so they will slide off smoothly.
How Long to Bake it
Each creation might require a different baking time and temperature, but if you want to bake more than one type of creation at a time, you can adjust the time and temperatures accordingly.
Most of the creations will bake to the desired consistency in a 250-degree oven and the times will vary, but just like baking cookies, you will want to keep a close eye on them.
It is okay if they turn golden brown like cookies, especially if you plan to paint and decorate them when they are cooled.
Making your Salt Dough Crafts and Ornaments
There are many things to create with your salt dough; from everyday decorations to holiday ornaments, the projects are endless.
You might want to create something special for a baby shower gift or let the kids create unique Christmas gifts for their teachers. The kids will also enjoy decorating the house with some spooky Halloween decorations.
The following are some salt dough craft ideas for the kids that even you will enjoy.
Salt Dough Handprint Ornaments
This is a fun craft for making a long-lasting memory from your child’s handprint.
You will need:
| Salt dough | Rolling pin |
| Round cookie cutter or drinking glass | Plastic straw |
| Ribbon | Acrylic paint |
Instructions:
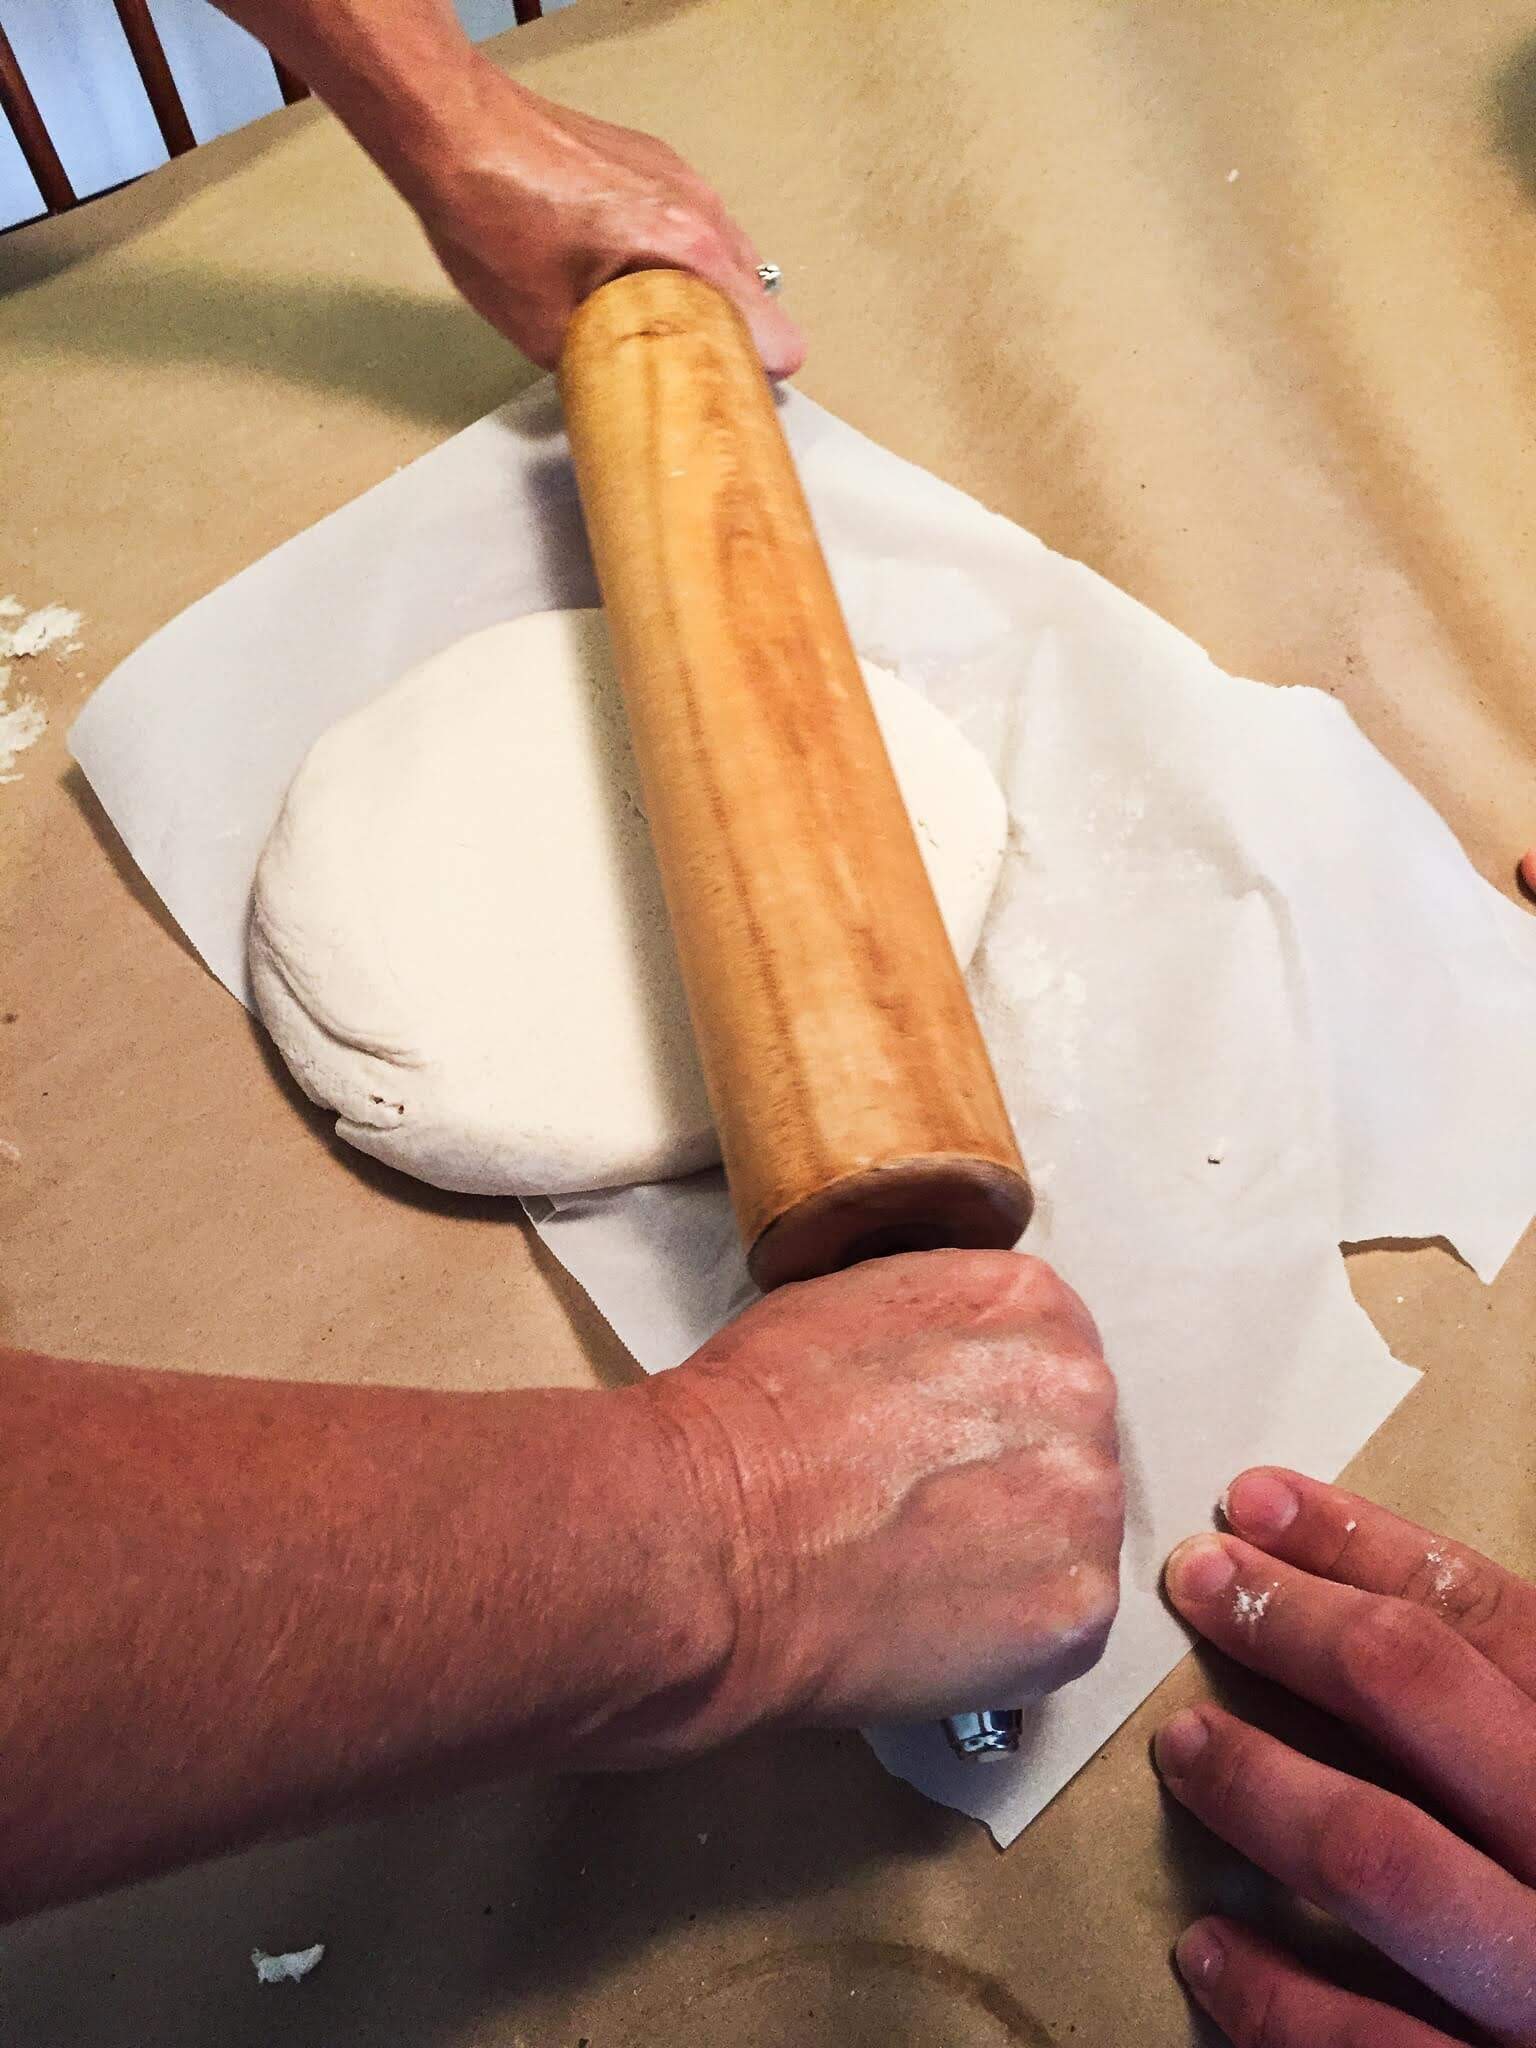
Using the rolling pin, roll the dough flat like a pancake, approximately ¼-inch thick.
Cut a circle out of the dough using the cutter or a drinking glass. (You will need a larger round if your child has larger hands).
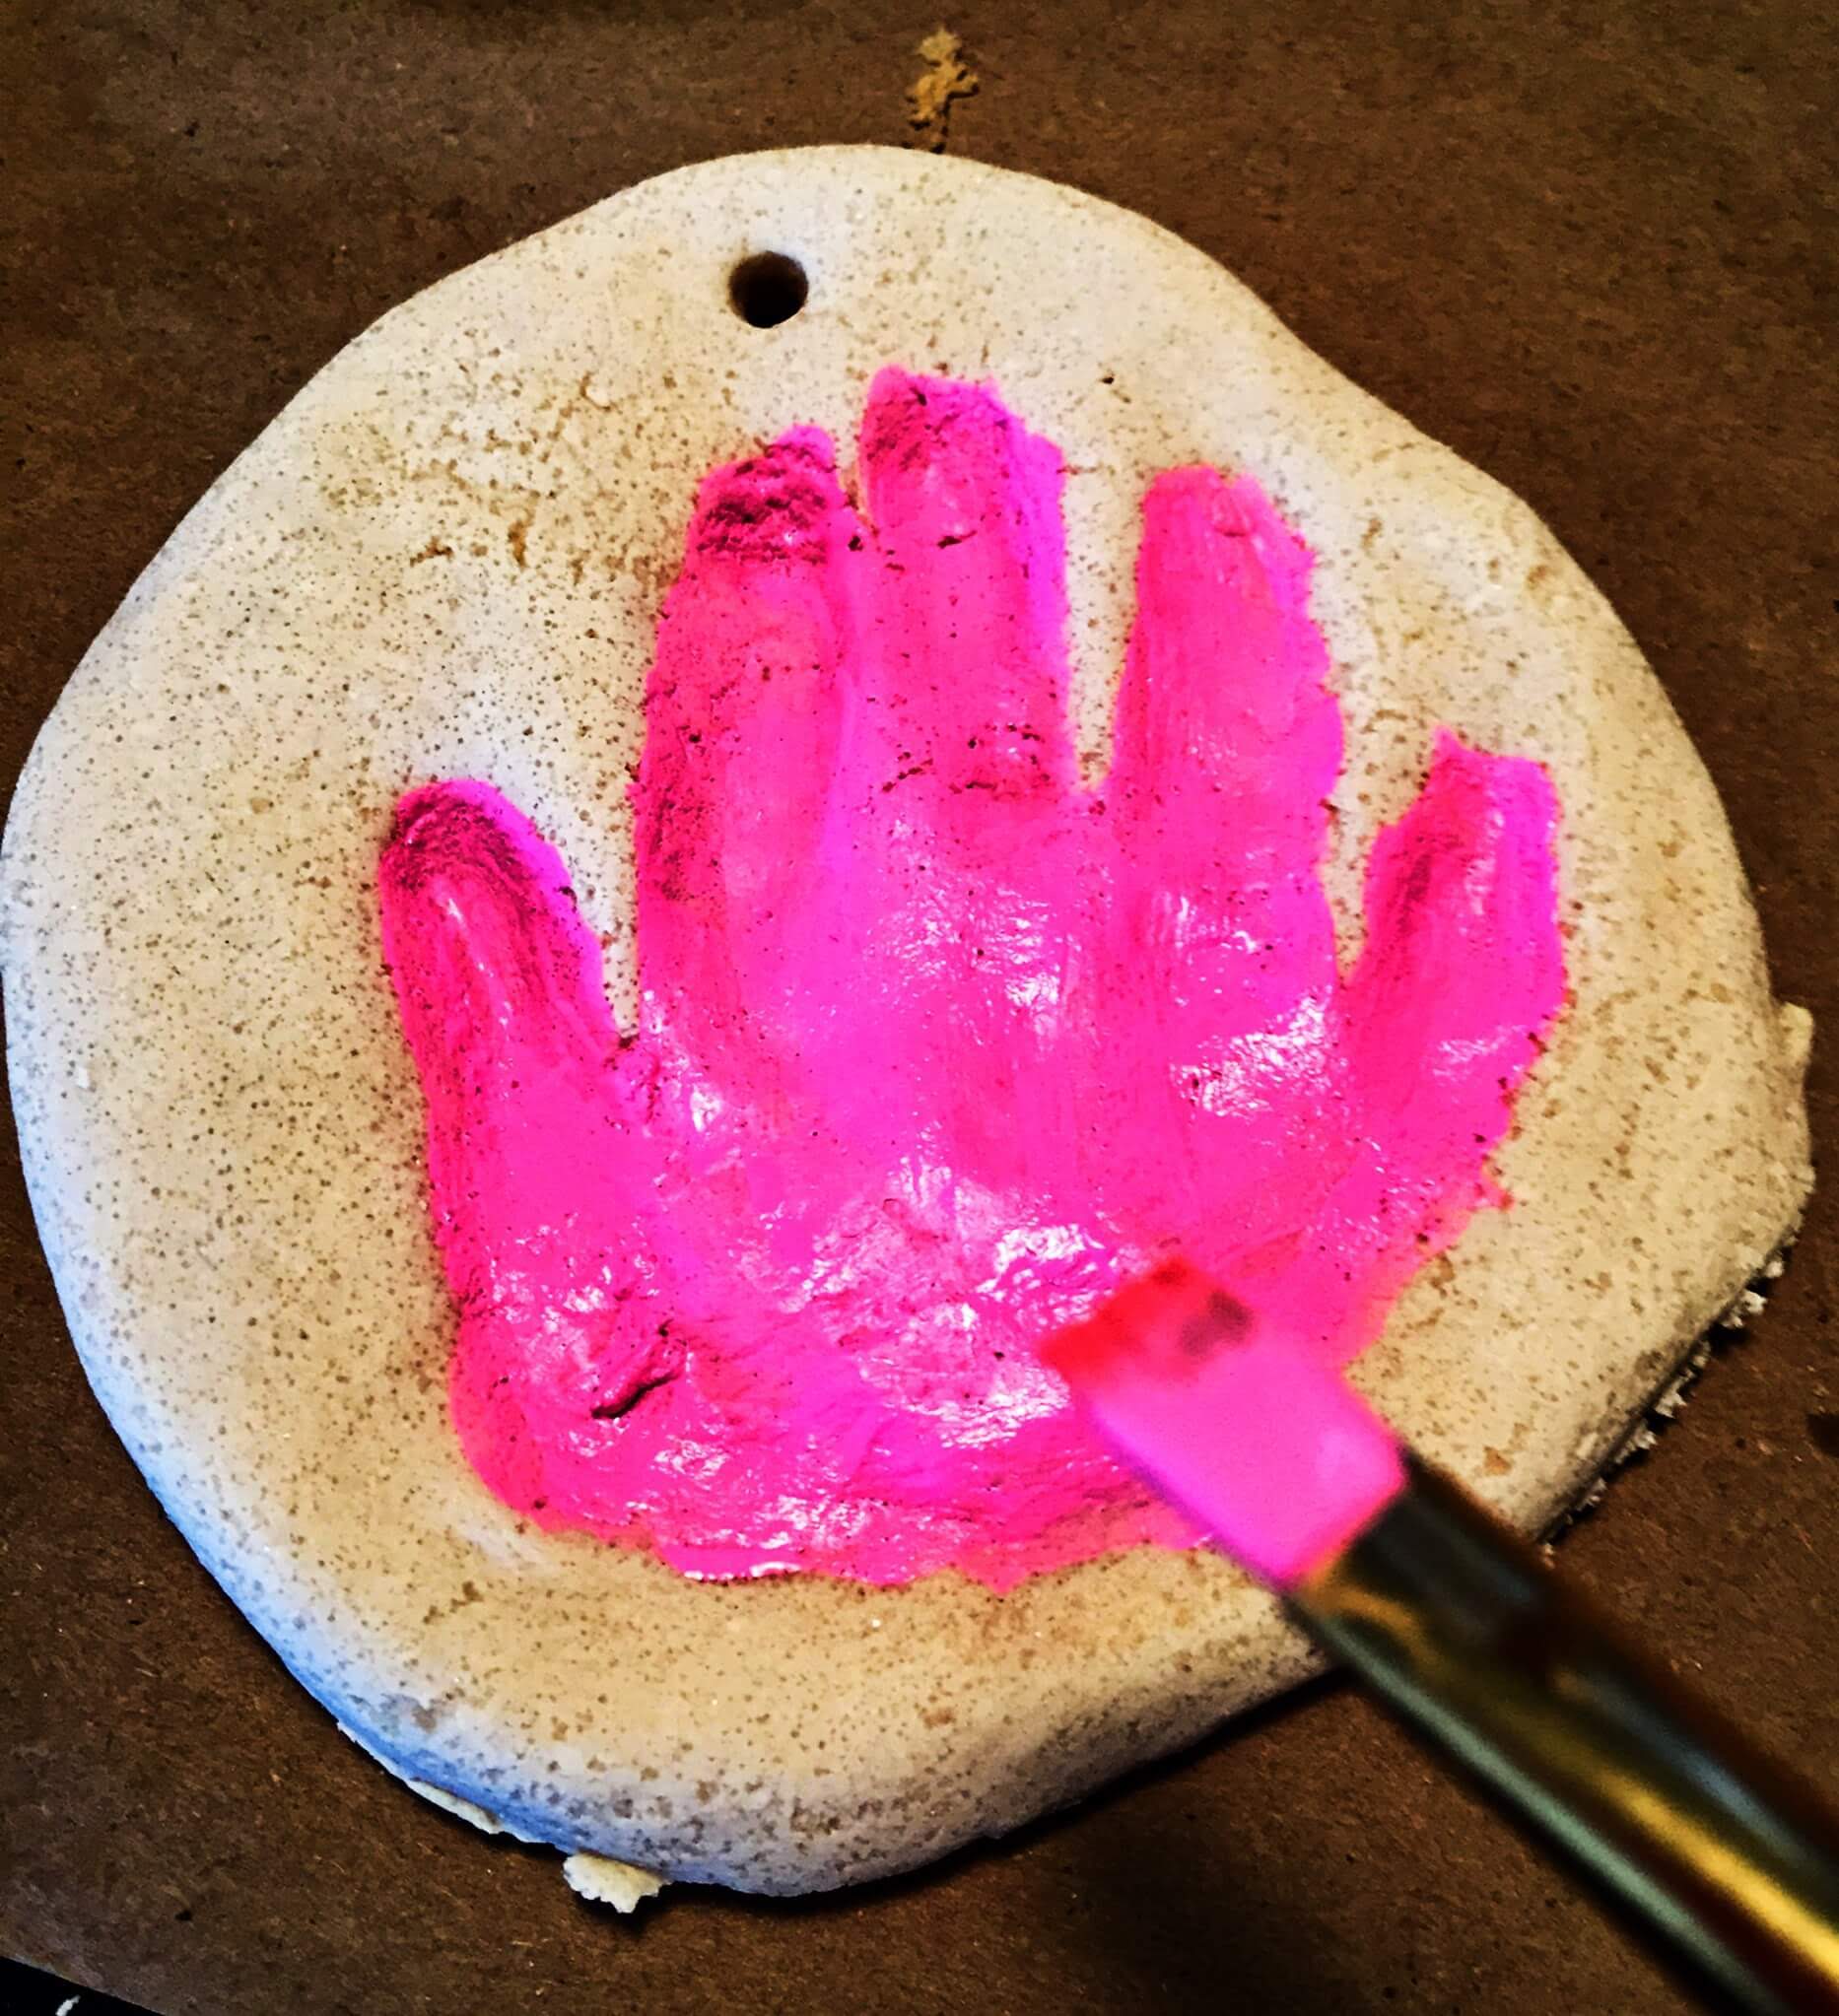
Once you have the dough prepared to size, press your child’s hand firmly into the dough. If the print isn’t deep enough you can reinforce it using your own fingers. You will find that the deeper the print, the better the end results will be.
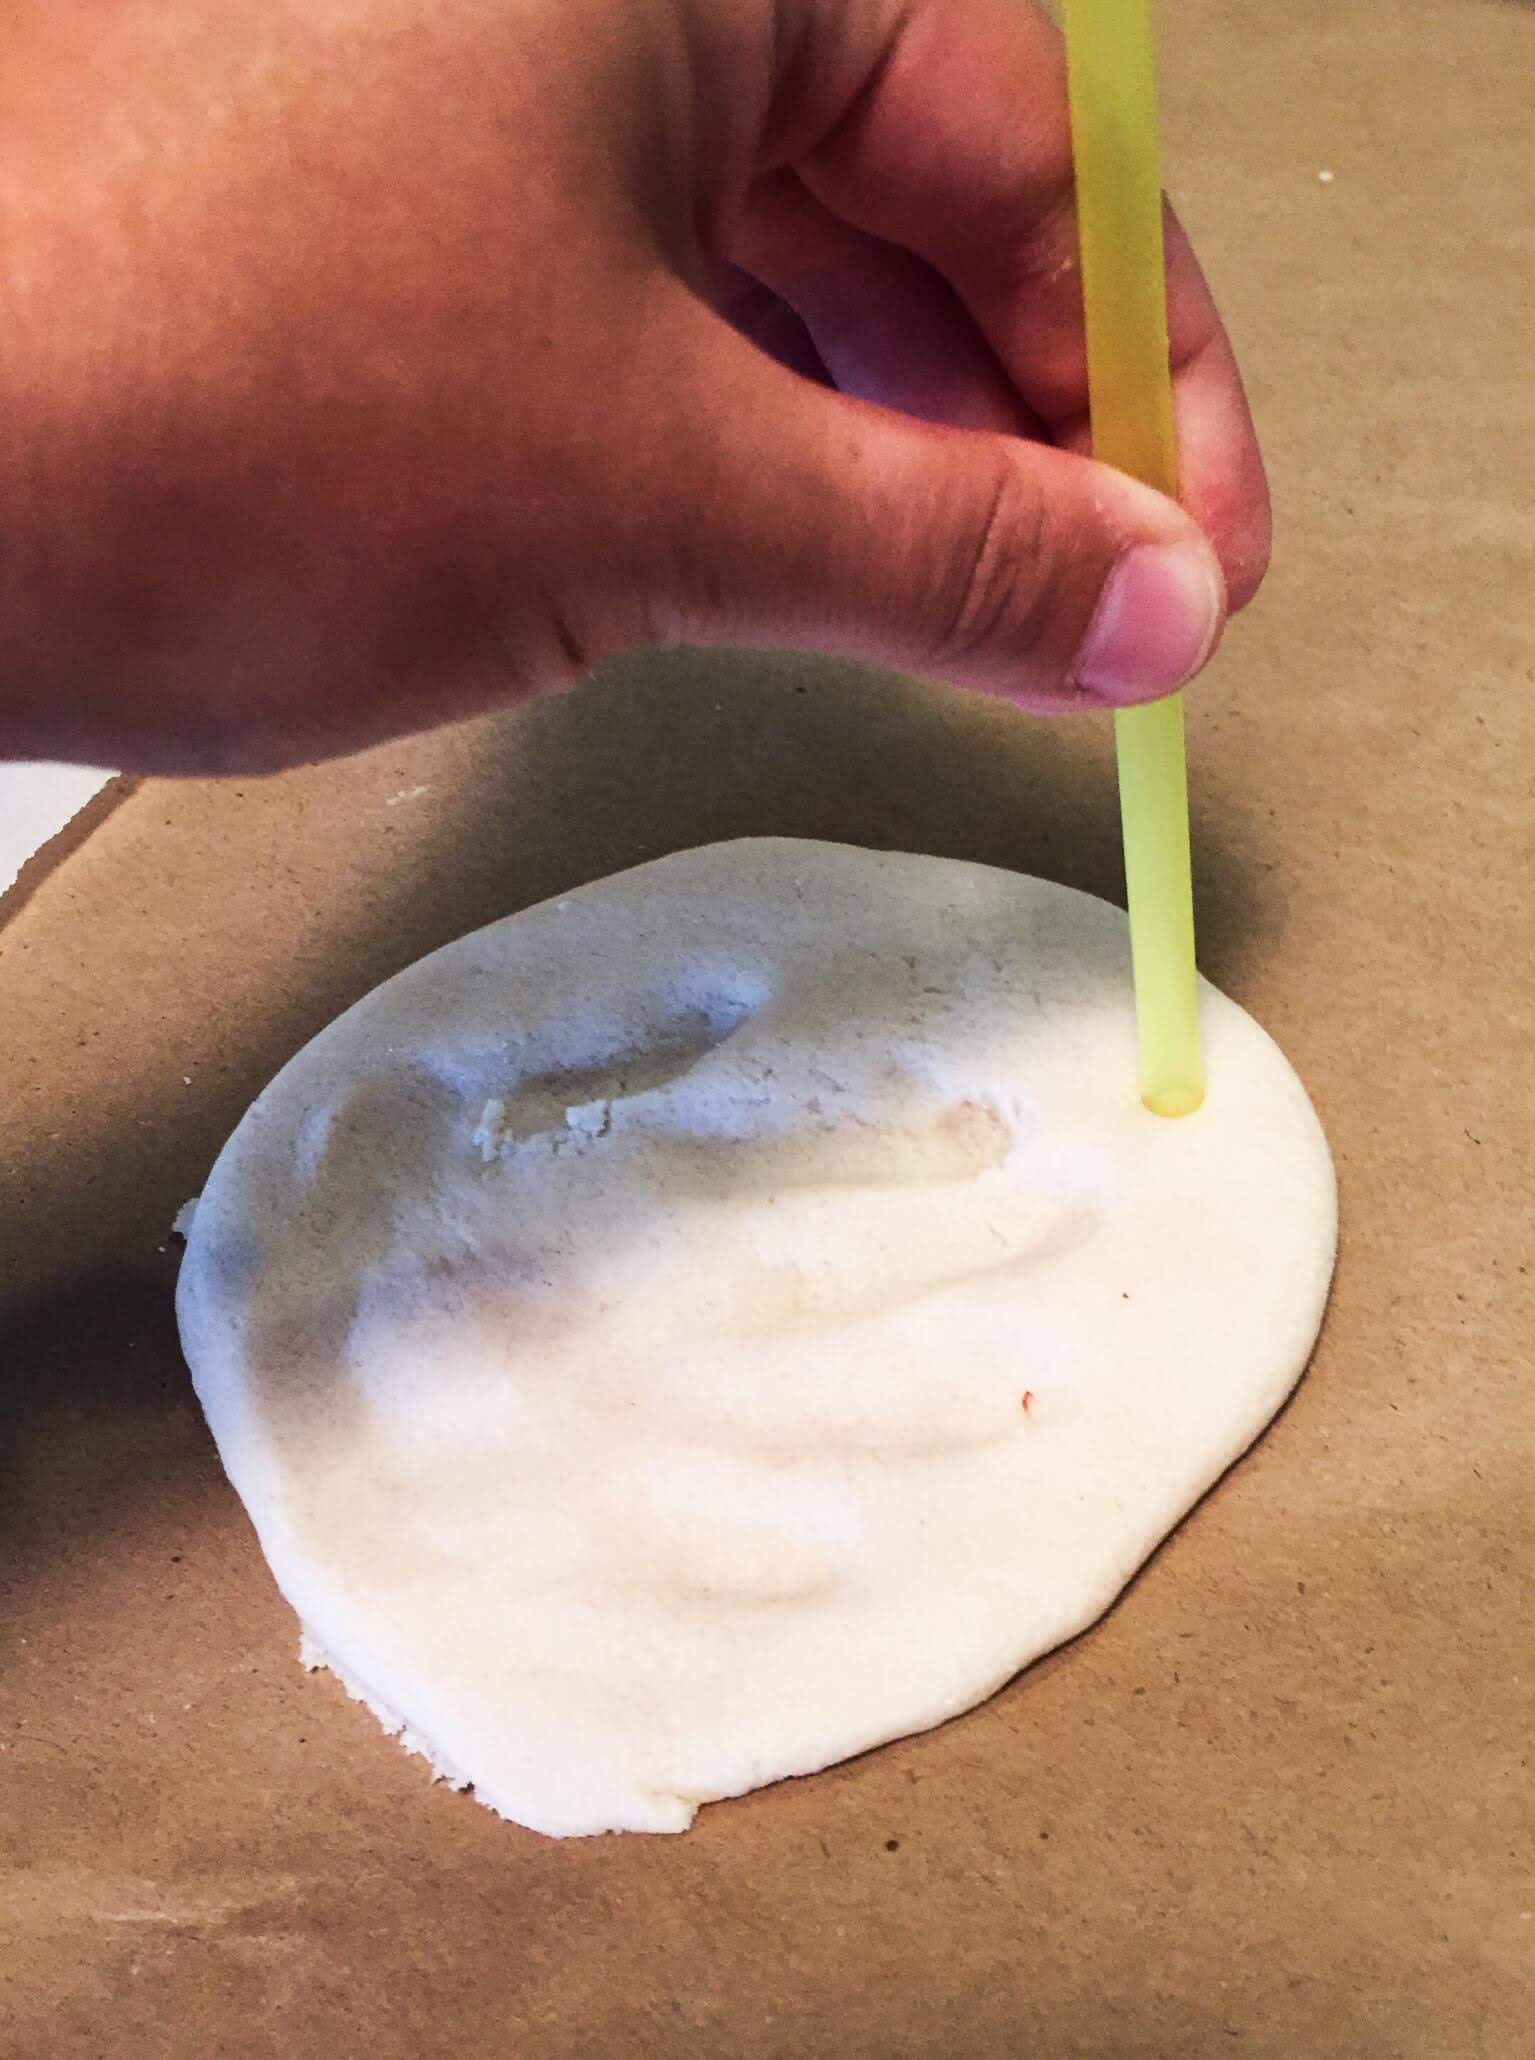
Using the plastic straw, poke a hole to make a place for the ribbon when the ornament is complete.
Place the ornaments on a baking sheet and bake in the oven at 250-degrees for 40-45-minutes or until golden brown.
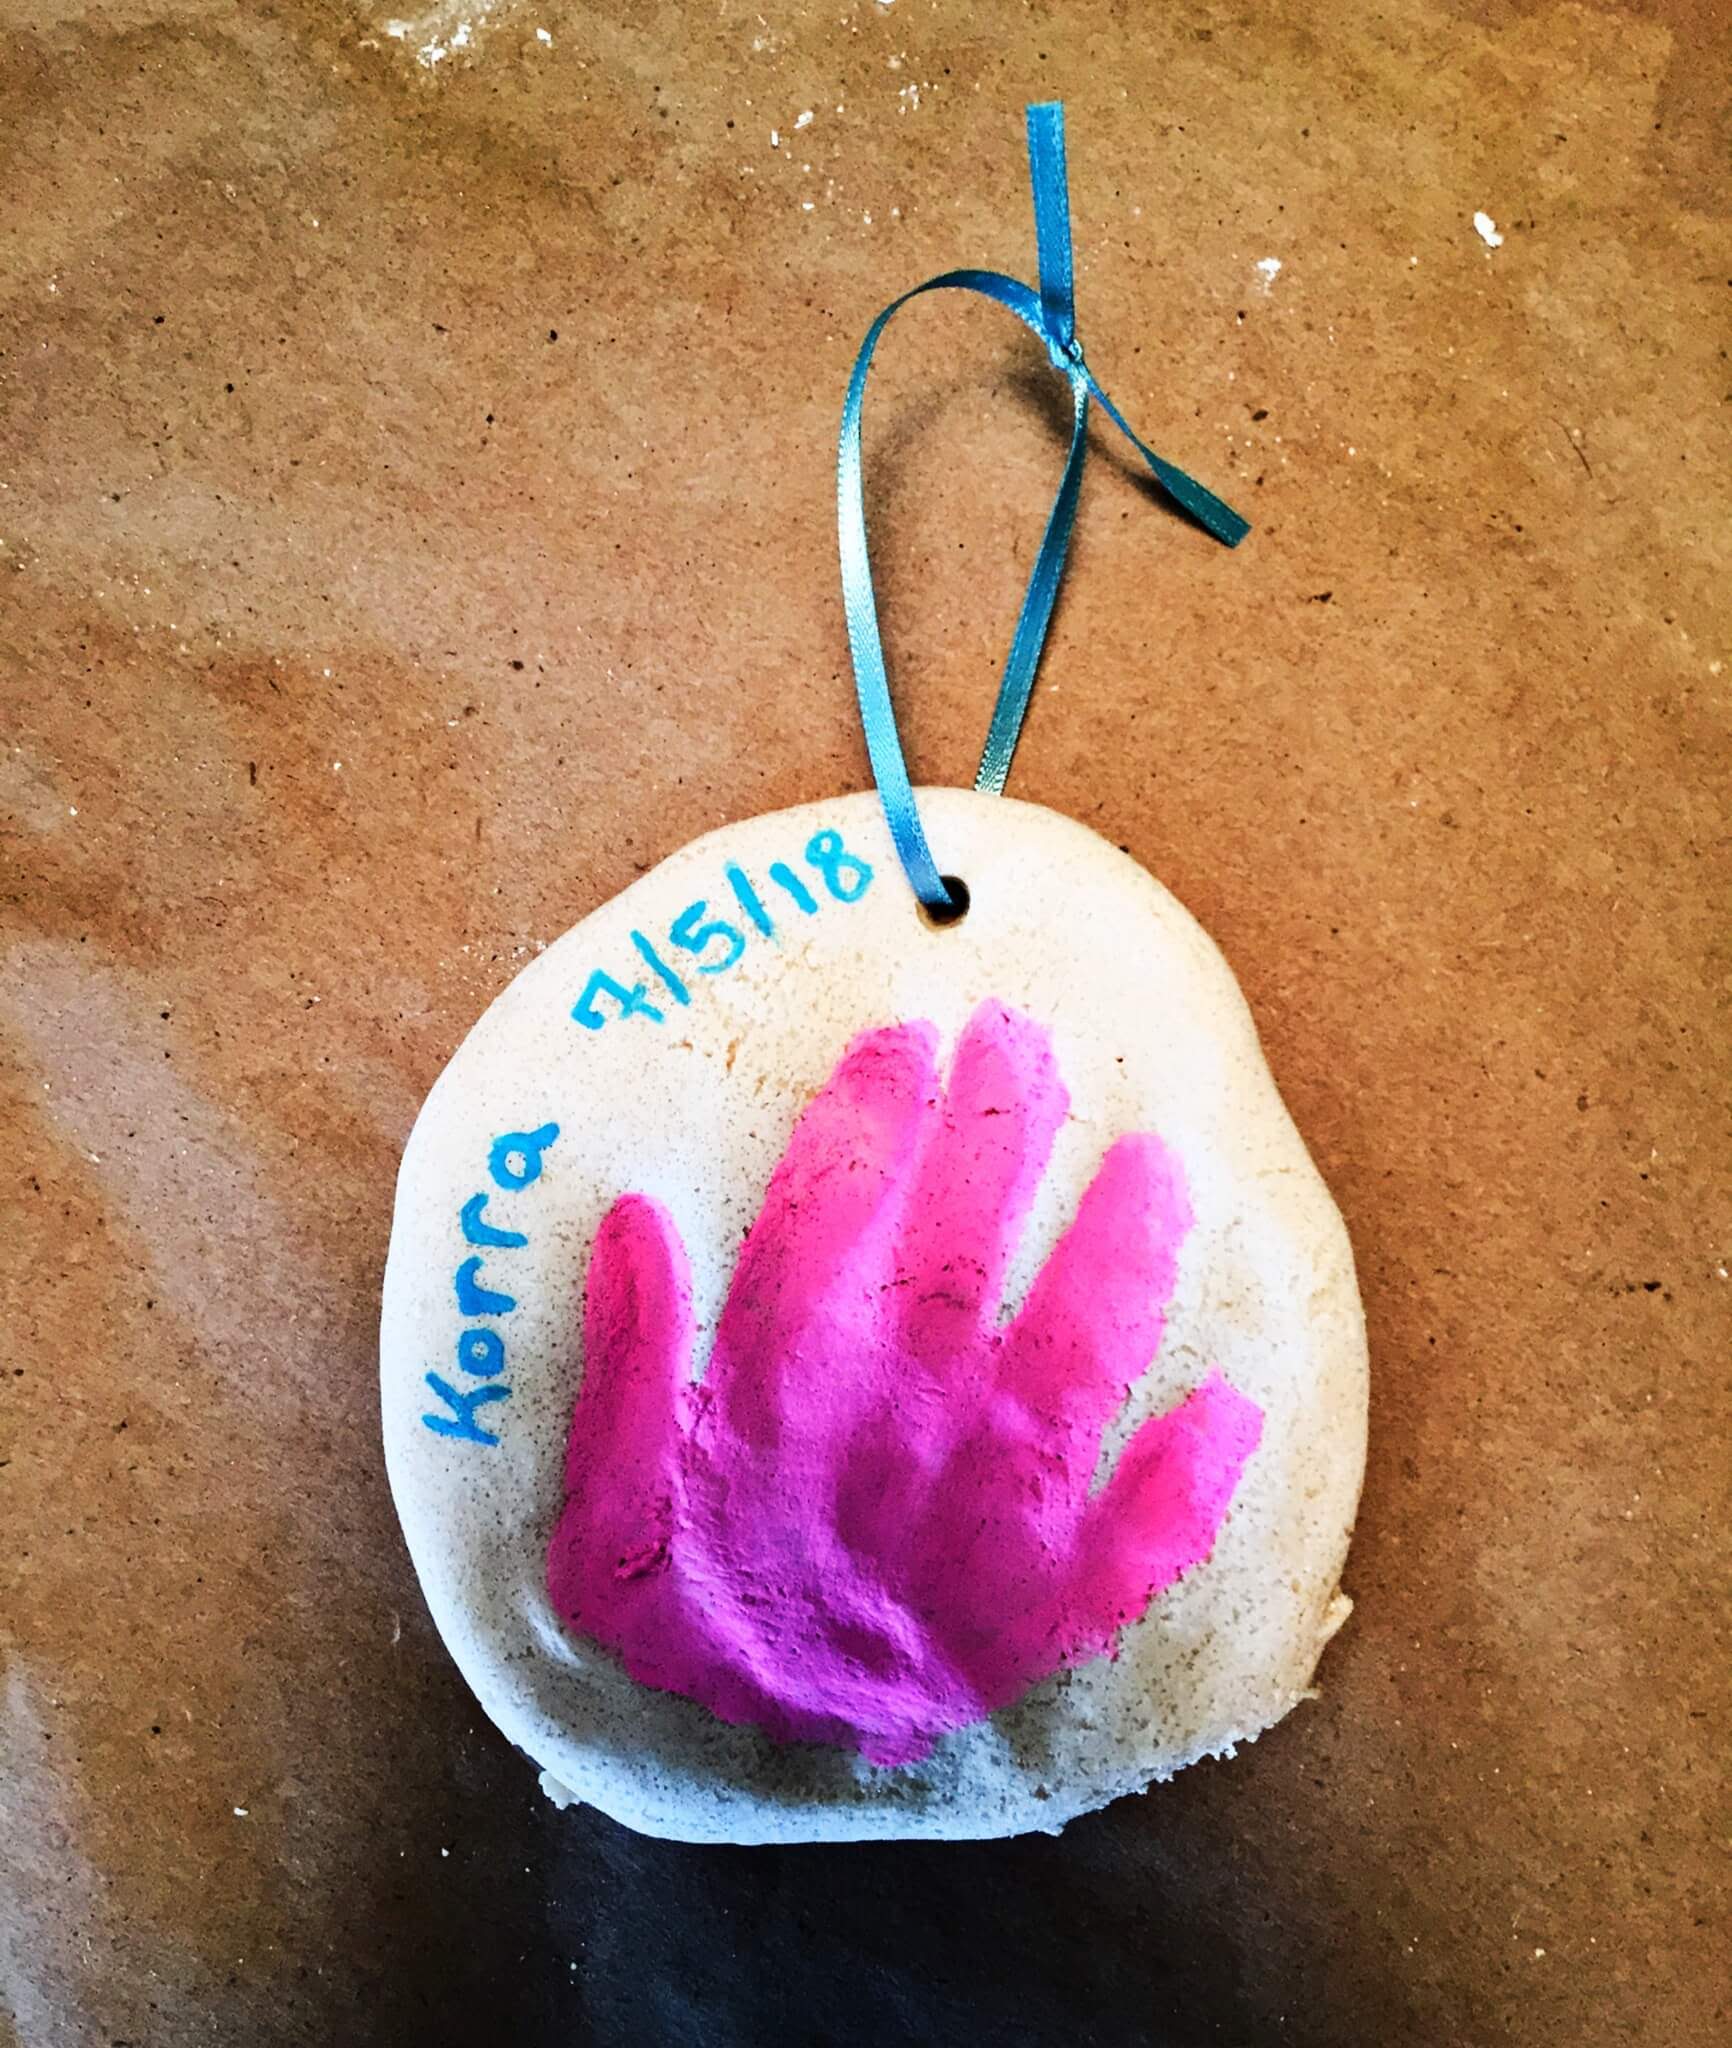
Allow to cool completely and then decorate using acrylic paints and complete it by pulling a ribbon through the hole and tying it.
These make the perfect Grandparent gifts or give them to new parents for a special keepsake.
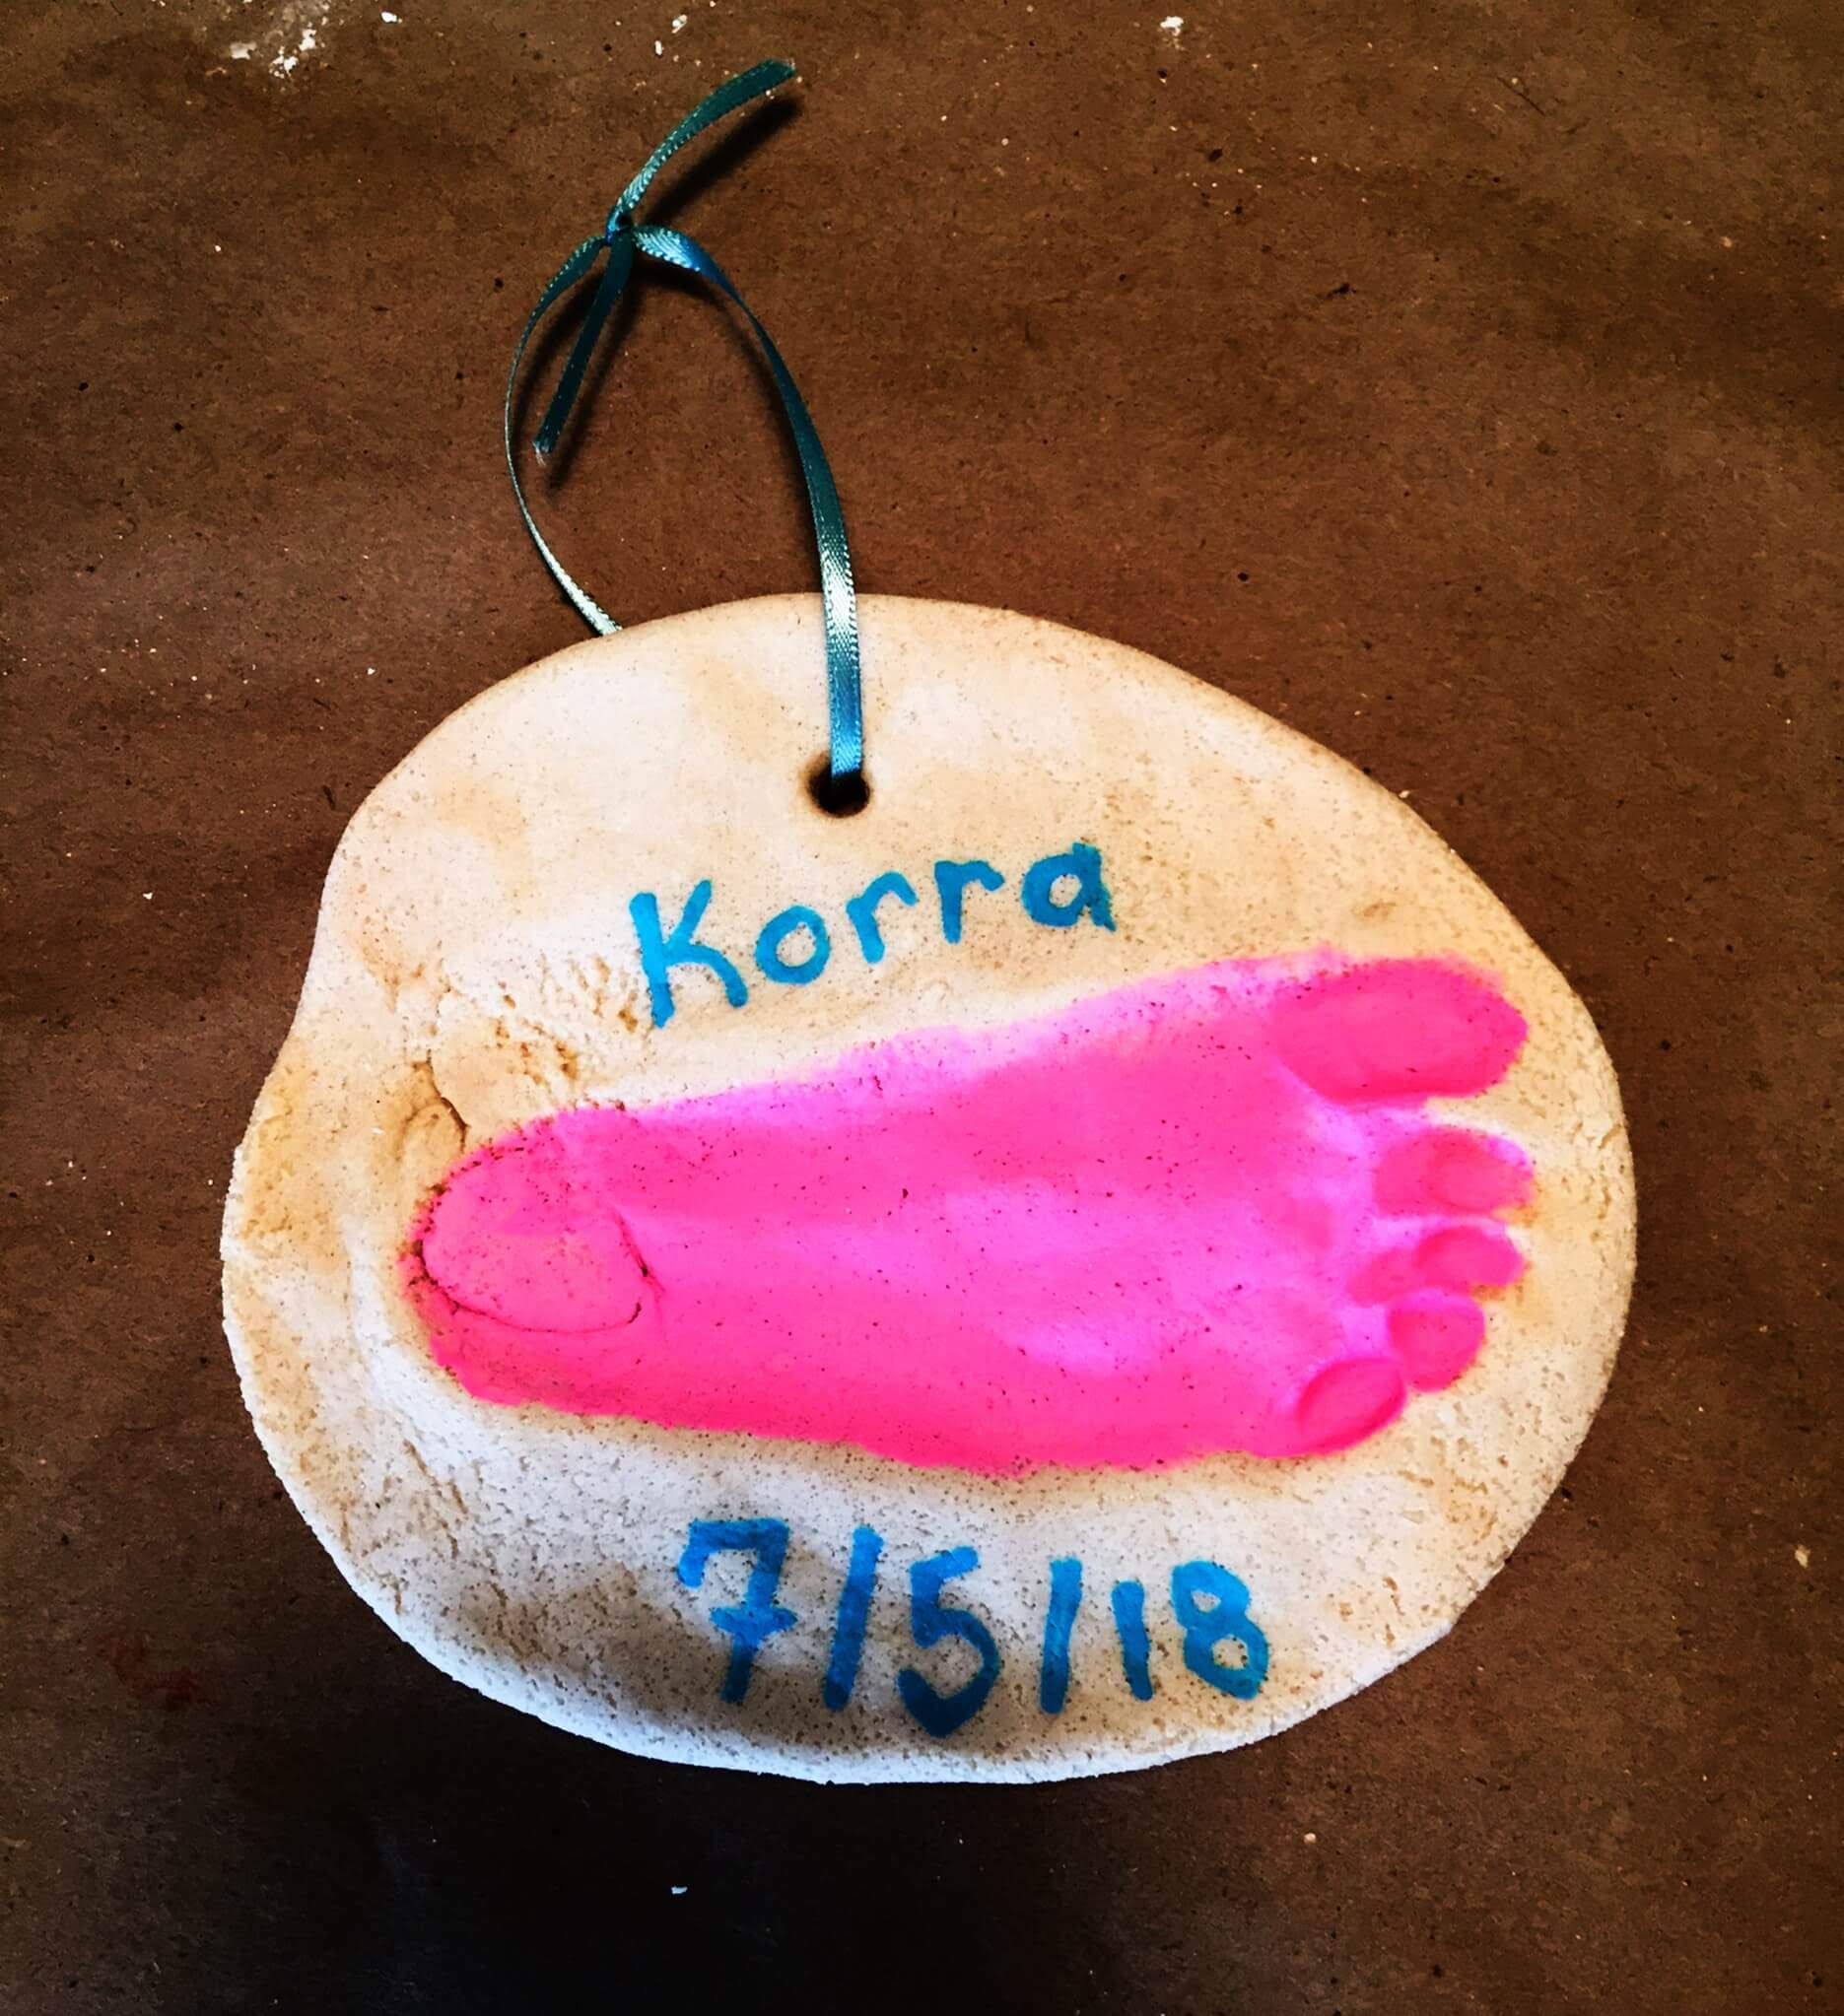
Salt Dough Footprint Ornaments
Just like the handprint ornaments, this one will also make a special gift from your child to someone special.
You will need:
- Salt dough
- Rolling pin
- Round cookie cutter or drinking glass
- Plastic straw
- Ribbon
- Acrylic paint
Instructions:
Roll the dough flat using the rolling pin, approximately ¼-inch thick should be sufficient.
Using the cookie cutter or a drinking glass, cut out a circle. (Be sure and measure your child’s foot to get the proper diameter).
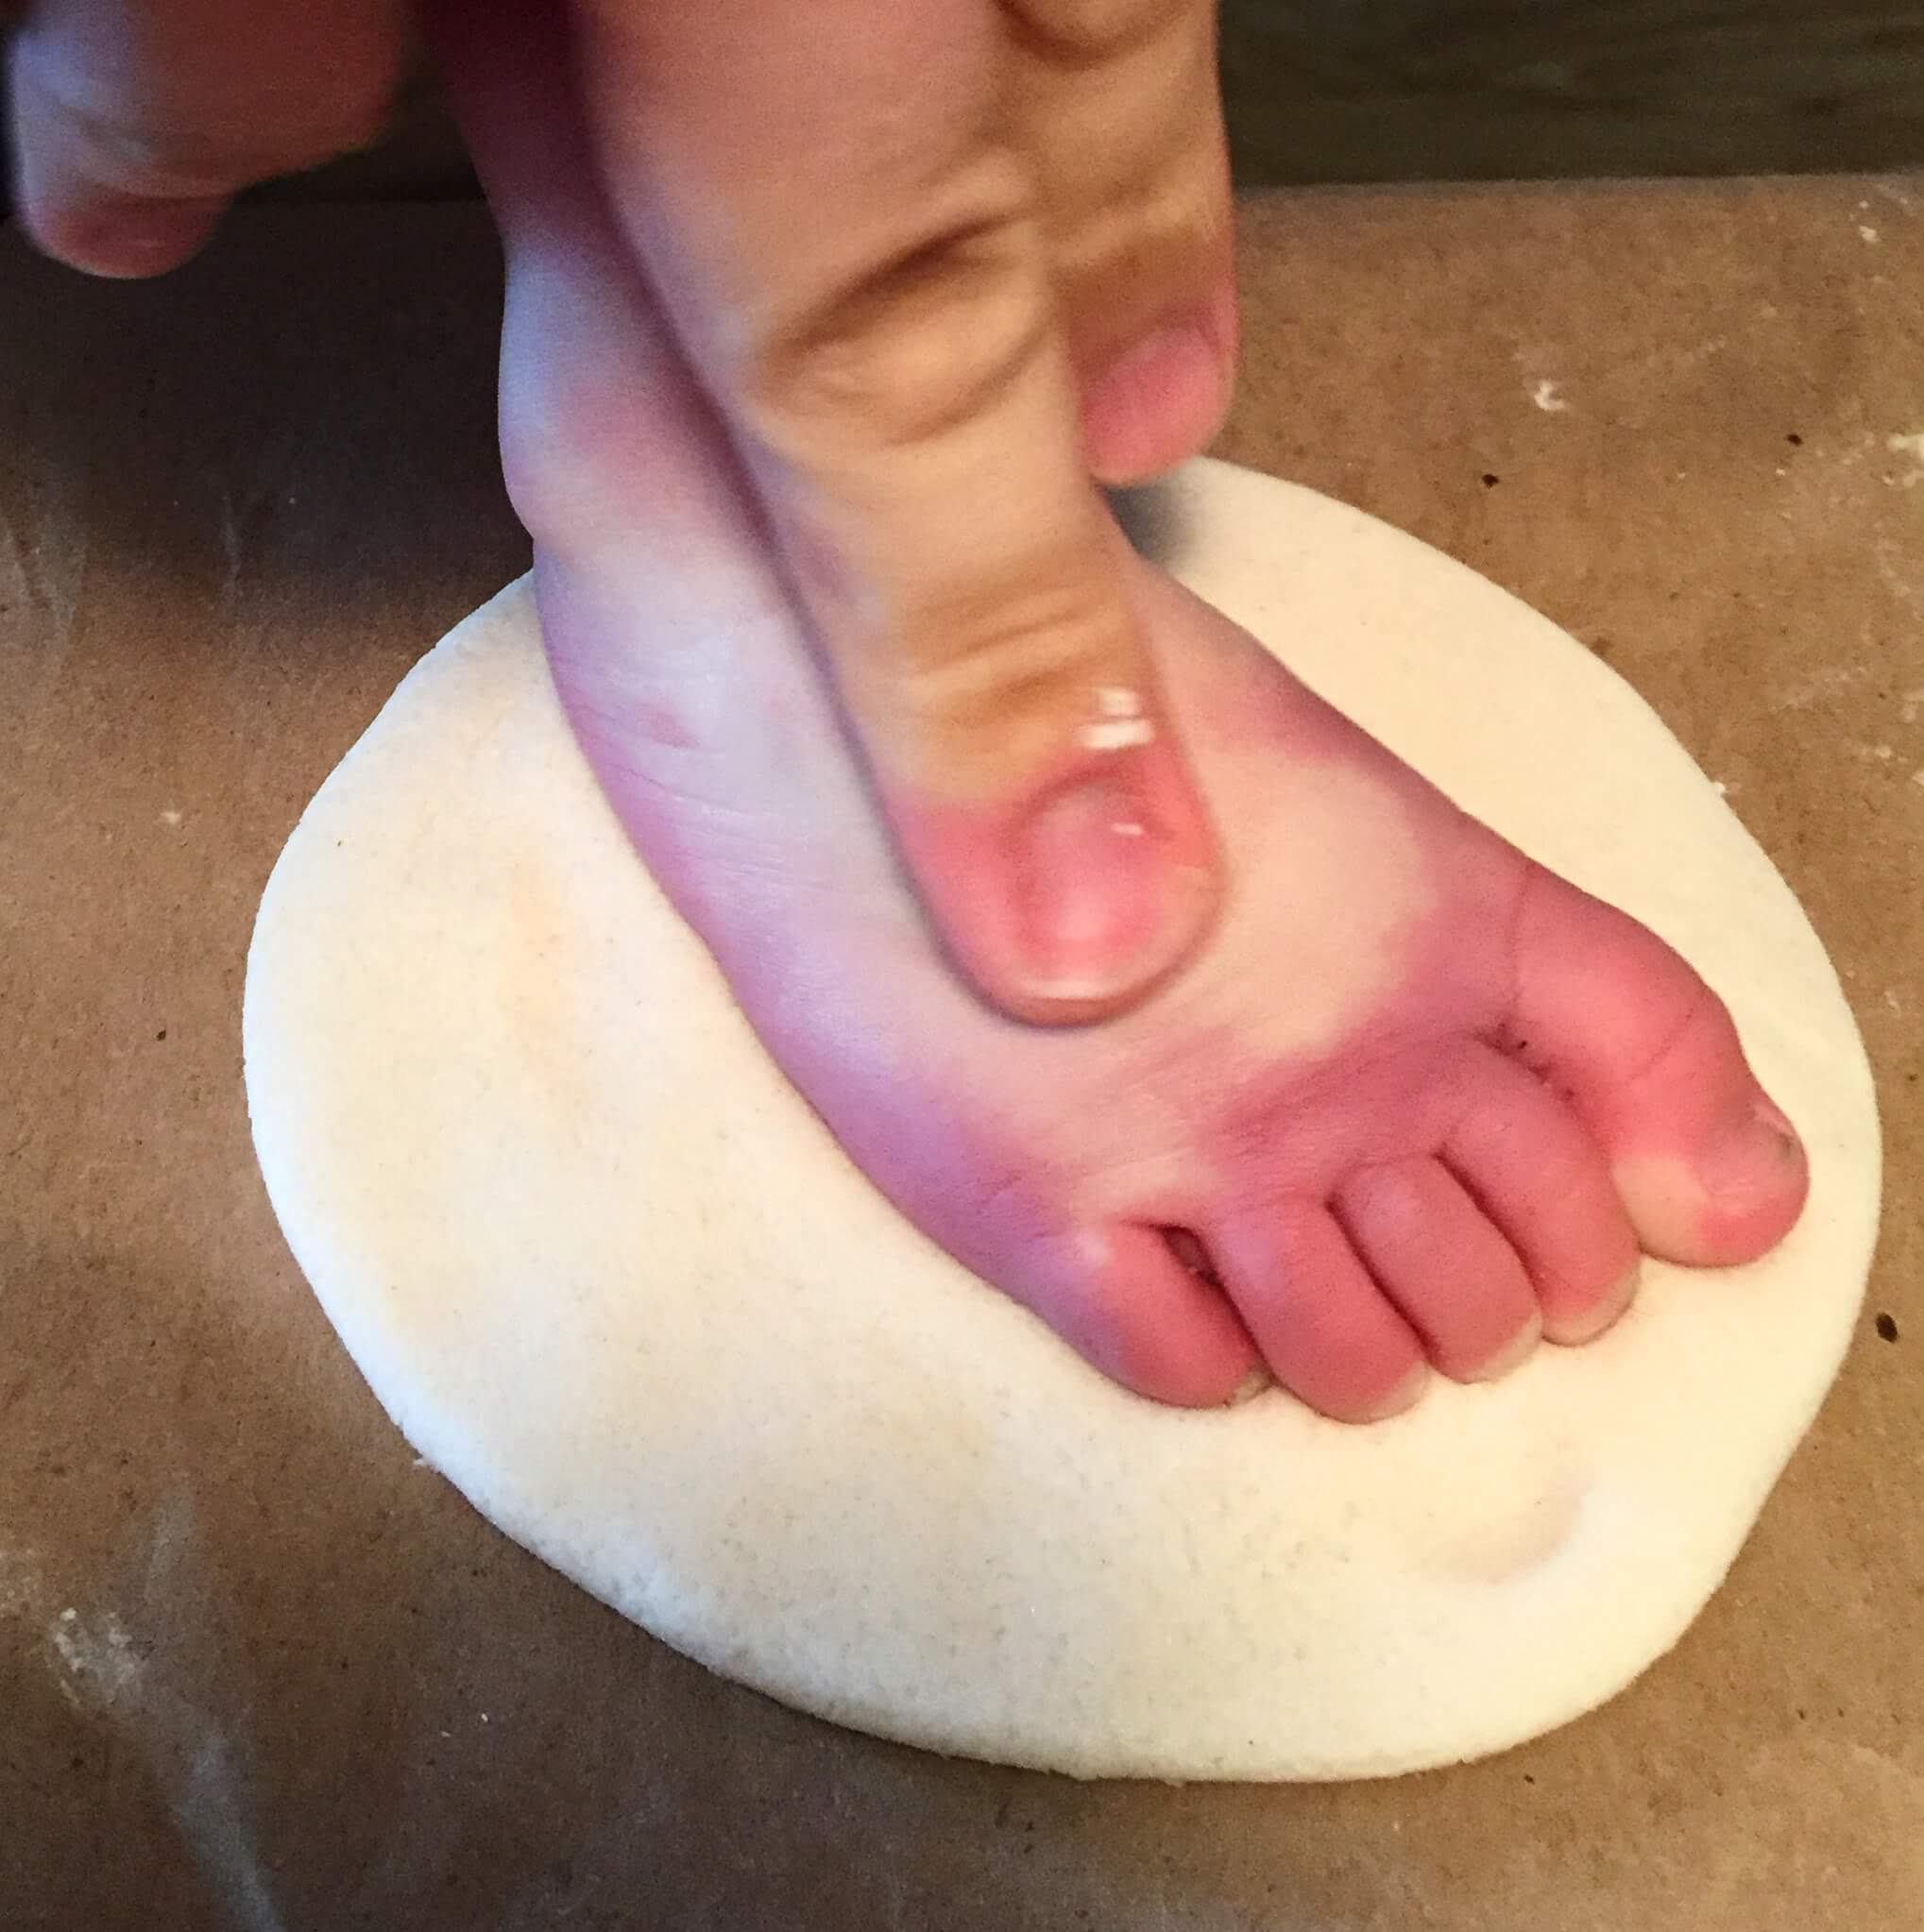
Press your child’s foot firmly into the prepared dough. It works best when you start with their heel and press forward until the entire foot is imprinted into the dough.
Using the straw, poke a hole in the top of the ornament so that you can string a ribbon through it later.
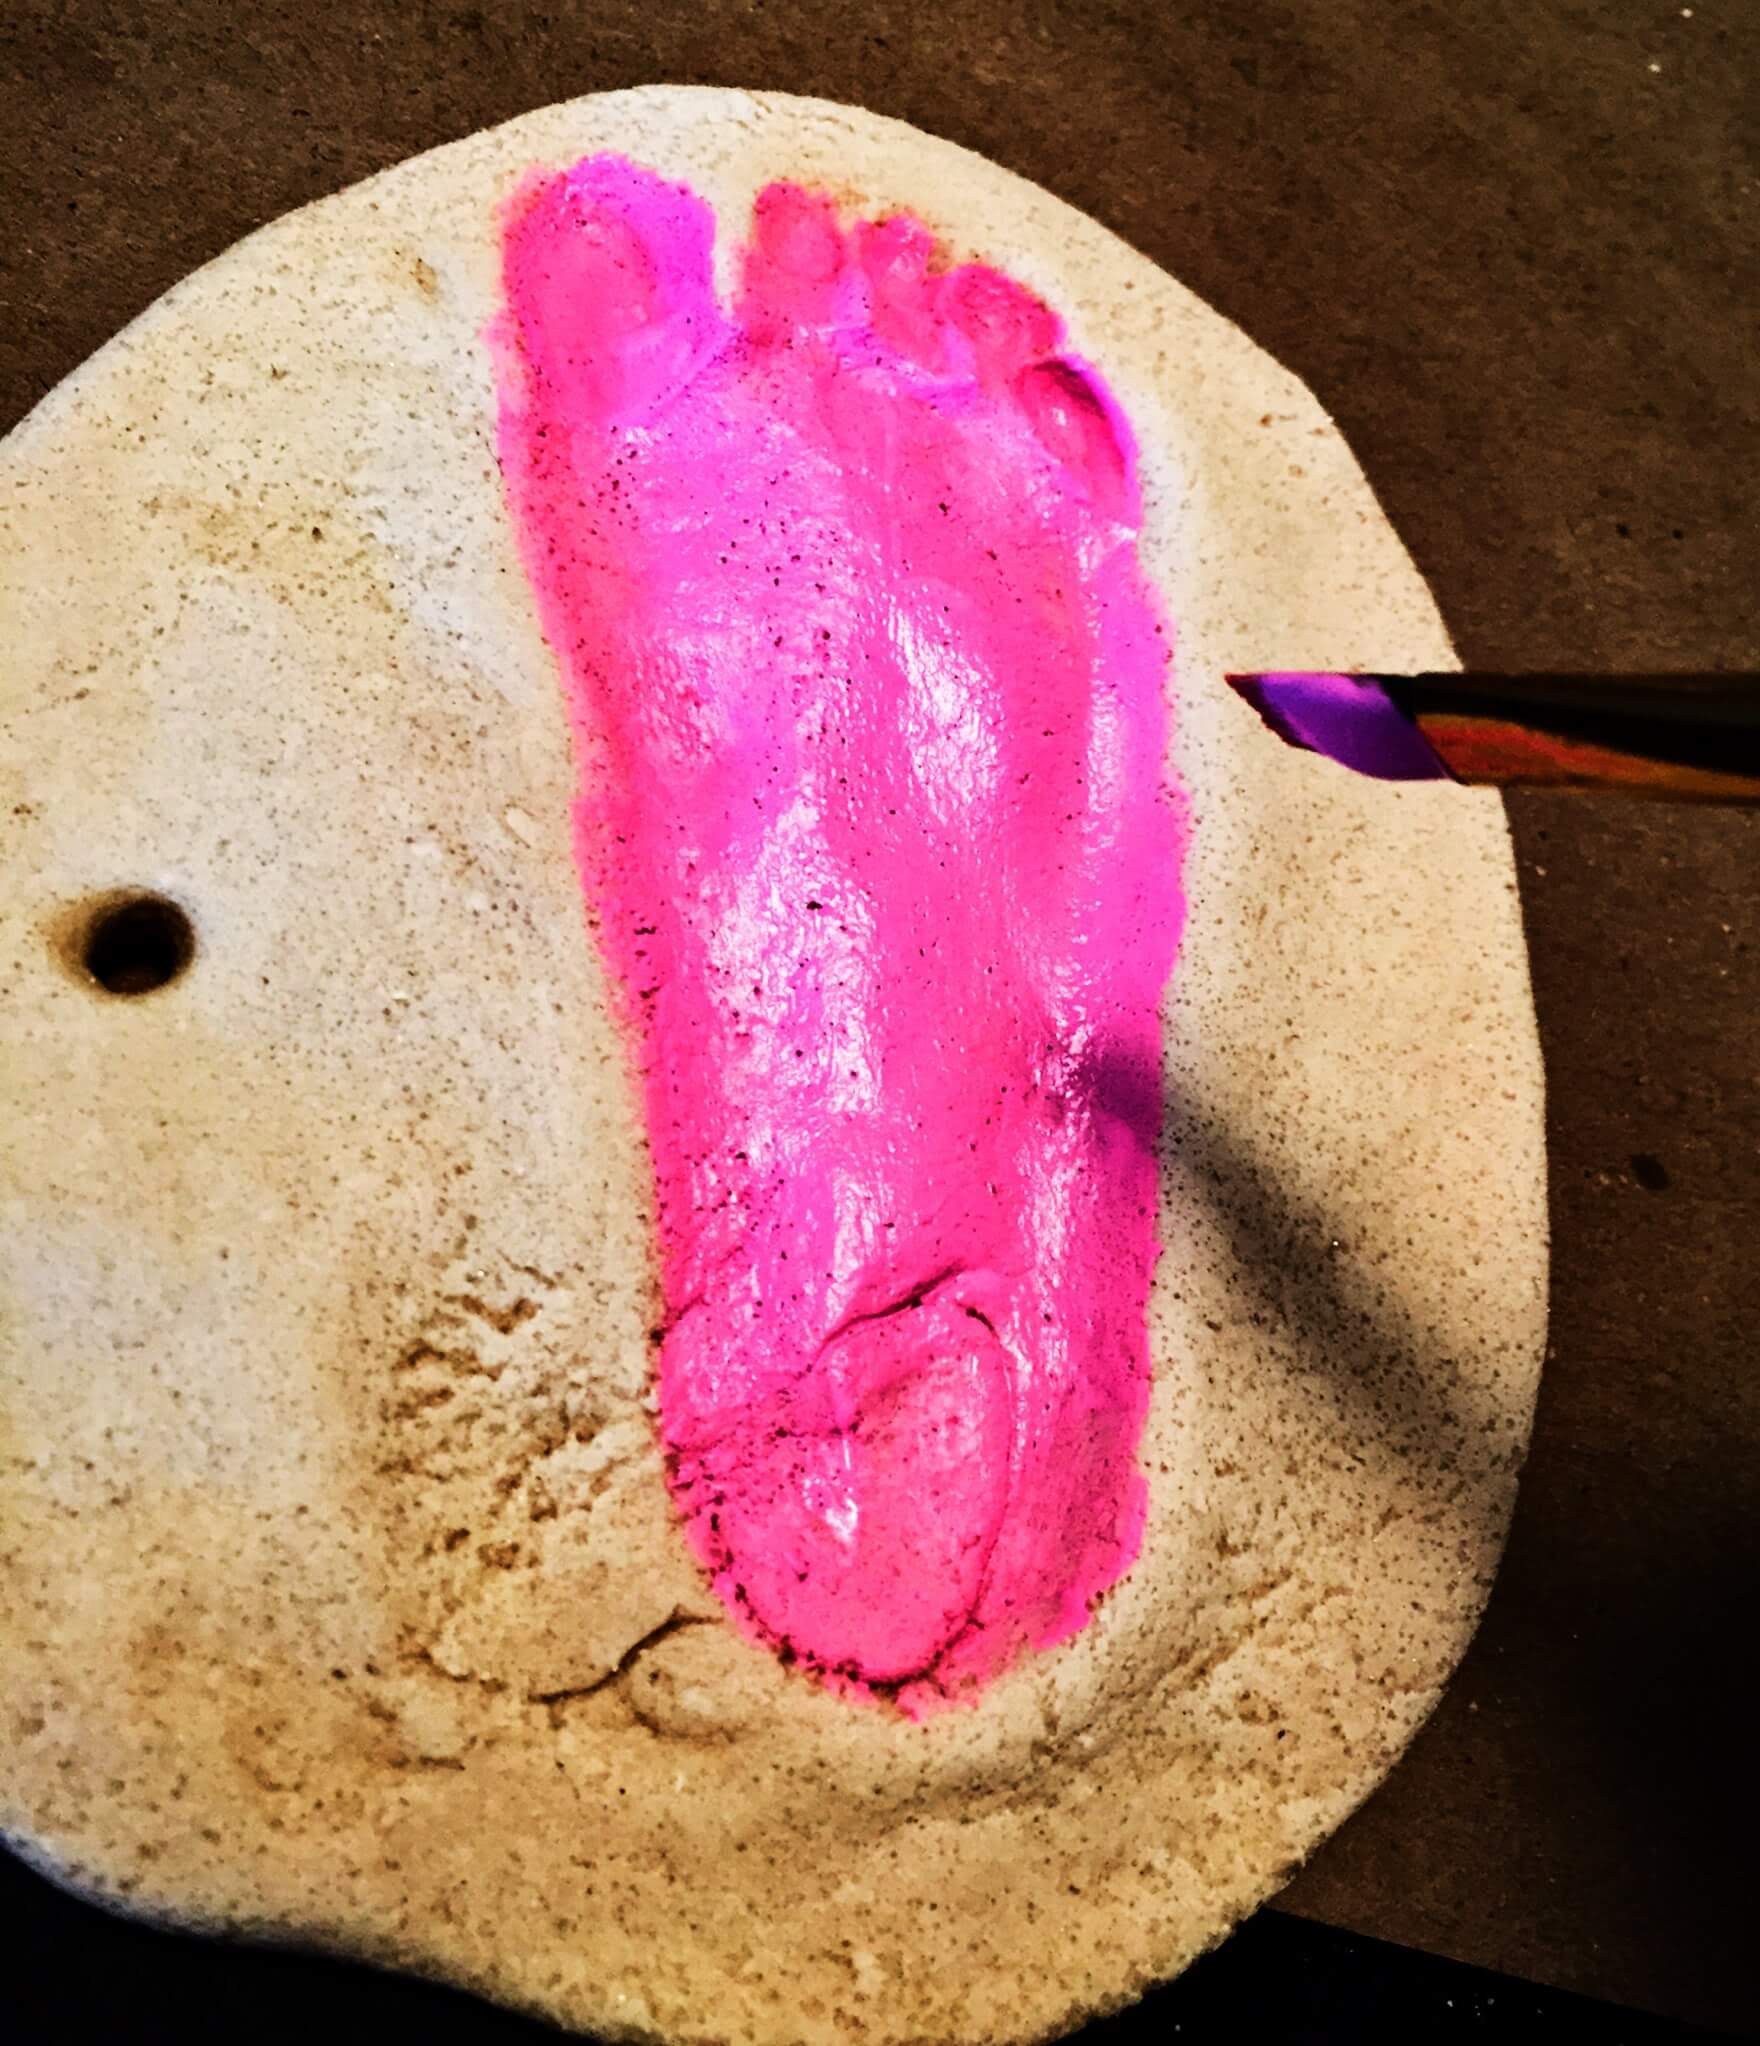
Place the ornaments on a baking sheet and bake in the oven at 250-degrees for 40-45-minutes or until golden brown.
Allow to cool completely and then decorate using acrylic paints and complete it by pulling a ribbon through the hole and tying it to hang.
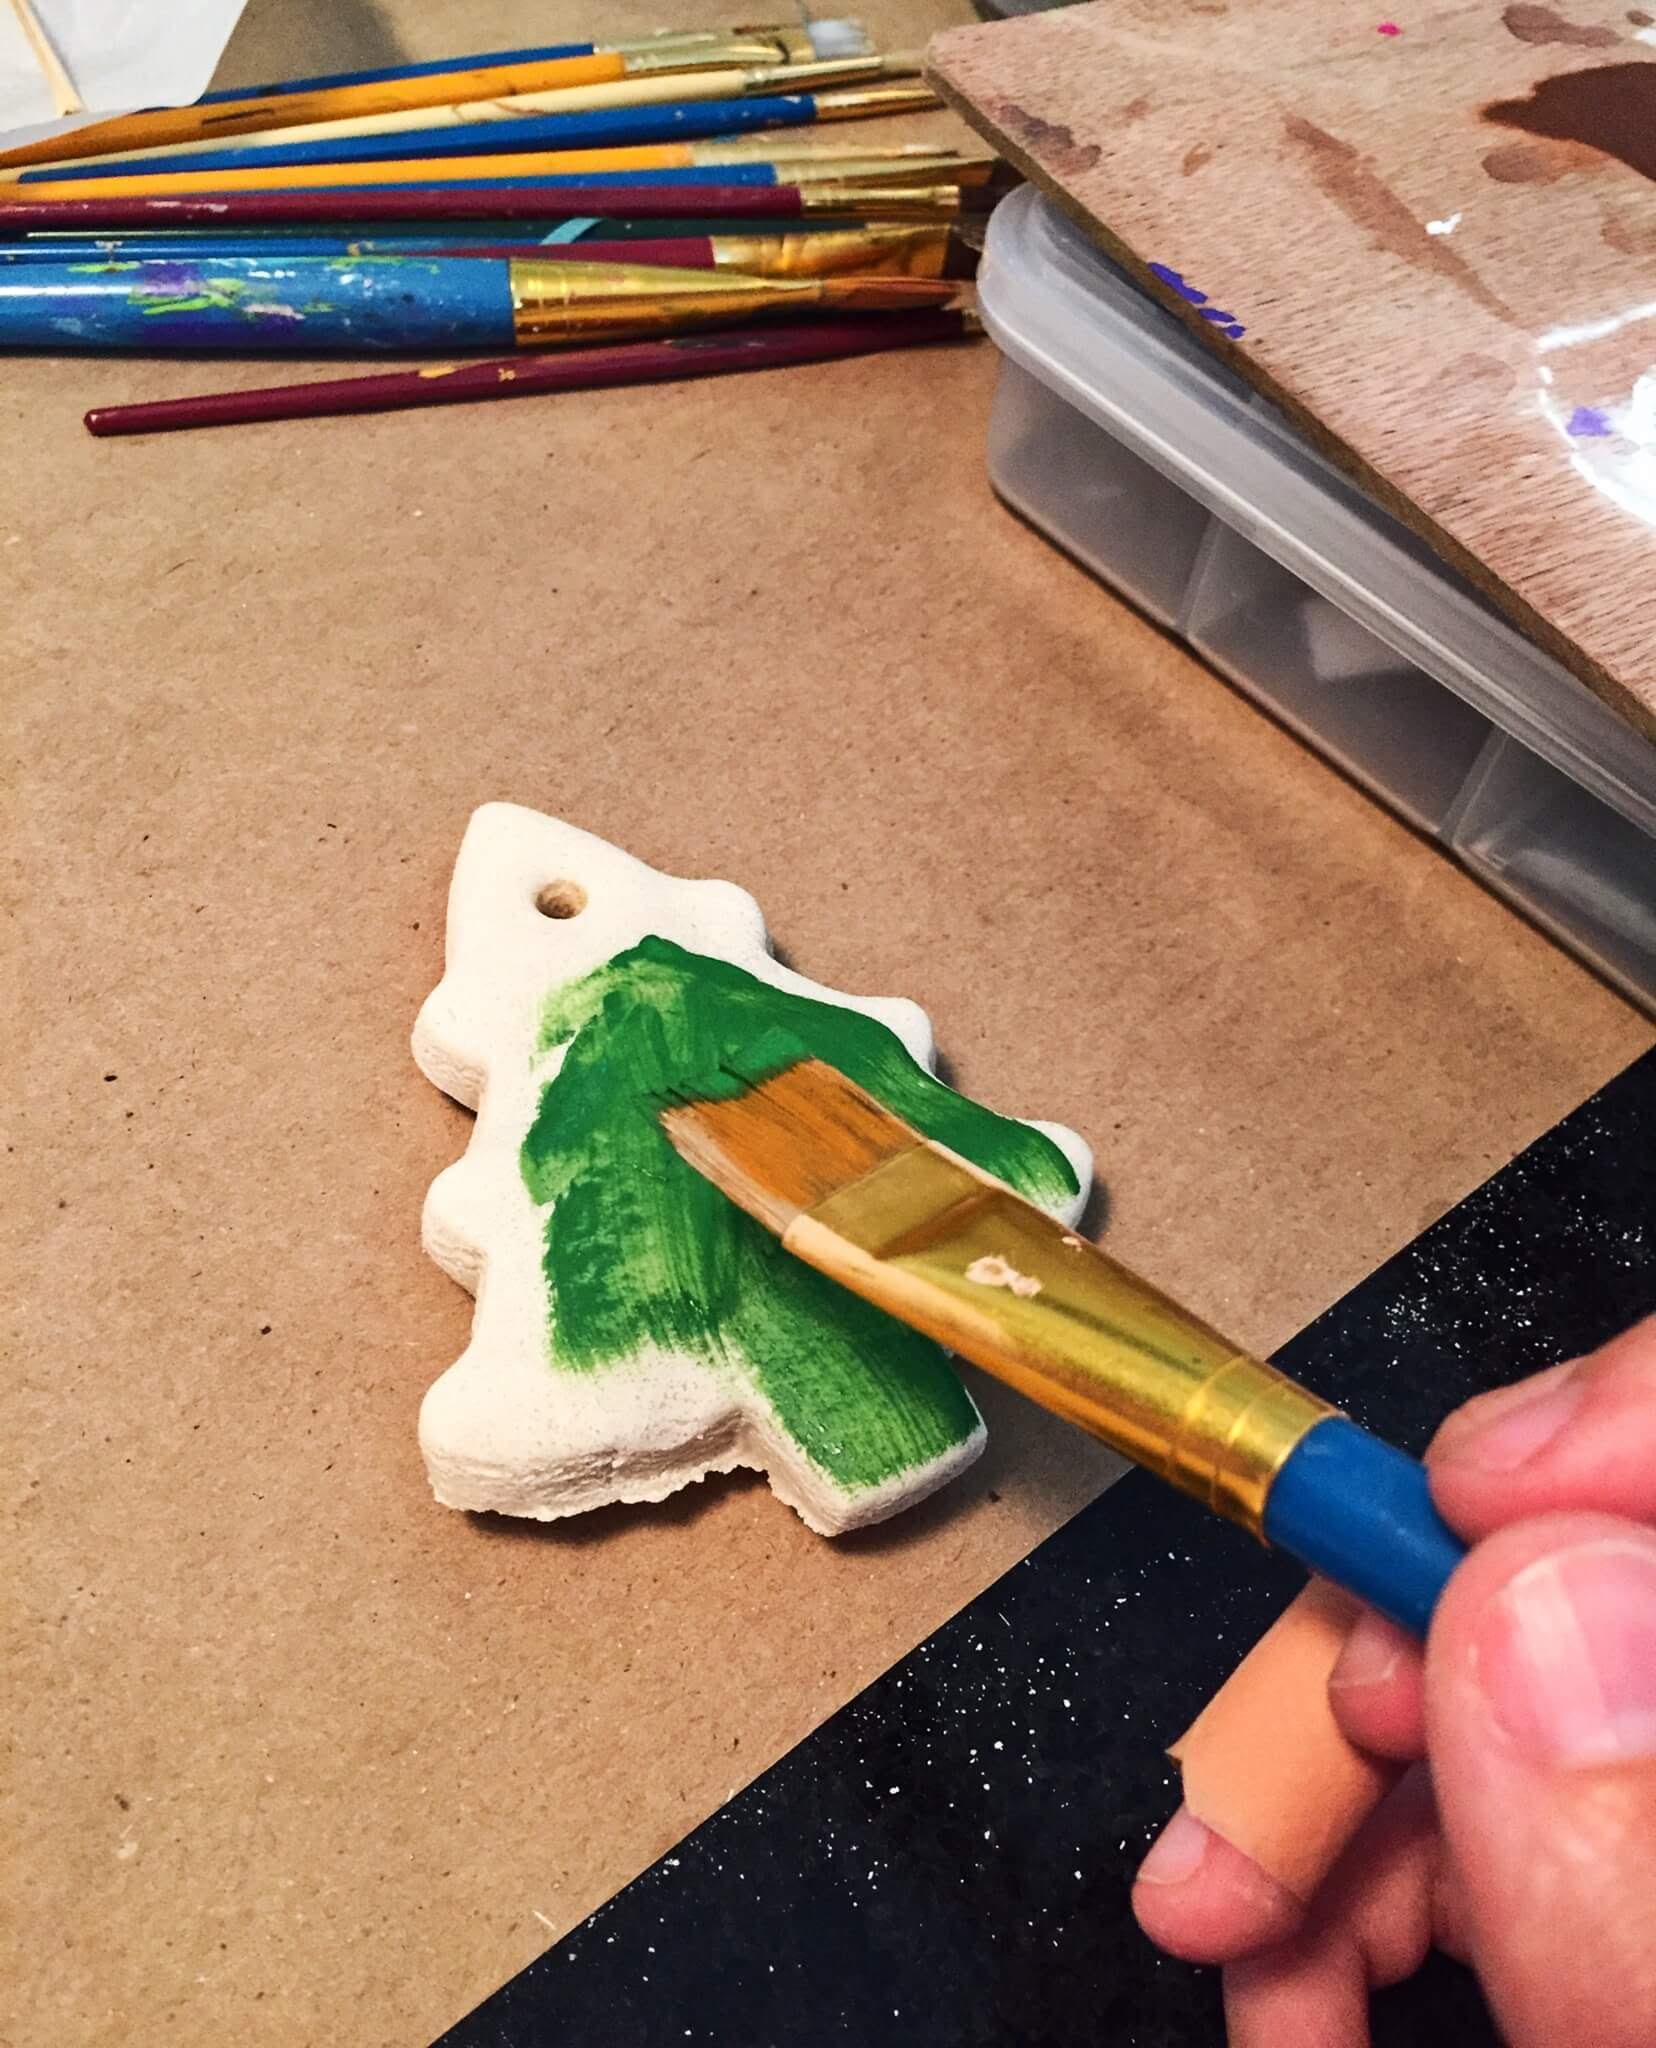
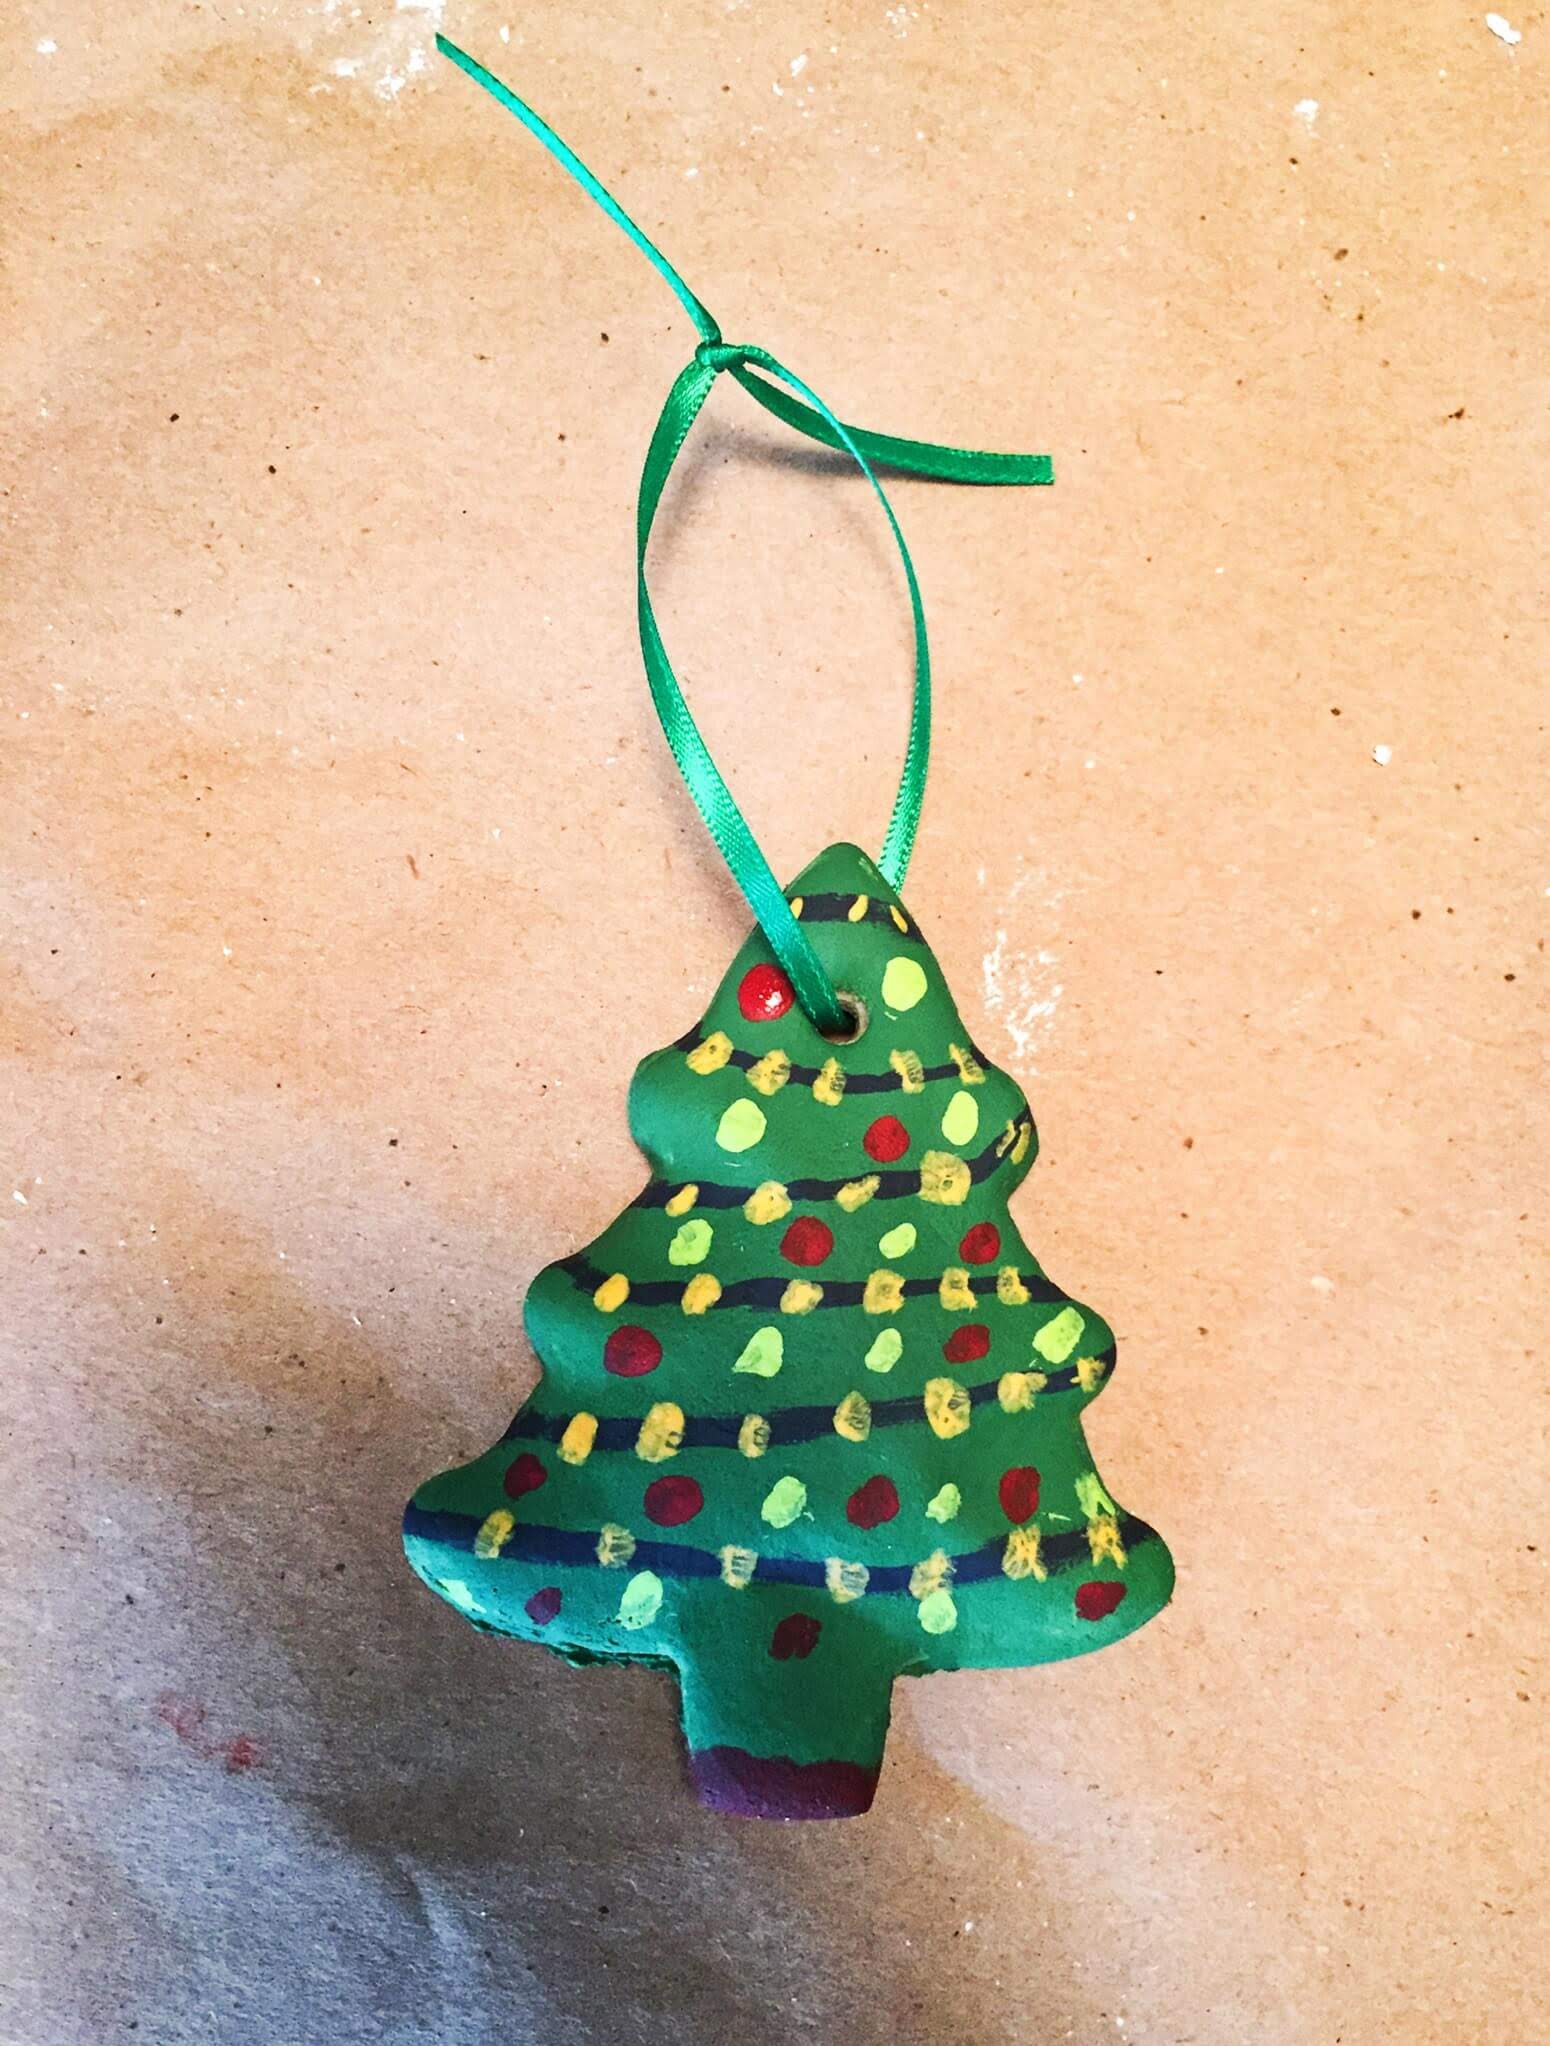
Salt Dough Ornament Ideas
Nothing says Christmas more than family and memories. Pulling out the ornaments year after year only to find those homemade ornaments the kids made you throughout the years means more than anything you can buy, so why not carry on the tradition by creating some fun salt dough Christmas tree ornaments?
You will need:
| Salt dough | Rolling pin |
| Christmas cookie cutters | Plastic straw |
| Ribbon | Acrylic paints and decorations |
Instructions:
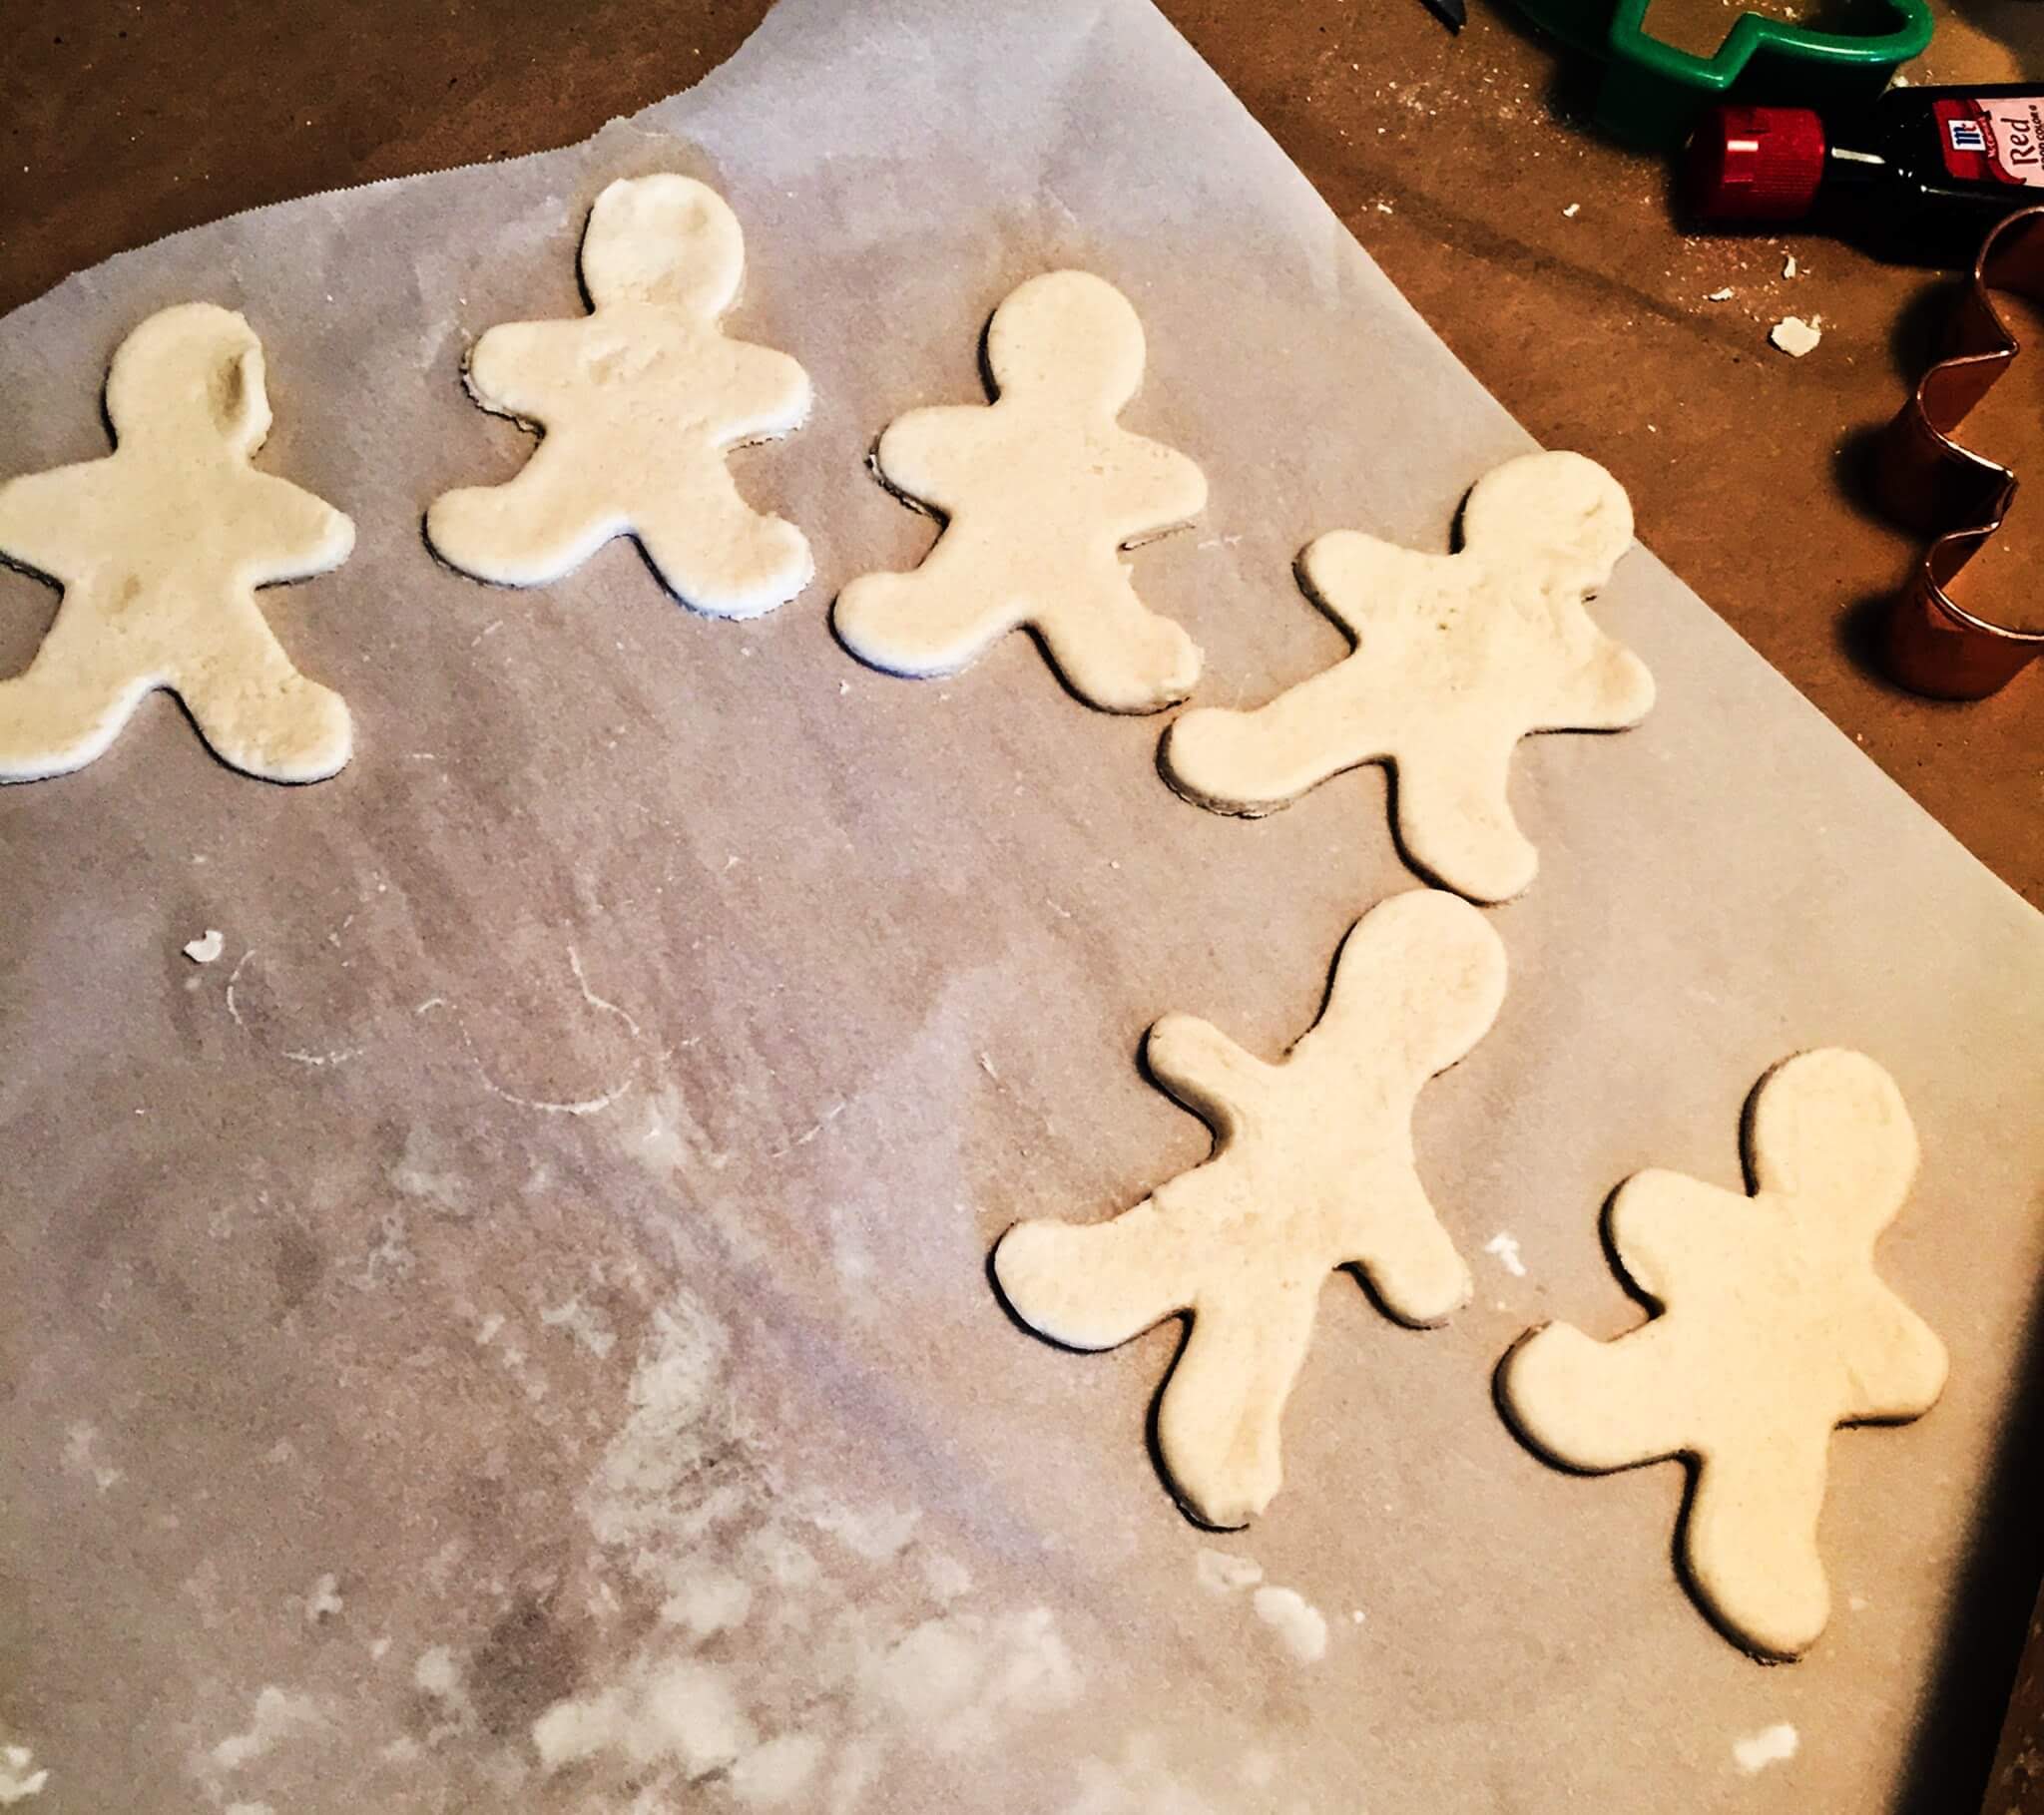
Roll the dough out onto parchment paper just like you would if you were going to make cut out cookies.
Once the dough is flattened to your desire, place the cookie cutters on the dough and press them out into the shapes.
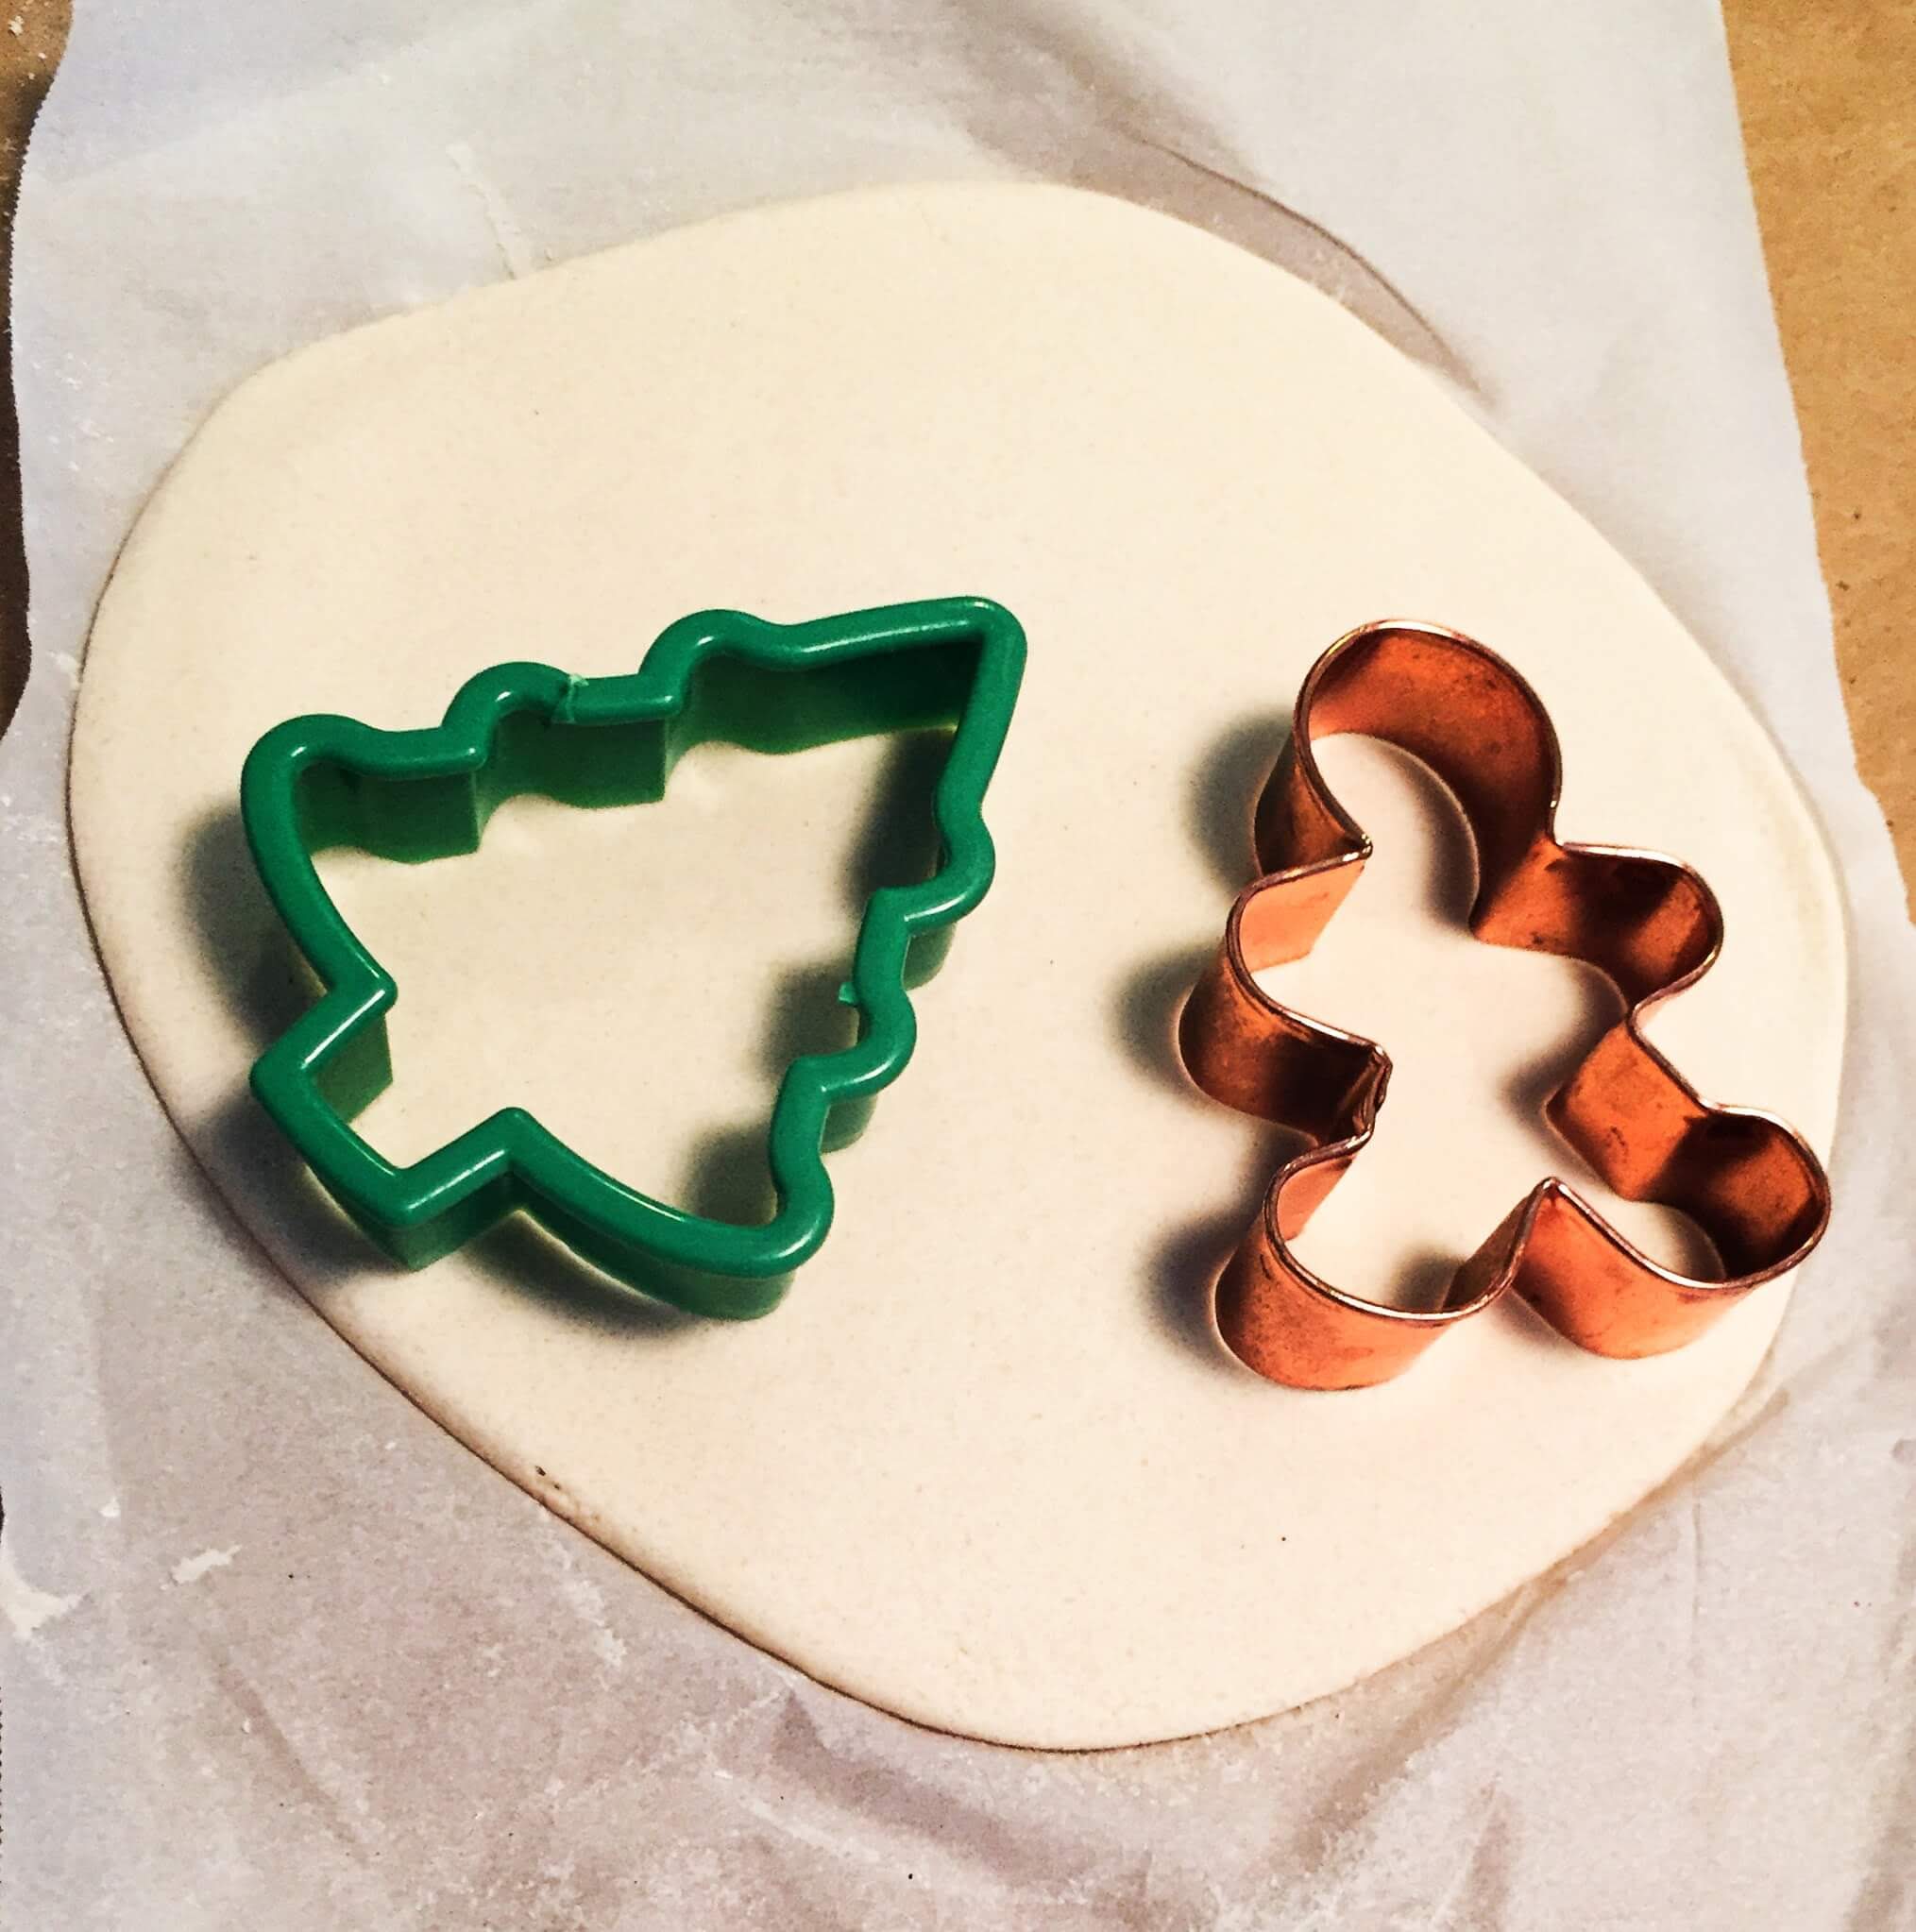
Using the straw, poke a hole into the top of the cut out so you can put a ribbon through the hole when the salt dough ornament is complete.
Place them on the cookie sheet and bake them in the oven at 250-degrees until they are golden brown.
Cool them completely and then paint them using acrylic paints, colorful markers, glitter, and other desired enhancements. When you are finished, pull a ribbon through and hang them on the tree or wrap them in Christmas tissue paper for thoughtful and unique gift giving.
Salt Dough Christmas Wreath
This one might be a bit more difficult for the smaller children to put together, but they will enjoy decorating the final creation once it has been baked and cooled.
You will need:
- Salt dough
- Rolling pin
- Cookie cutters
- Ribbon
- Acrylic paints and decorations
Instructions:
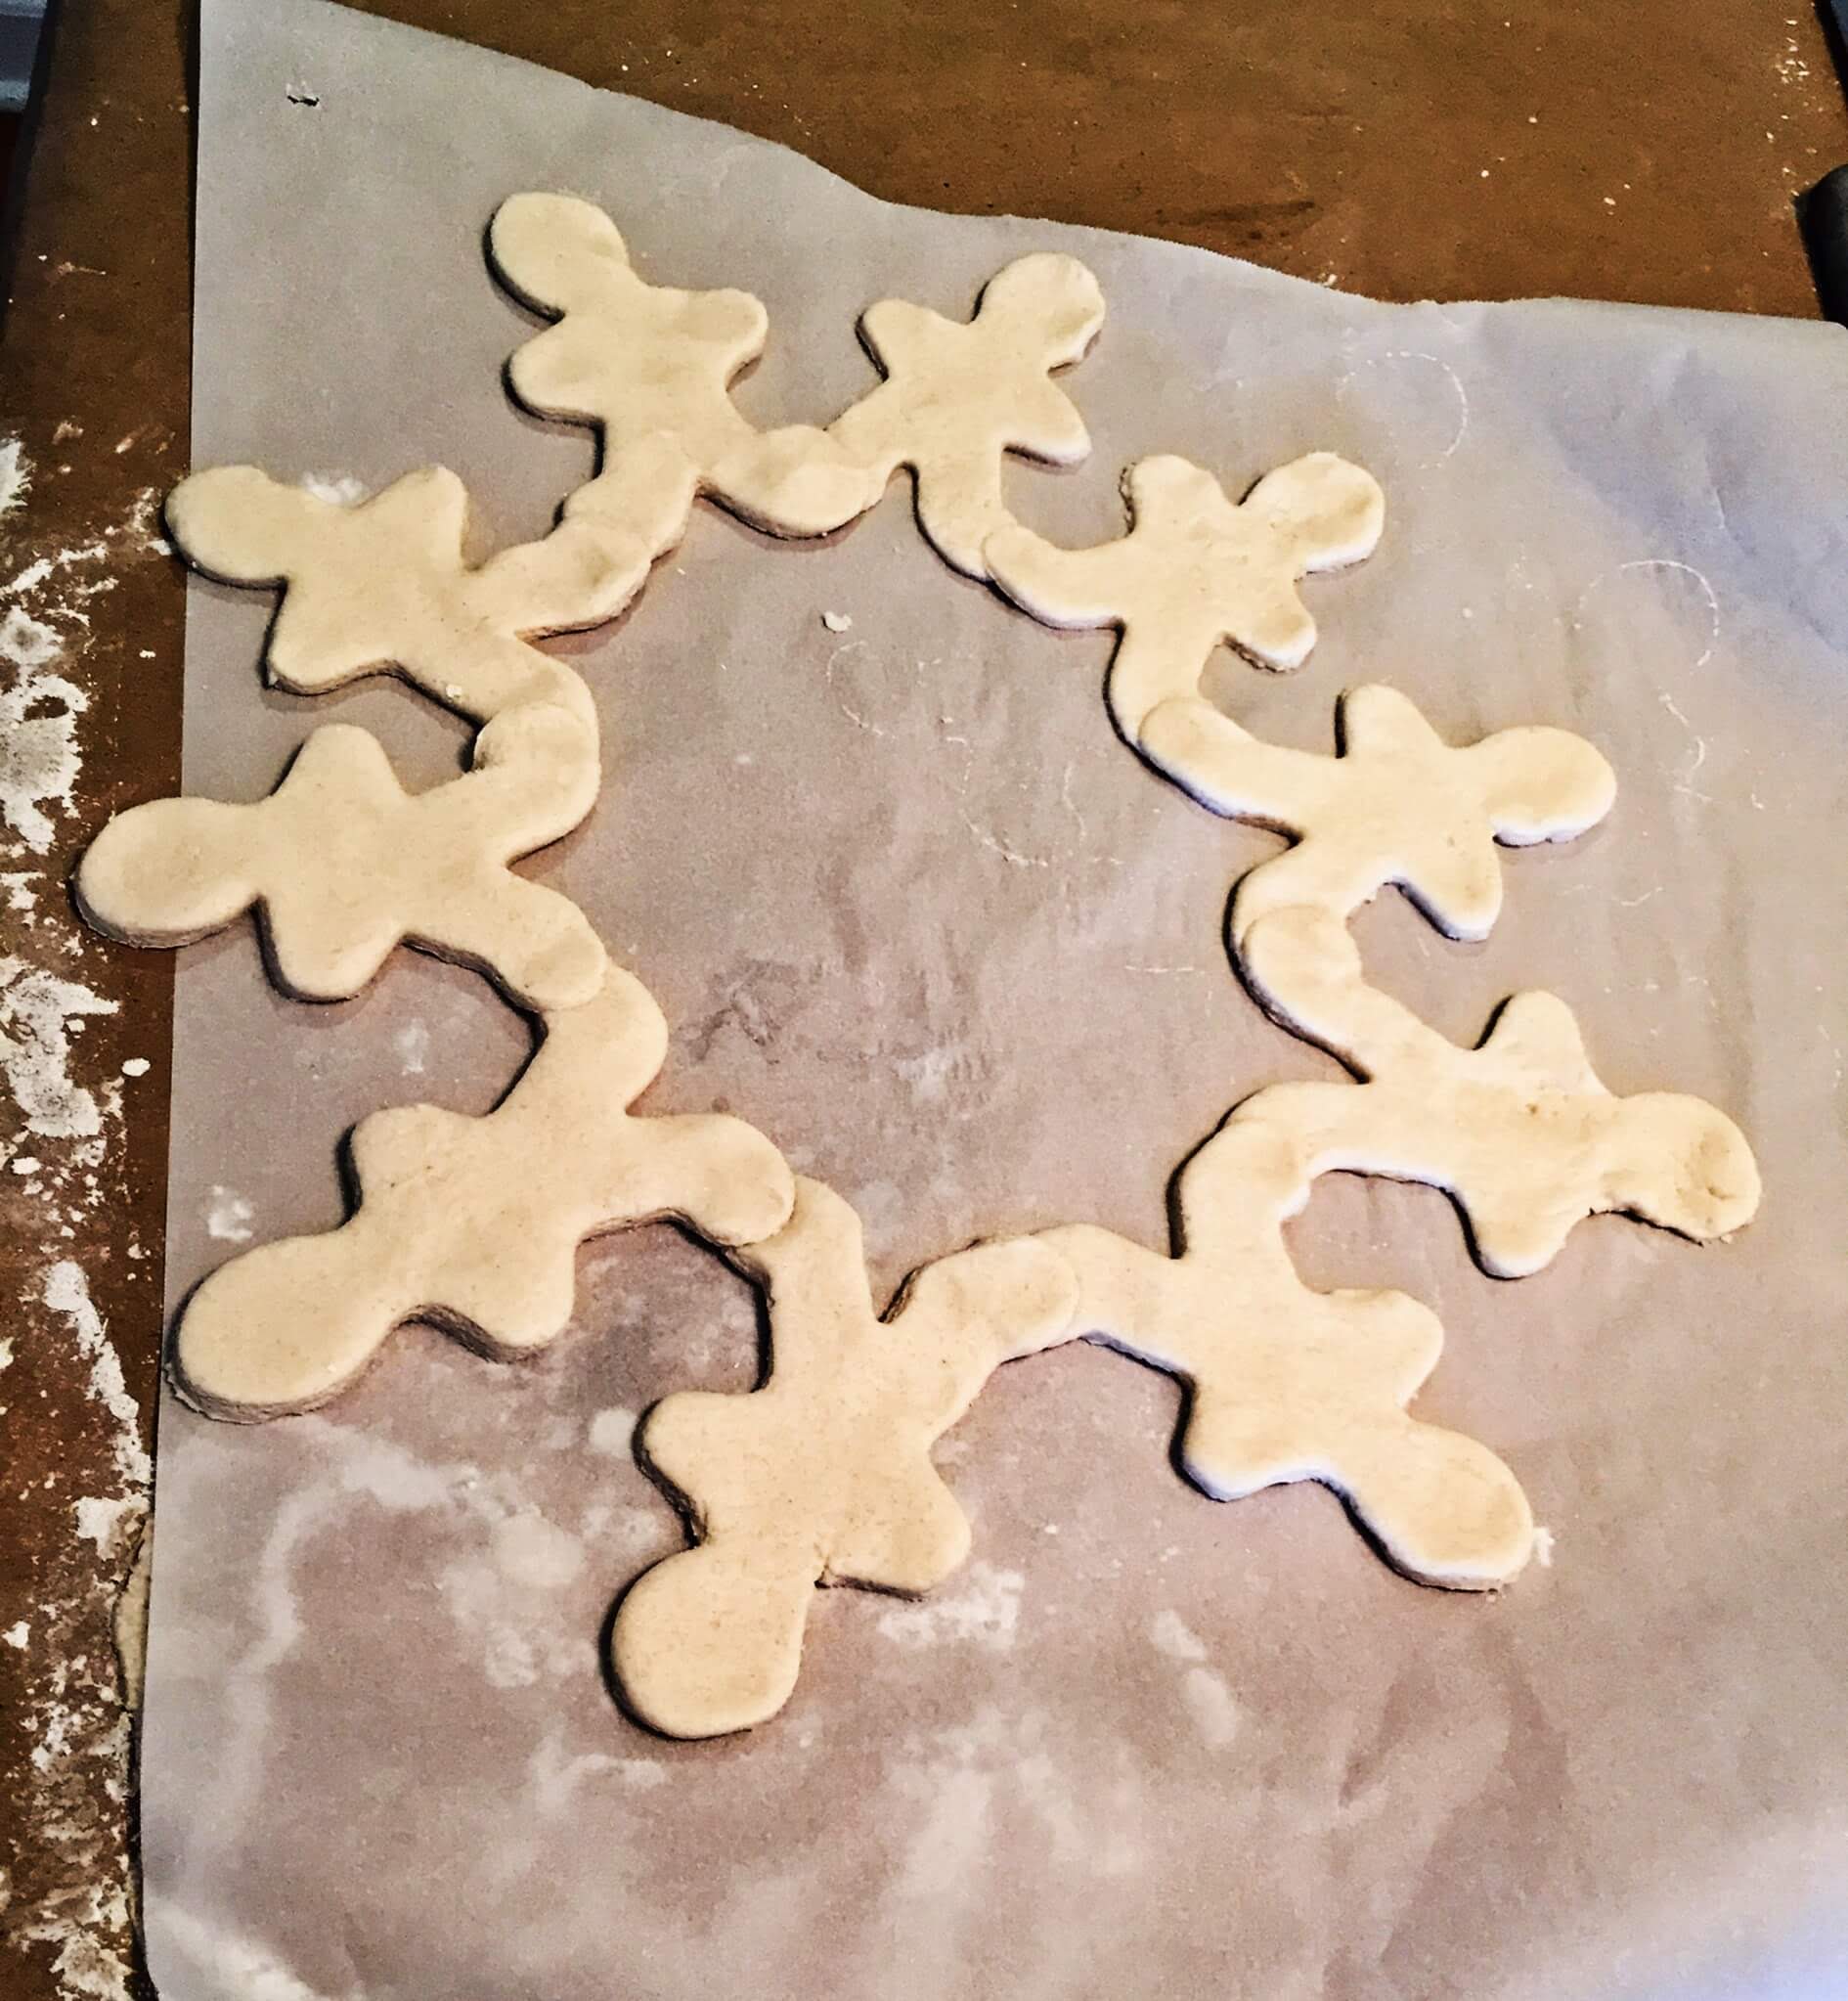
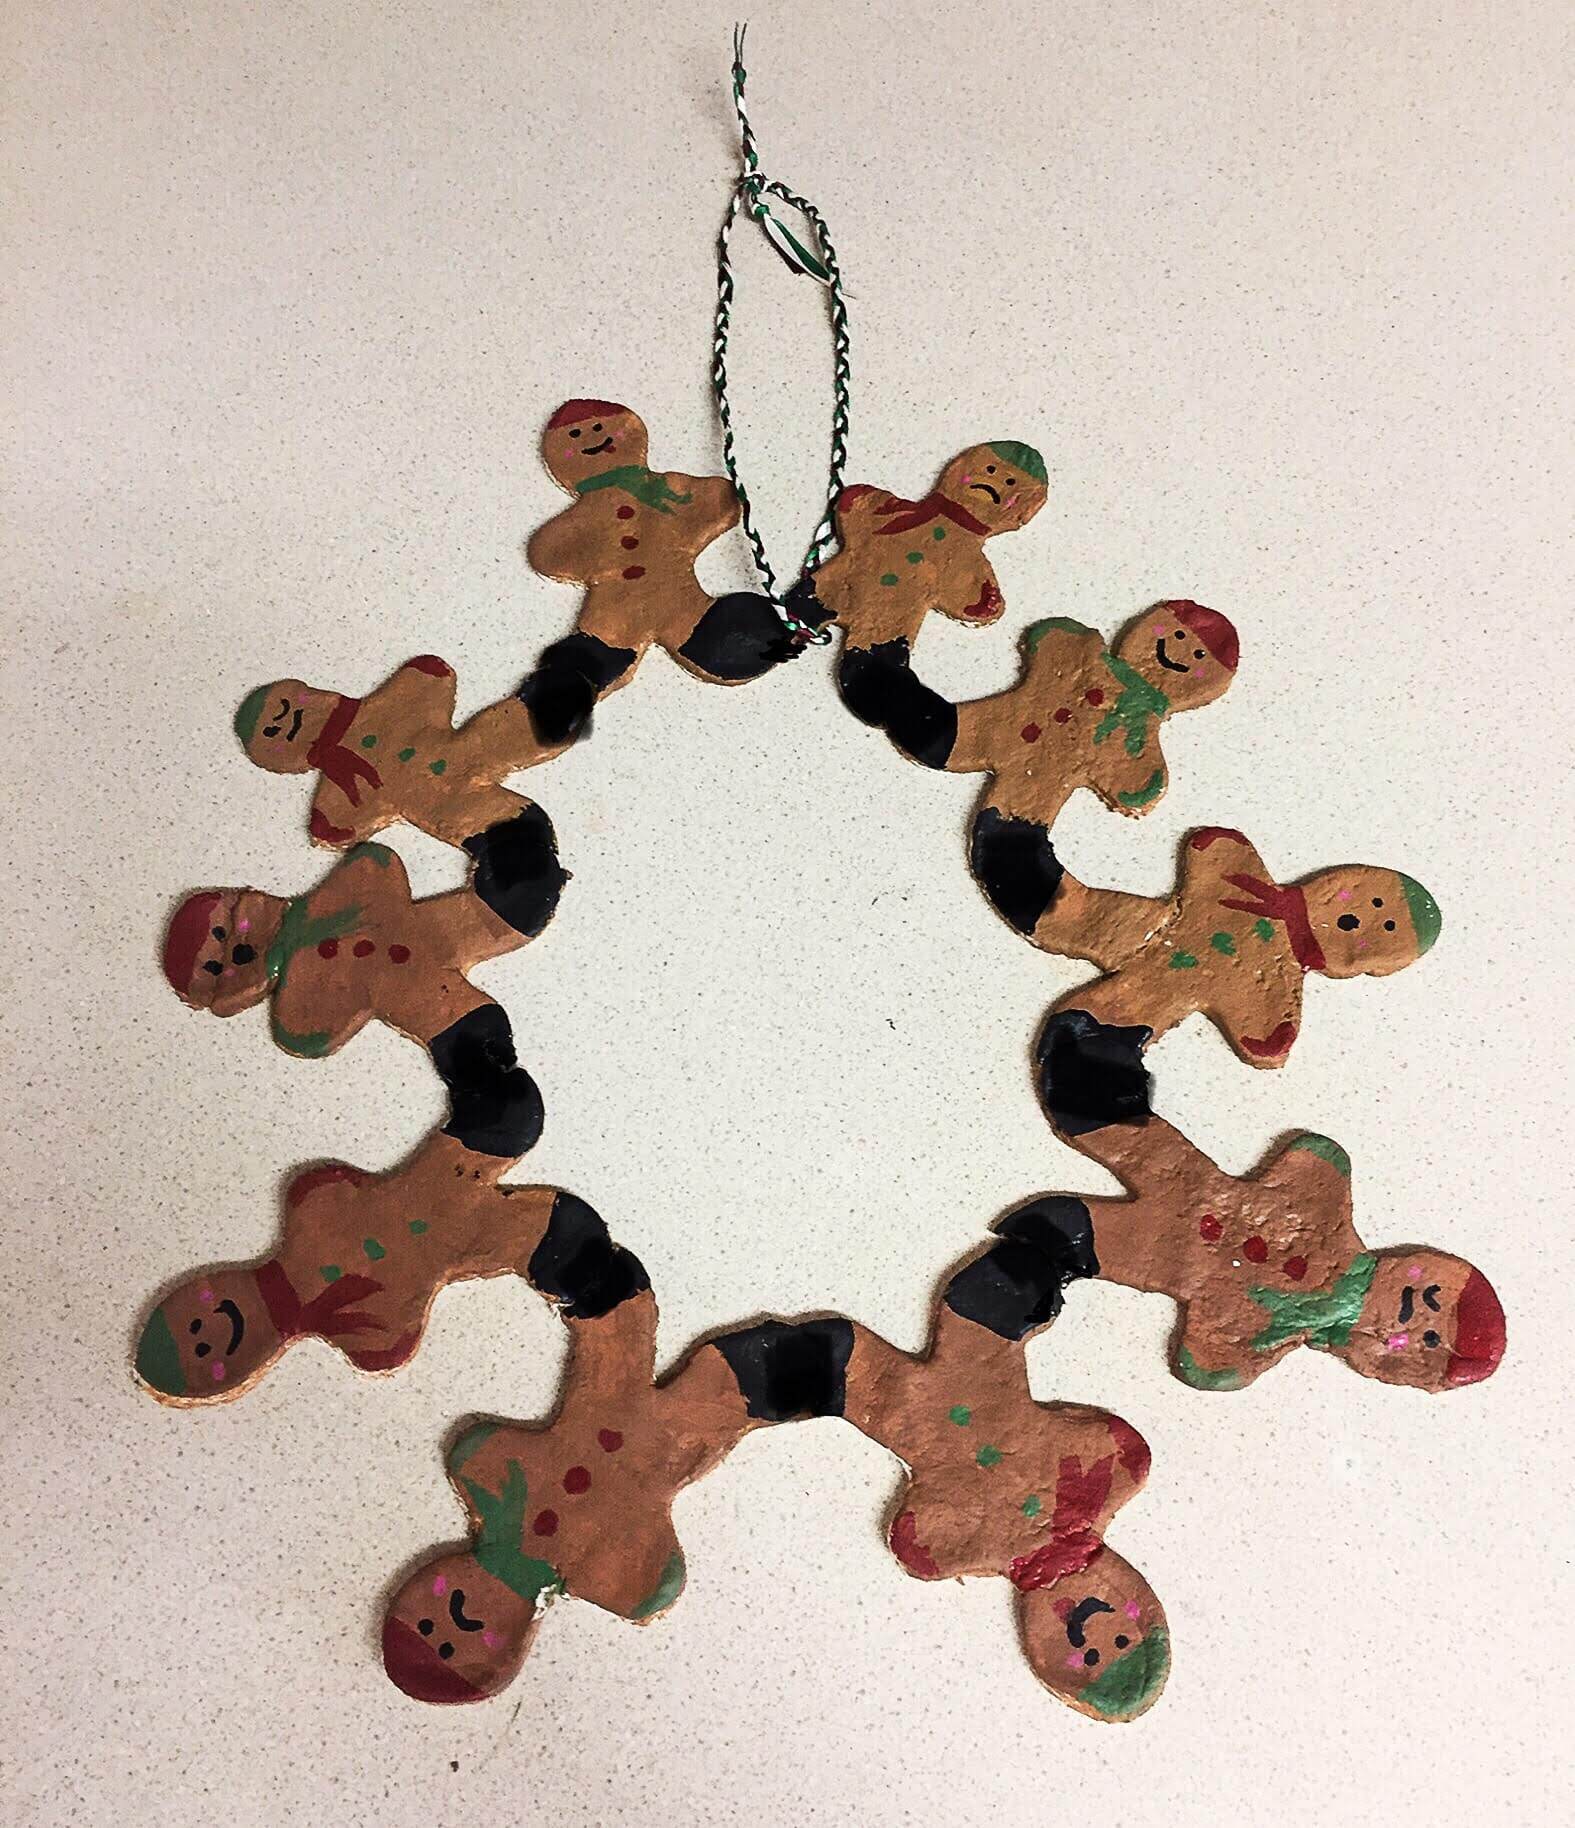
Just like cutting out cookies, you will roll out the dough to your desired consistency on the parchment paper.
You will want to use the same design for the entire wreath. (Gingerbread men, Christmas trees, stars, snowflakes, etc.)
Using the cookie cutter, cut out several of the same design to make a wreath the size of your choice.
Place the shapes on a cookie sheet lined with parchment paper, and using a dab of water, stick the pieces together at their tips. Example, gingerbread men will stick together with their feet, stars with their tips, etc.
Bake the wreath in the oven at 250-degrees until its hardened.
You can paint the wreath and design it to your liking. You might want to consider a silver glitter on snowflakes and a gold glitter on your stars.
This wreath can also be cut out with flags for a 4th of July decoration or make the stars colorful for other holidays and events.
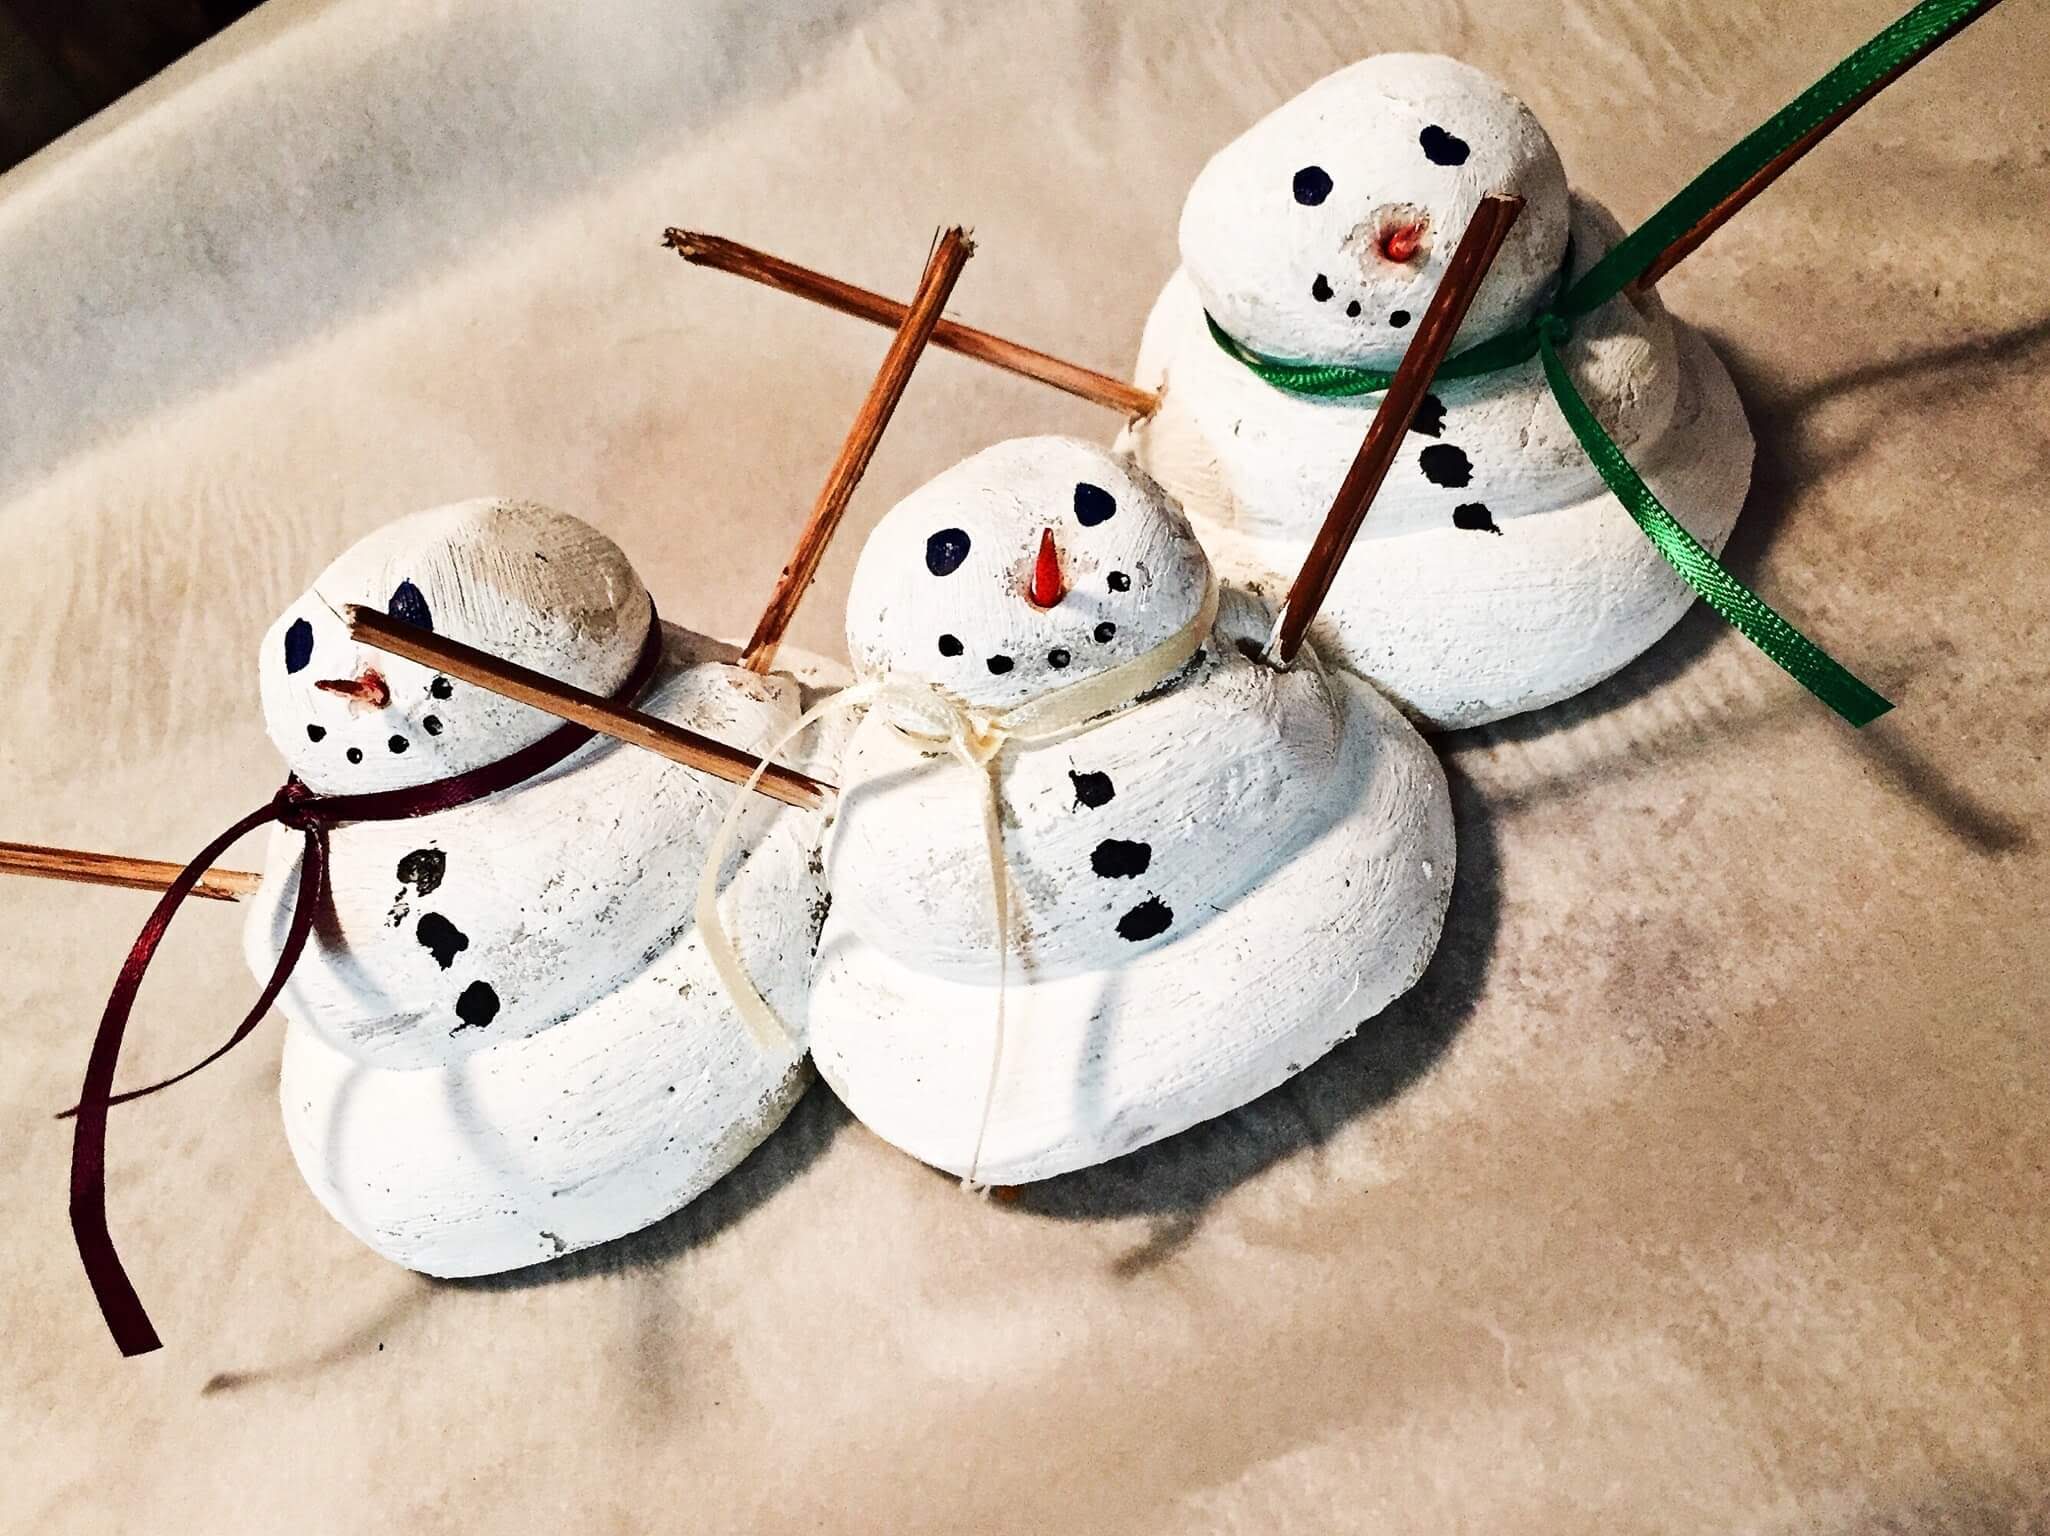
Salt Dough Snowman Family
This is a fun Christmas decoration that will have all your friends wanting one too. They are not only fun, but they are easy to make, and the final decorations can be a great way for the kids to express their creative insights.
You will need:
- Salt dough
- Toothpicks
- Sticks
- Acrylic paints and markers
- Felt, ribbons, other materials for clothing and enhancements
Instructions:
You will be creating a snowman family, so you will want to roll several different sized balls from the dough. Each snowman will require three balls, so for Dad, you will want them to be the largest, Mom should be a little smaller, and the children will be even smaller.
Once you have formed the balls, make the snowman’s body in three sections. The largest on the bottom, pressing it down but not flattening it, then the next smaller, and finally the smallest.
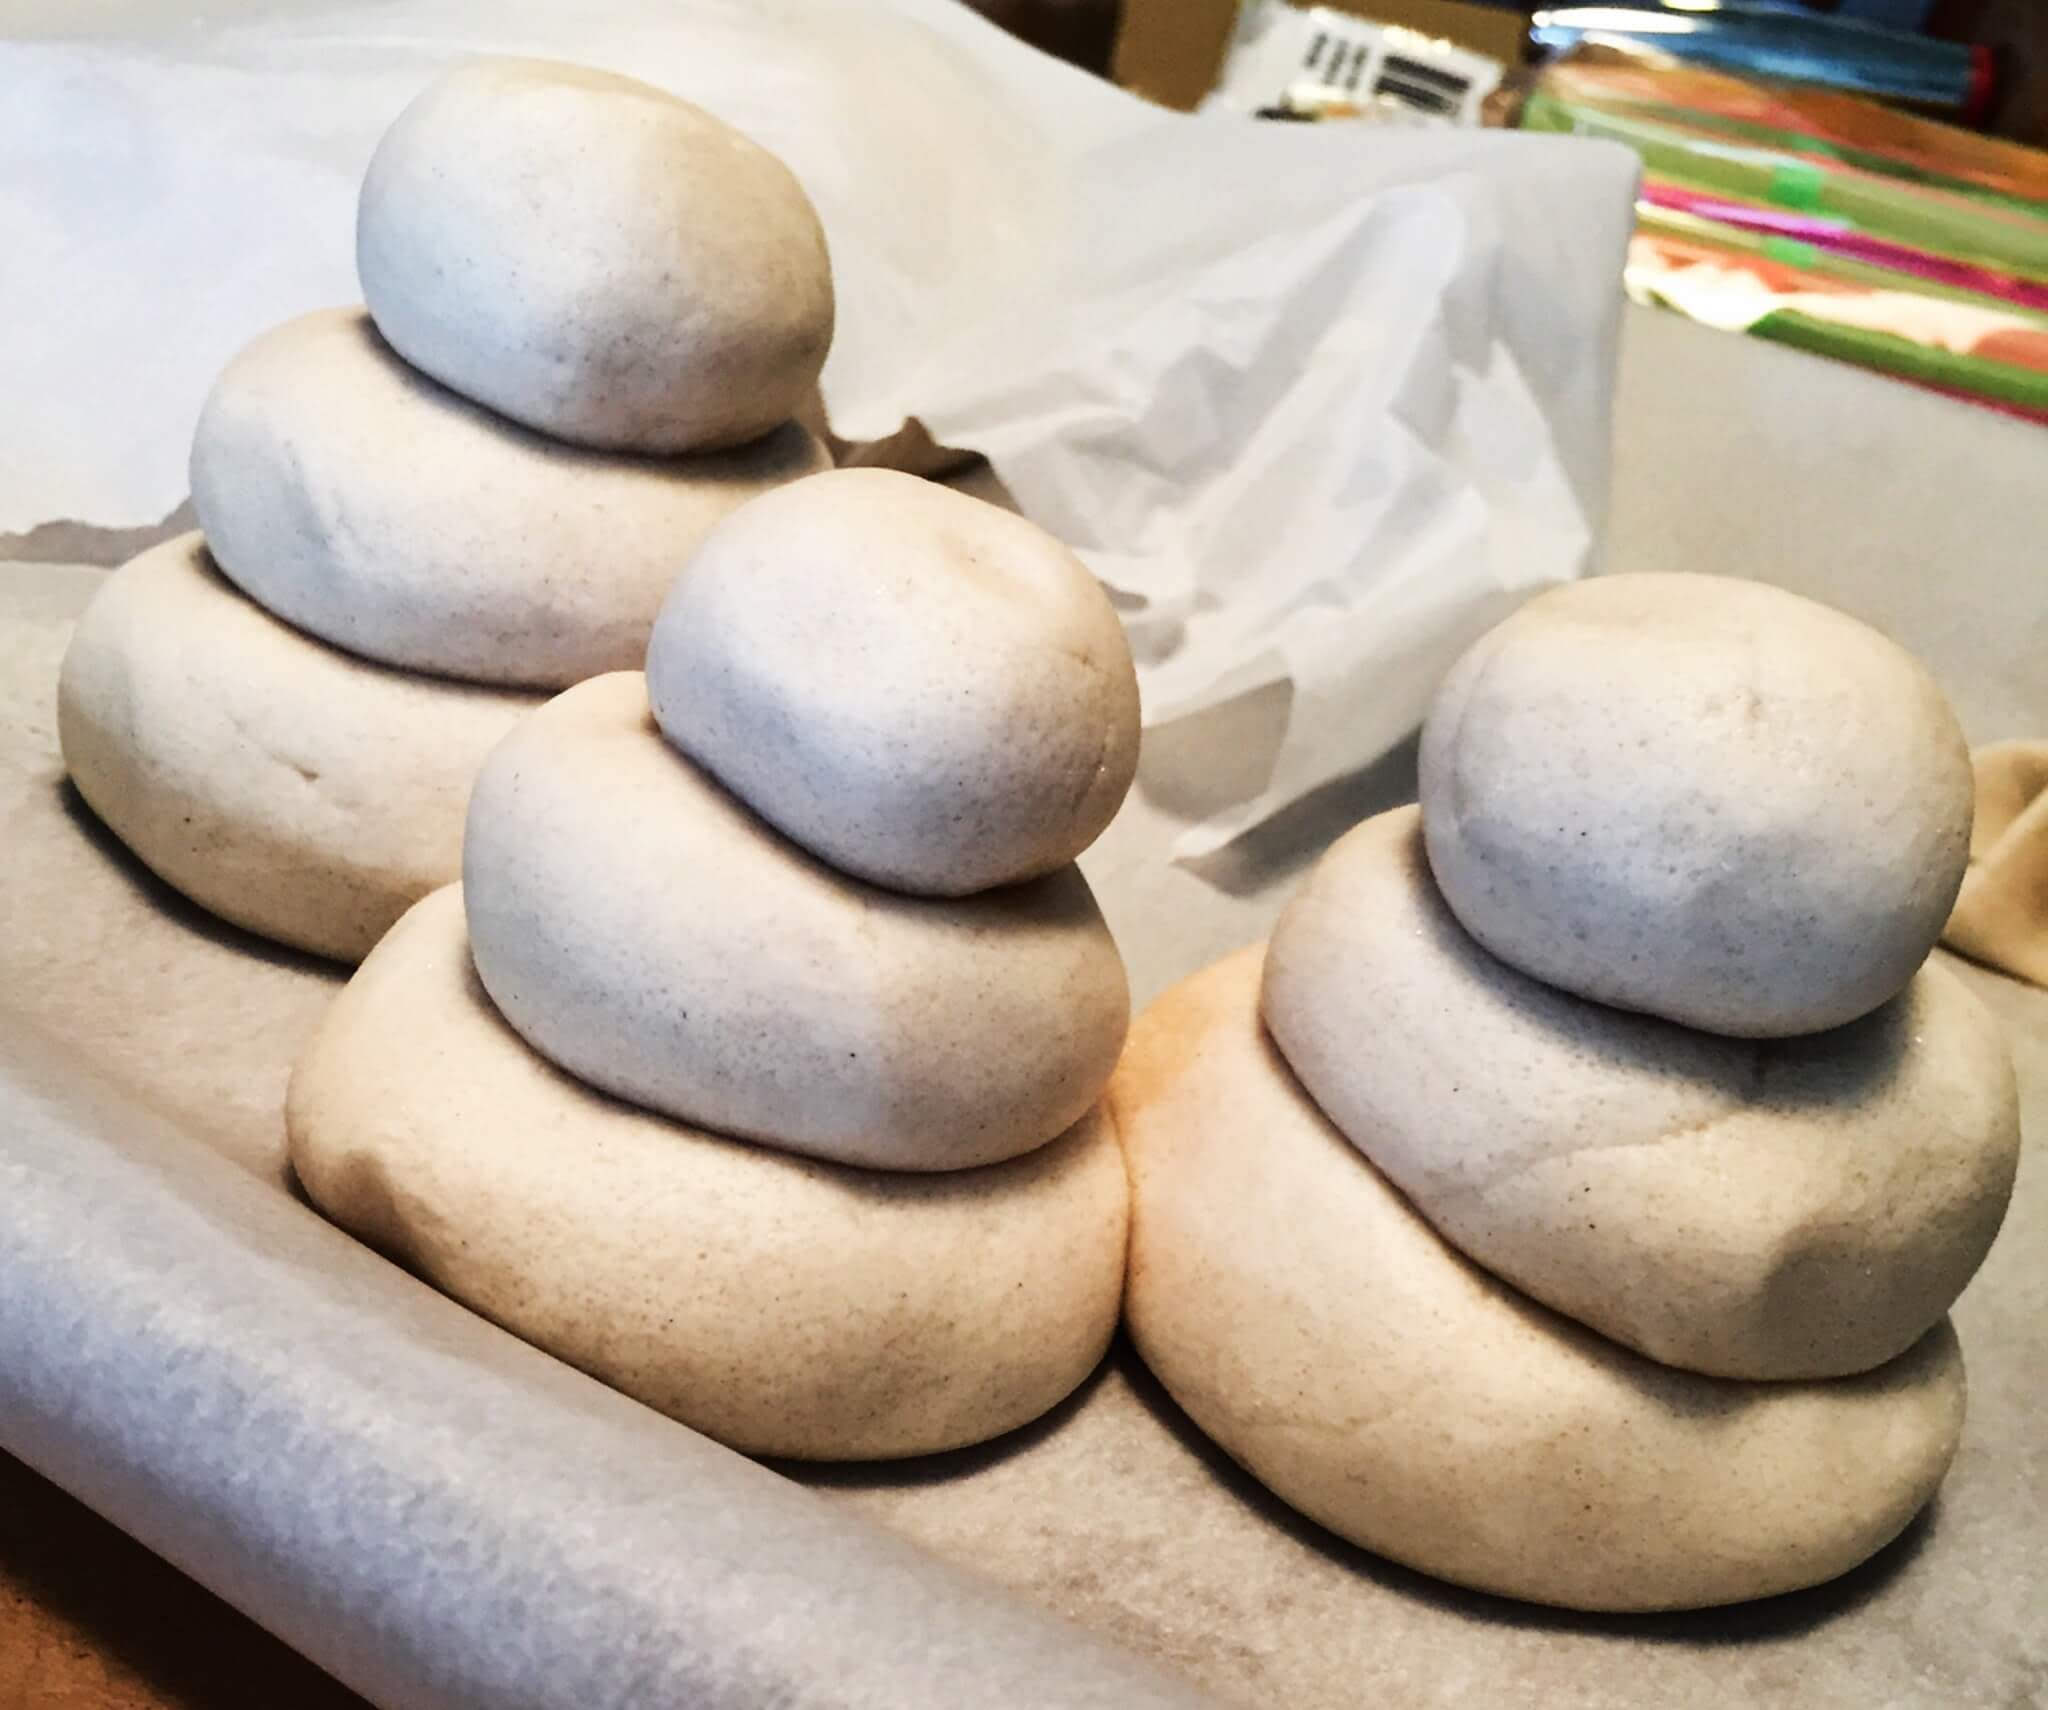
When you have all the snowmen shaped and formed, use the toothpicks to make armholes and nose holes.
Cut the toothpicks in half and using an orange marker, color them to make them look like carrots. Next. Stick them into the nose holes.
Using sticks, (skewer sticks work well), color them brown and stick them into the armholes.
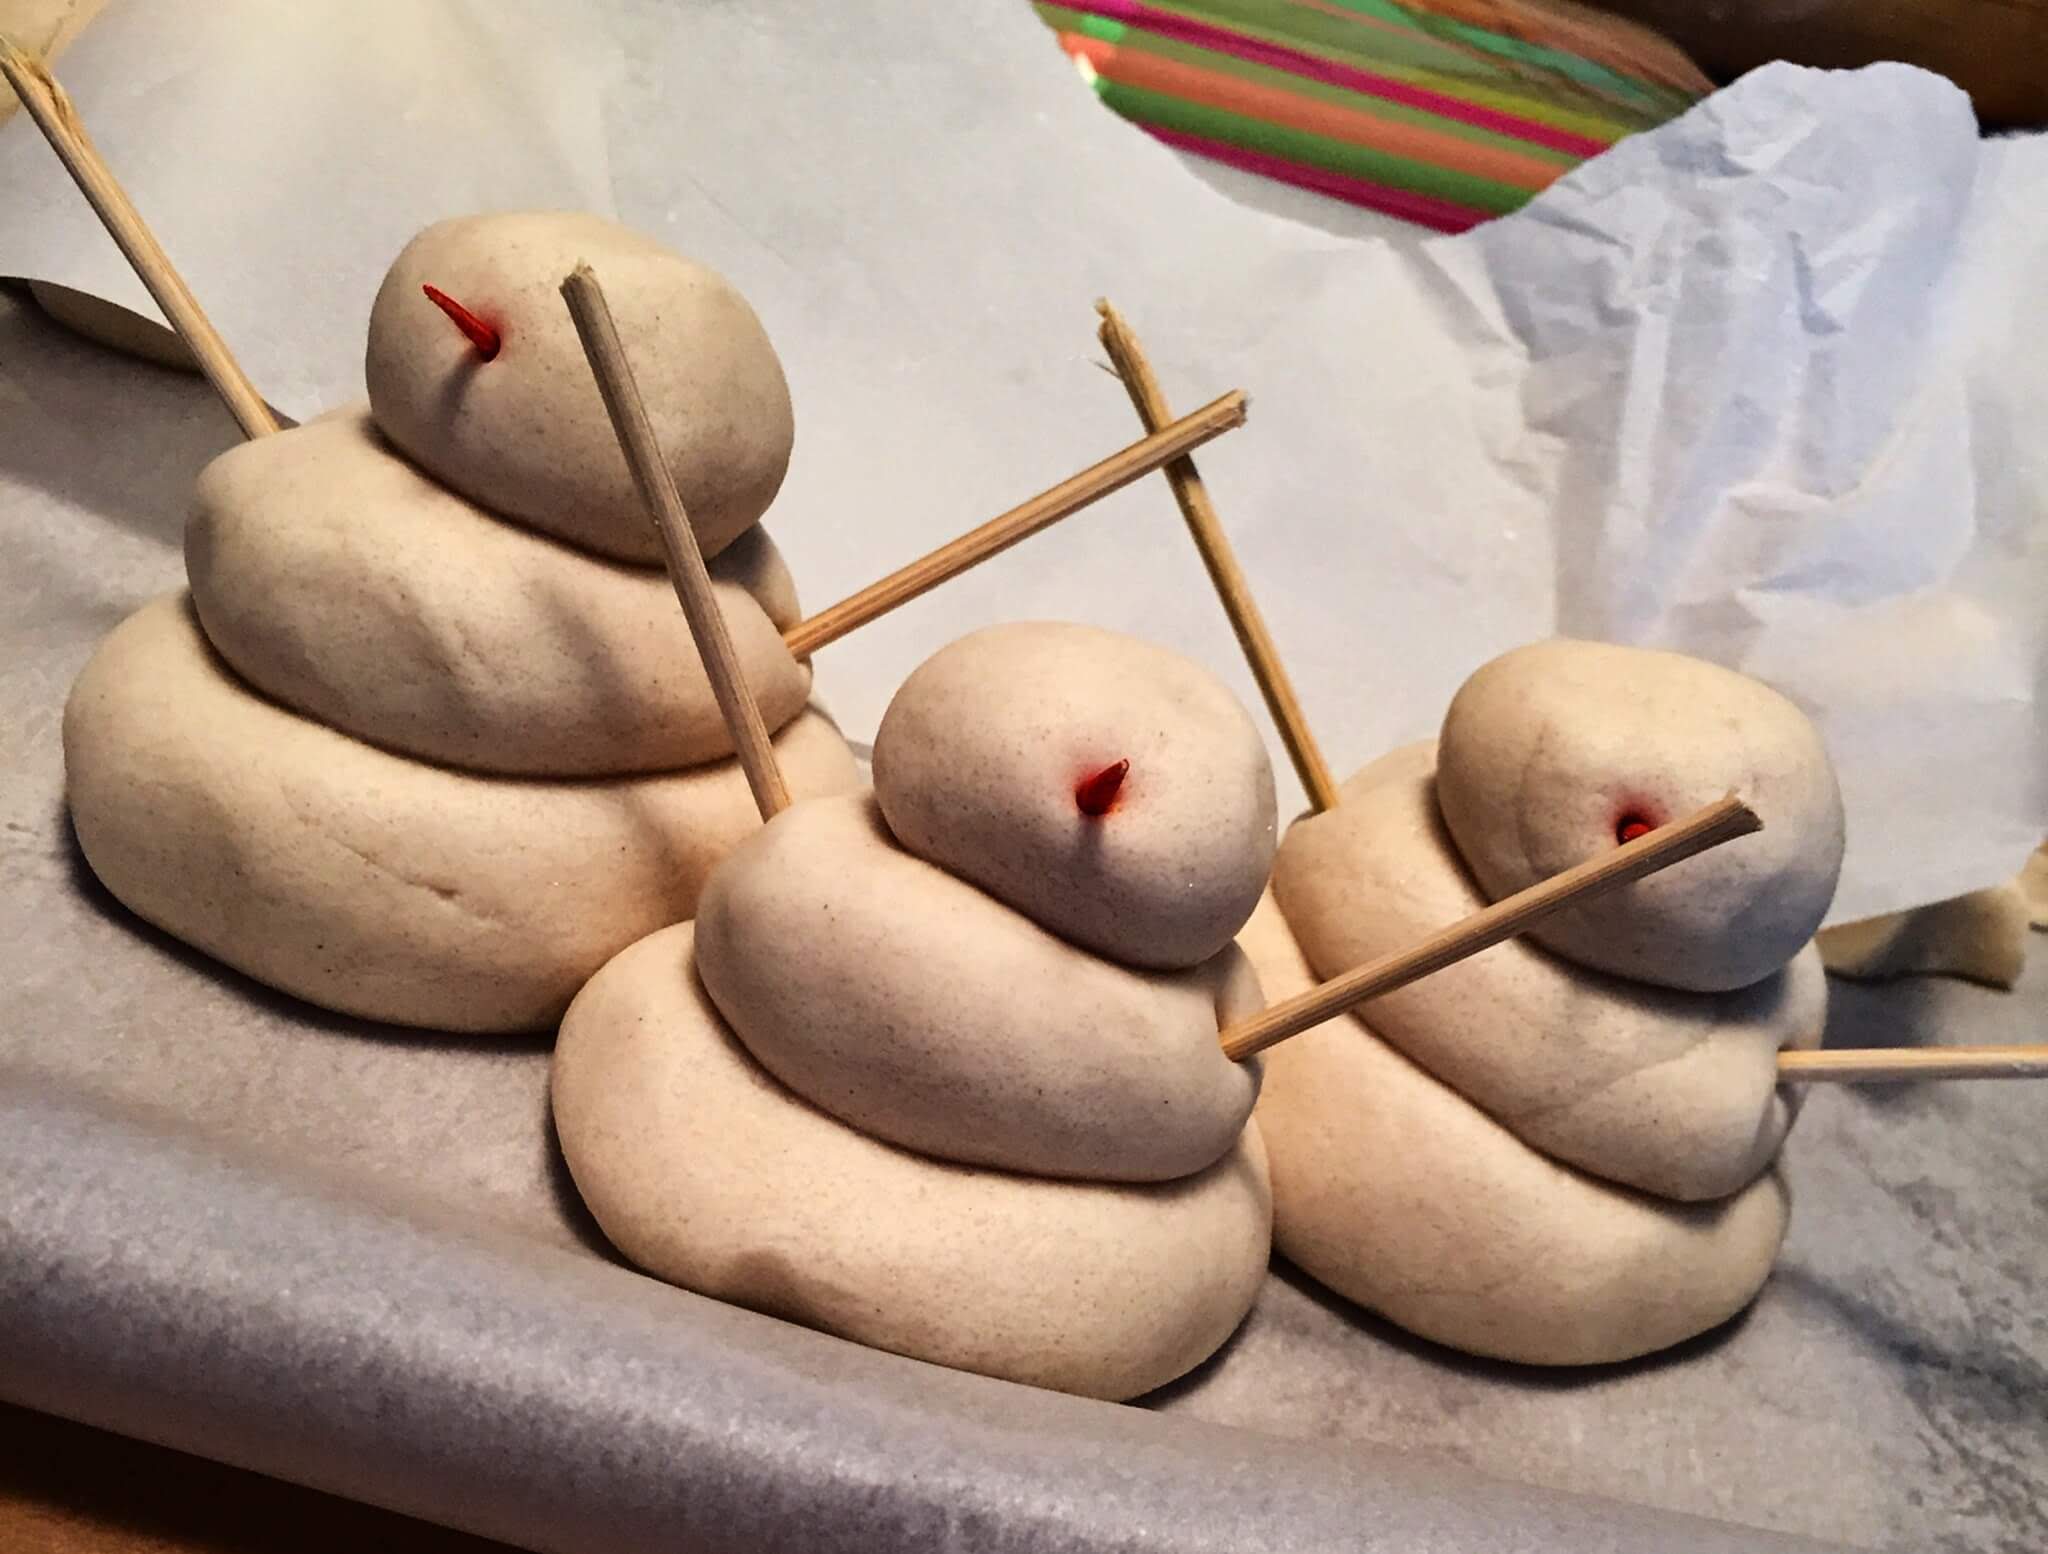
Stick the snowmen together using drops of water if needed, so that when they bake they will come out stuck firmly together.
Bake the snowmen on a cookie sheet at 250-degrees for two to two-and-half hours.
Allow them to cool completely, overnight if possible, before painting and decorating.
Use white acrylic paint on their bodies and use black paint to make “coal” eyes and a mouth. Paint buttons and other clothing or use felt, ribbons, and other materials for clothes.
These snowmen will make great teacher gifts, give one to the librarian or the babysitter, and Grandma would love one on her mantle too.
Salt Dough Fall Pumpkins
You can’t get through the fall season without the ever-popular pumpkins and gourds. One way to create the feel of the season is to create some fun salt dough pumpkins.
You will need:
- Salt dough
- Ribbon
- A piece of stick for the stem
- Acrylic paint
- Instructions:
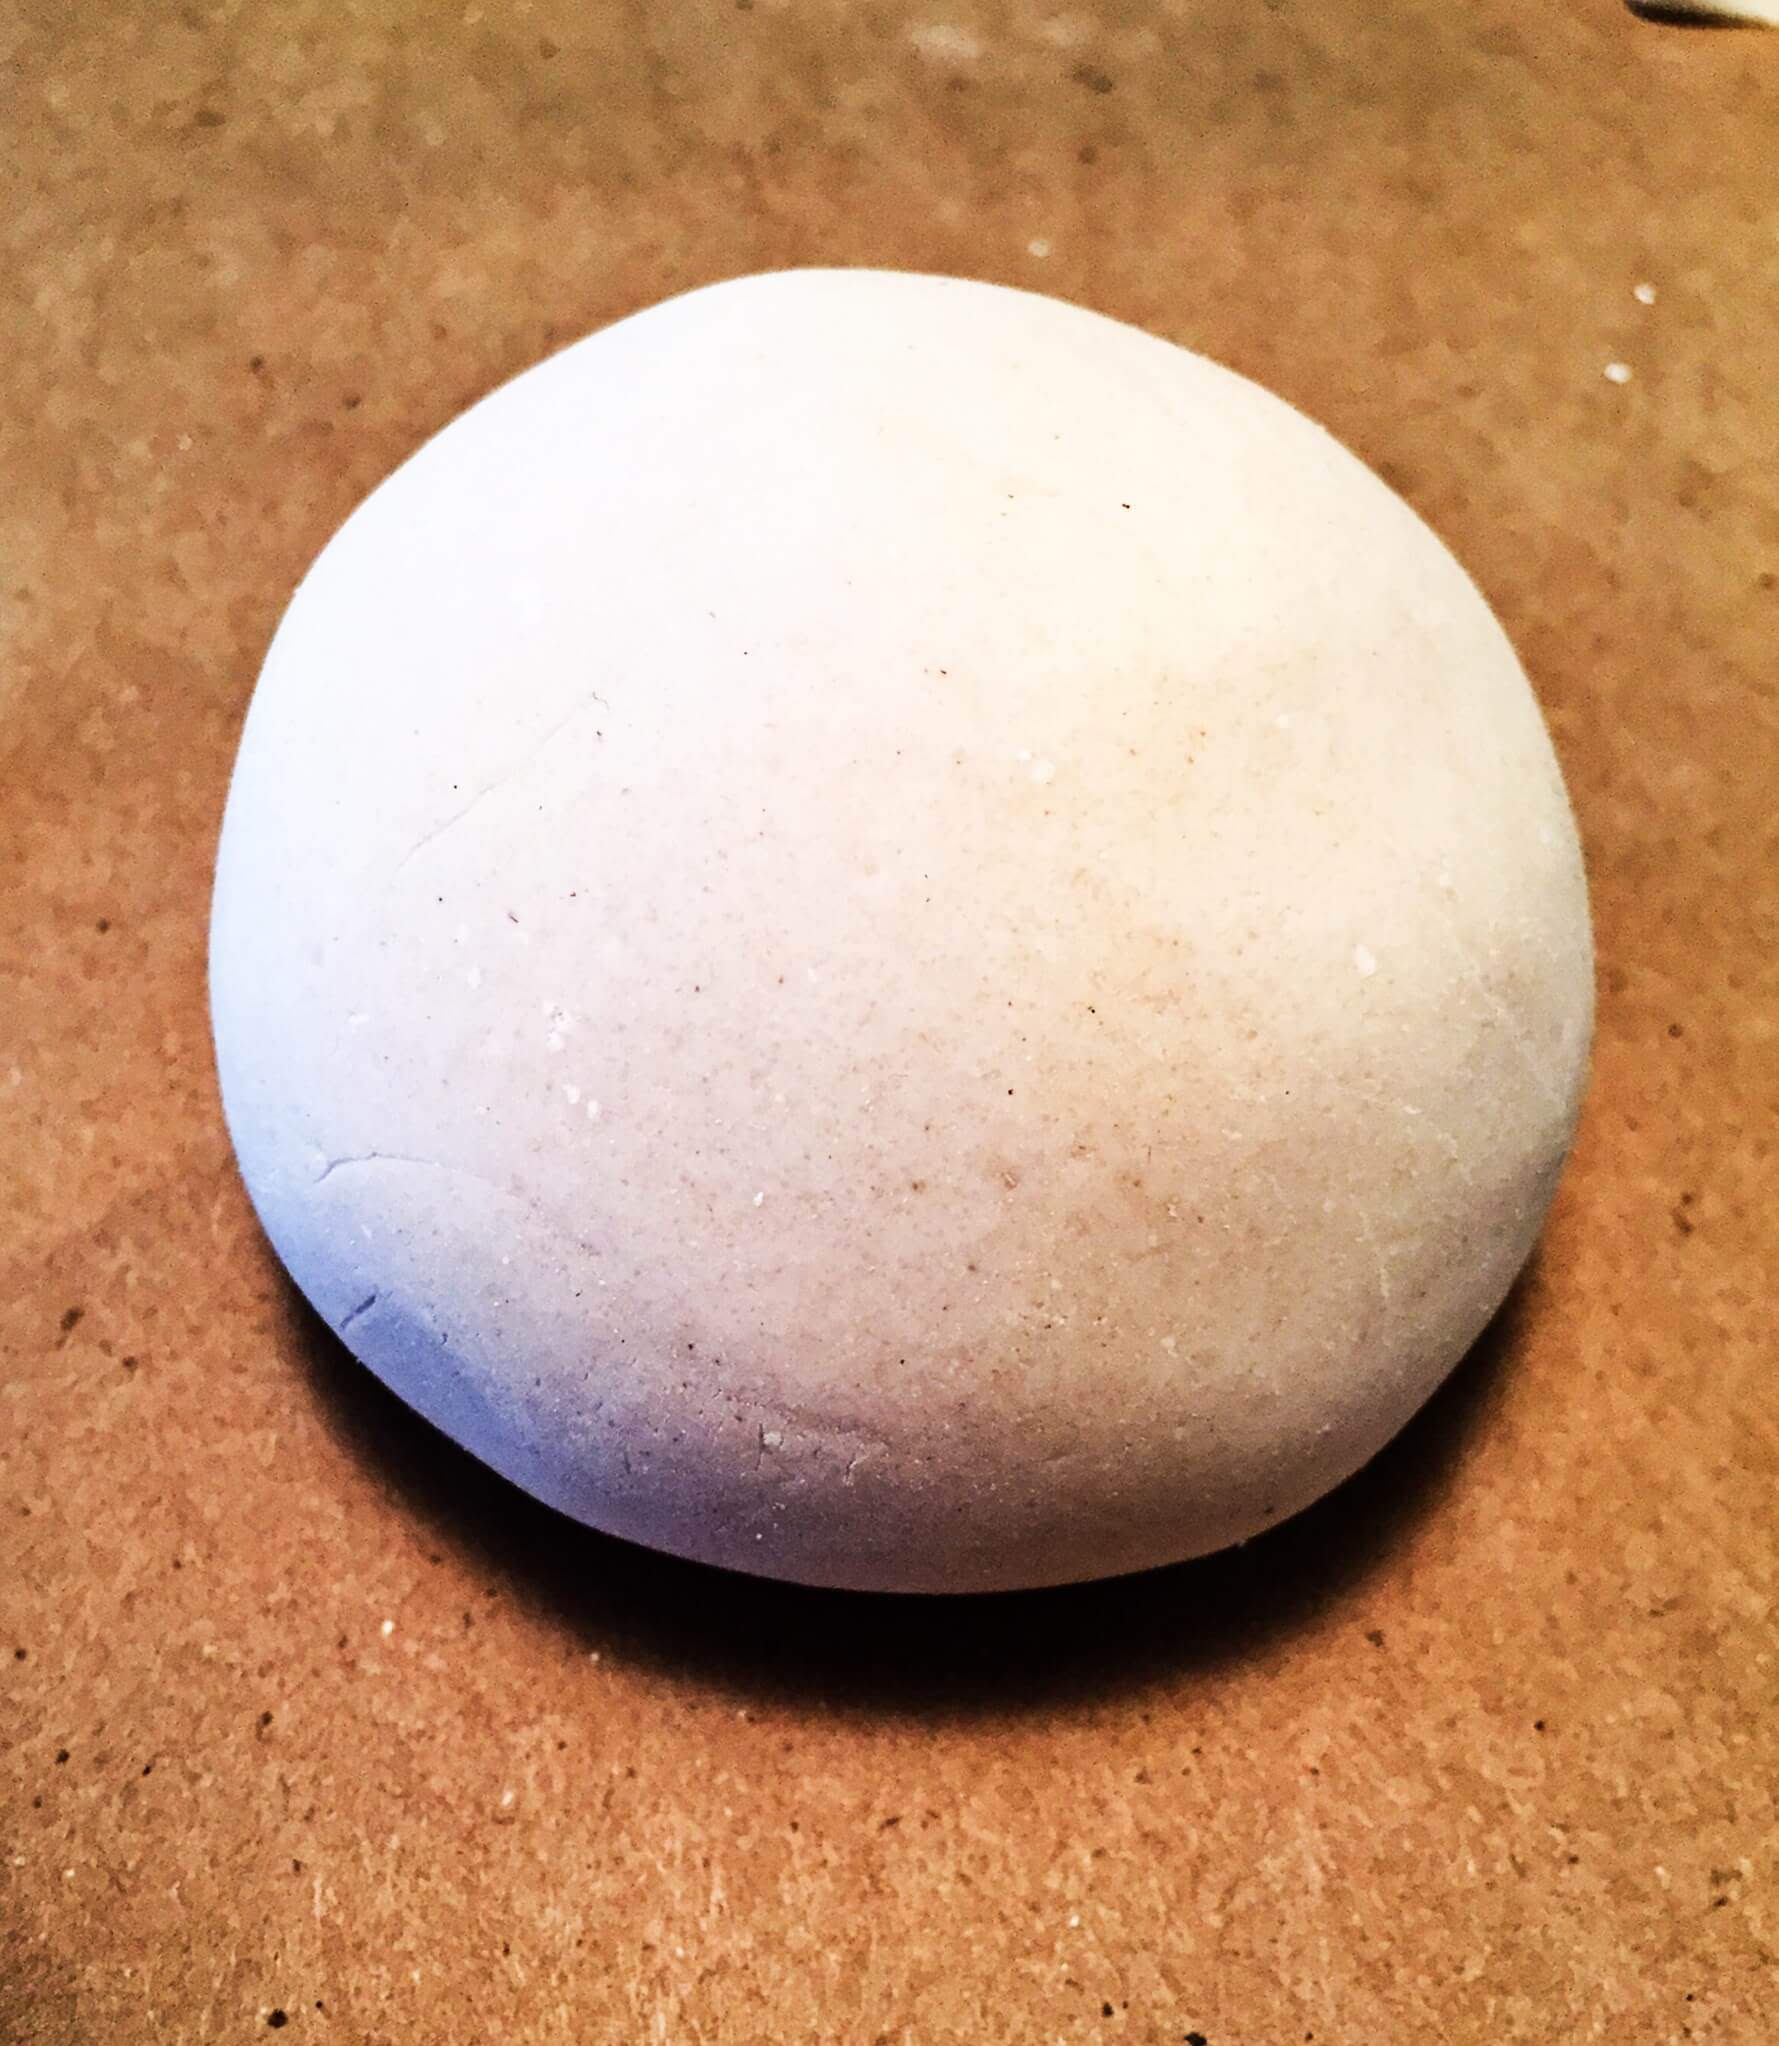
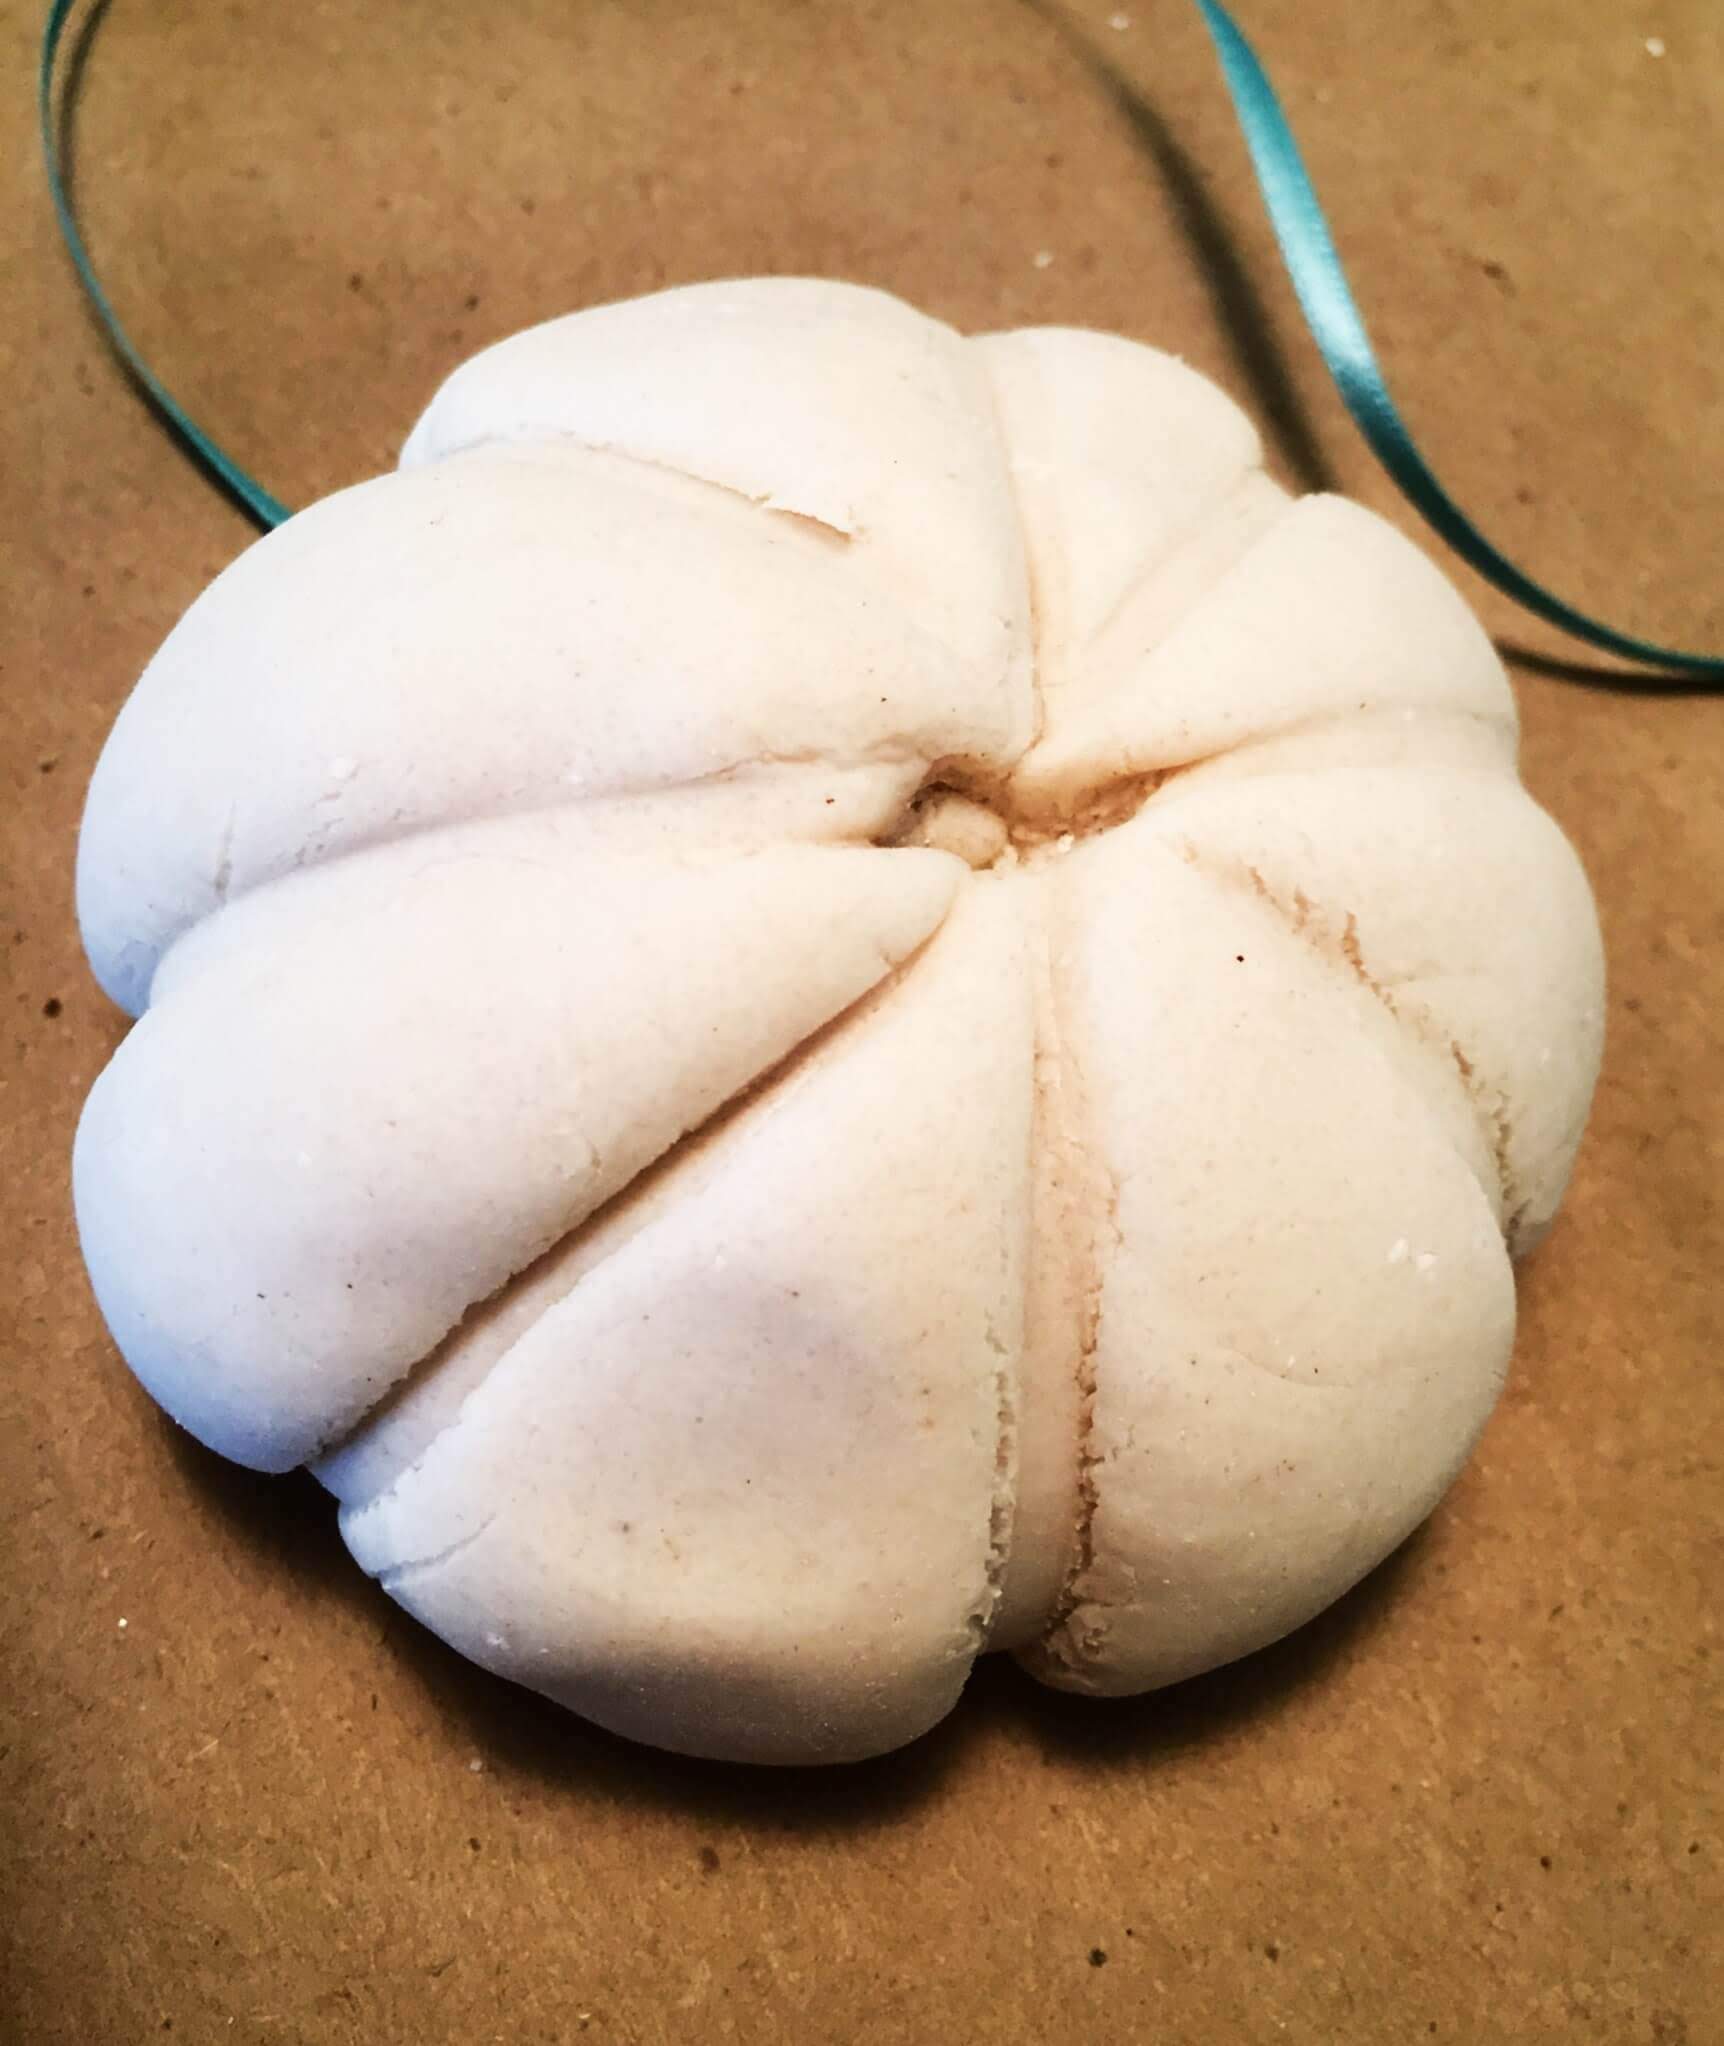
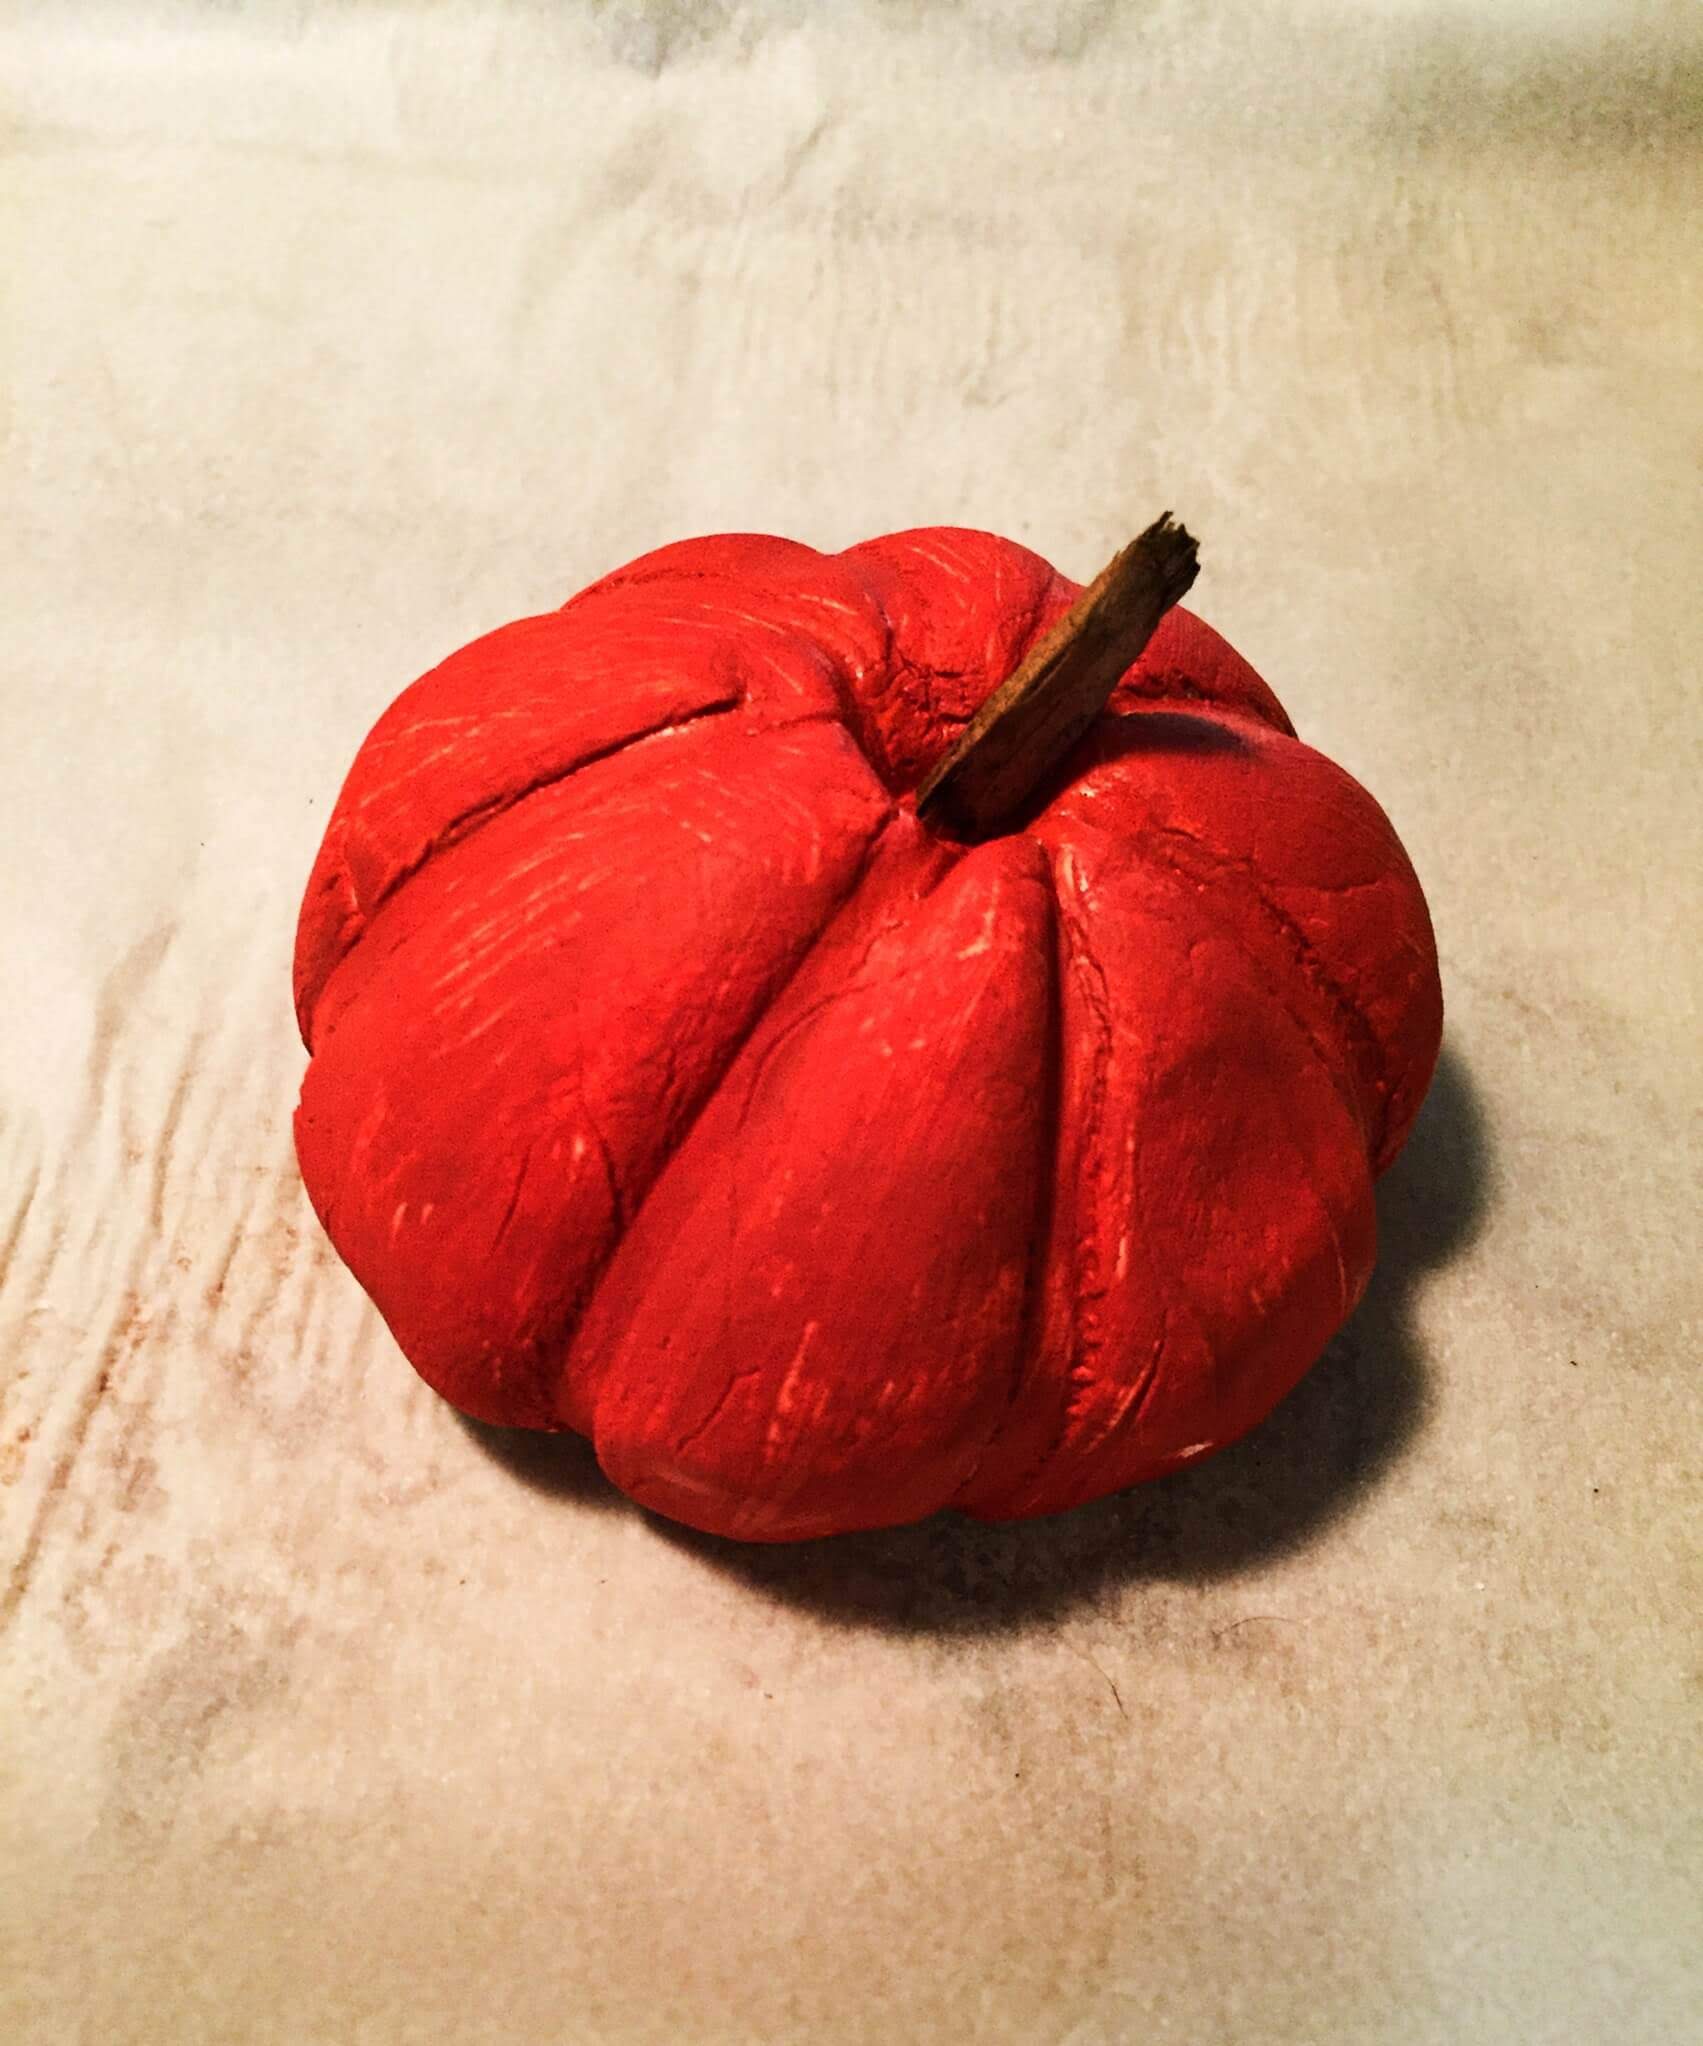
Roll the dough into a ball the desired size of your pumpkin.
Using the ribbon, pull it up from under the pumpkin making rows of ridges.
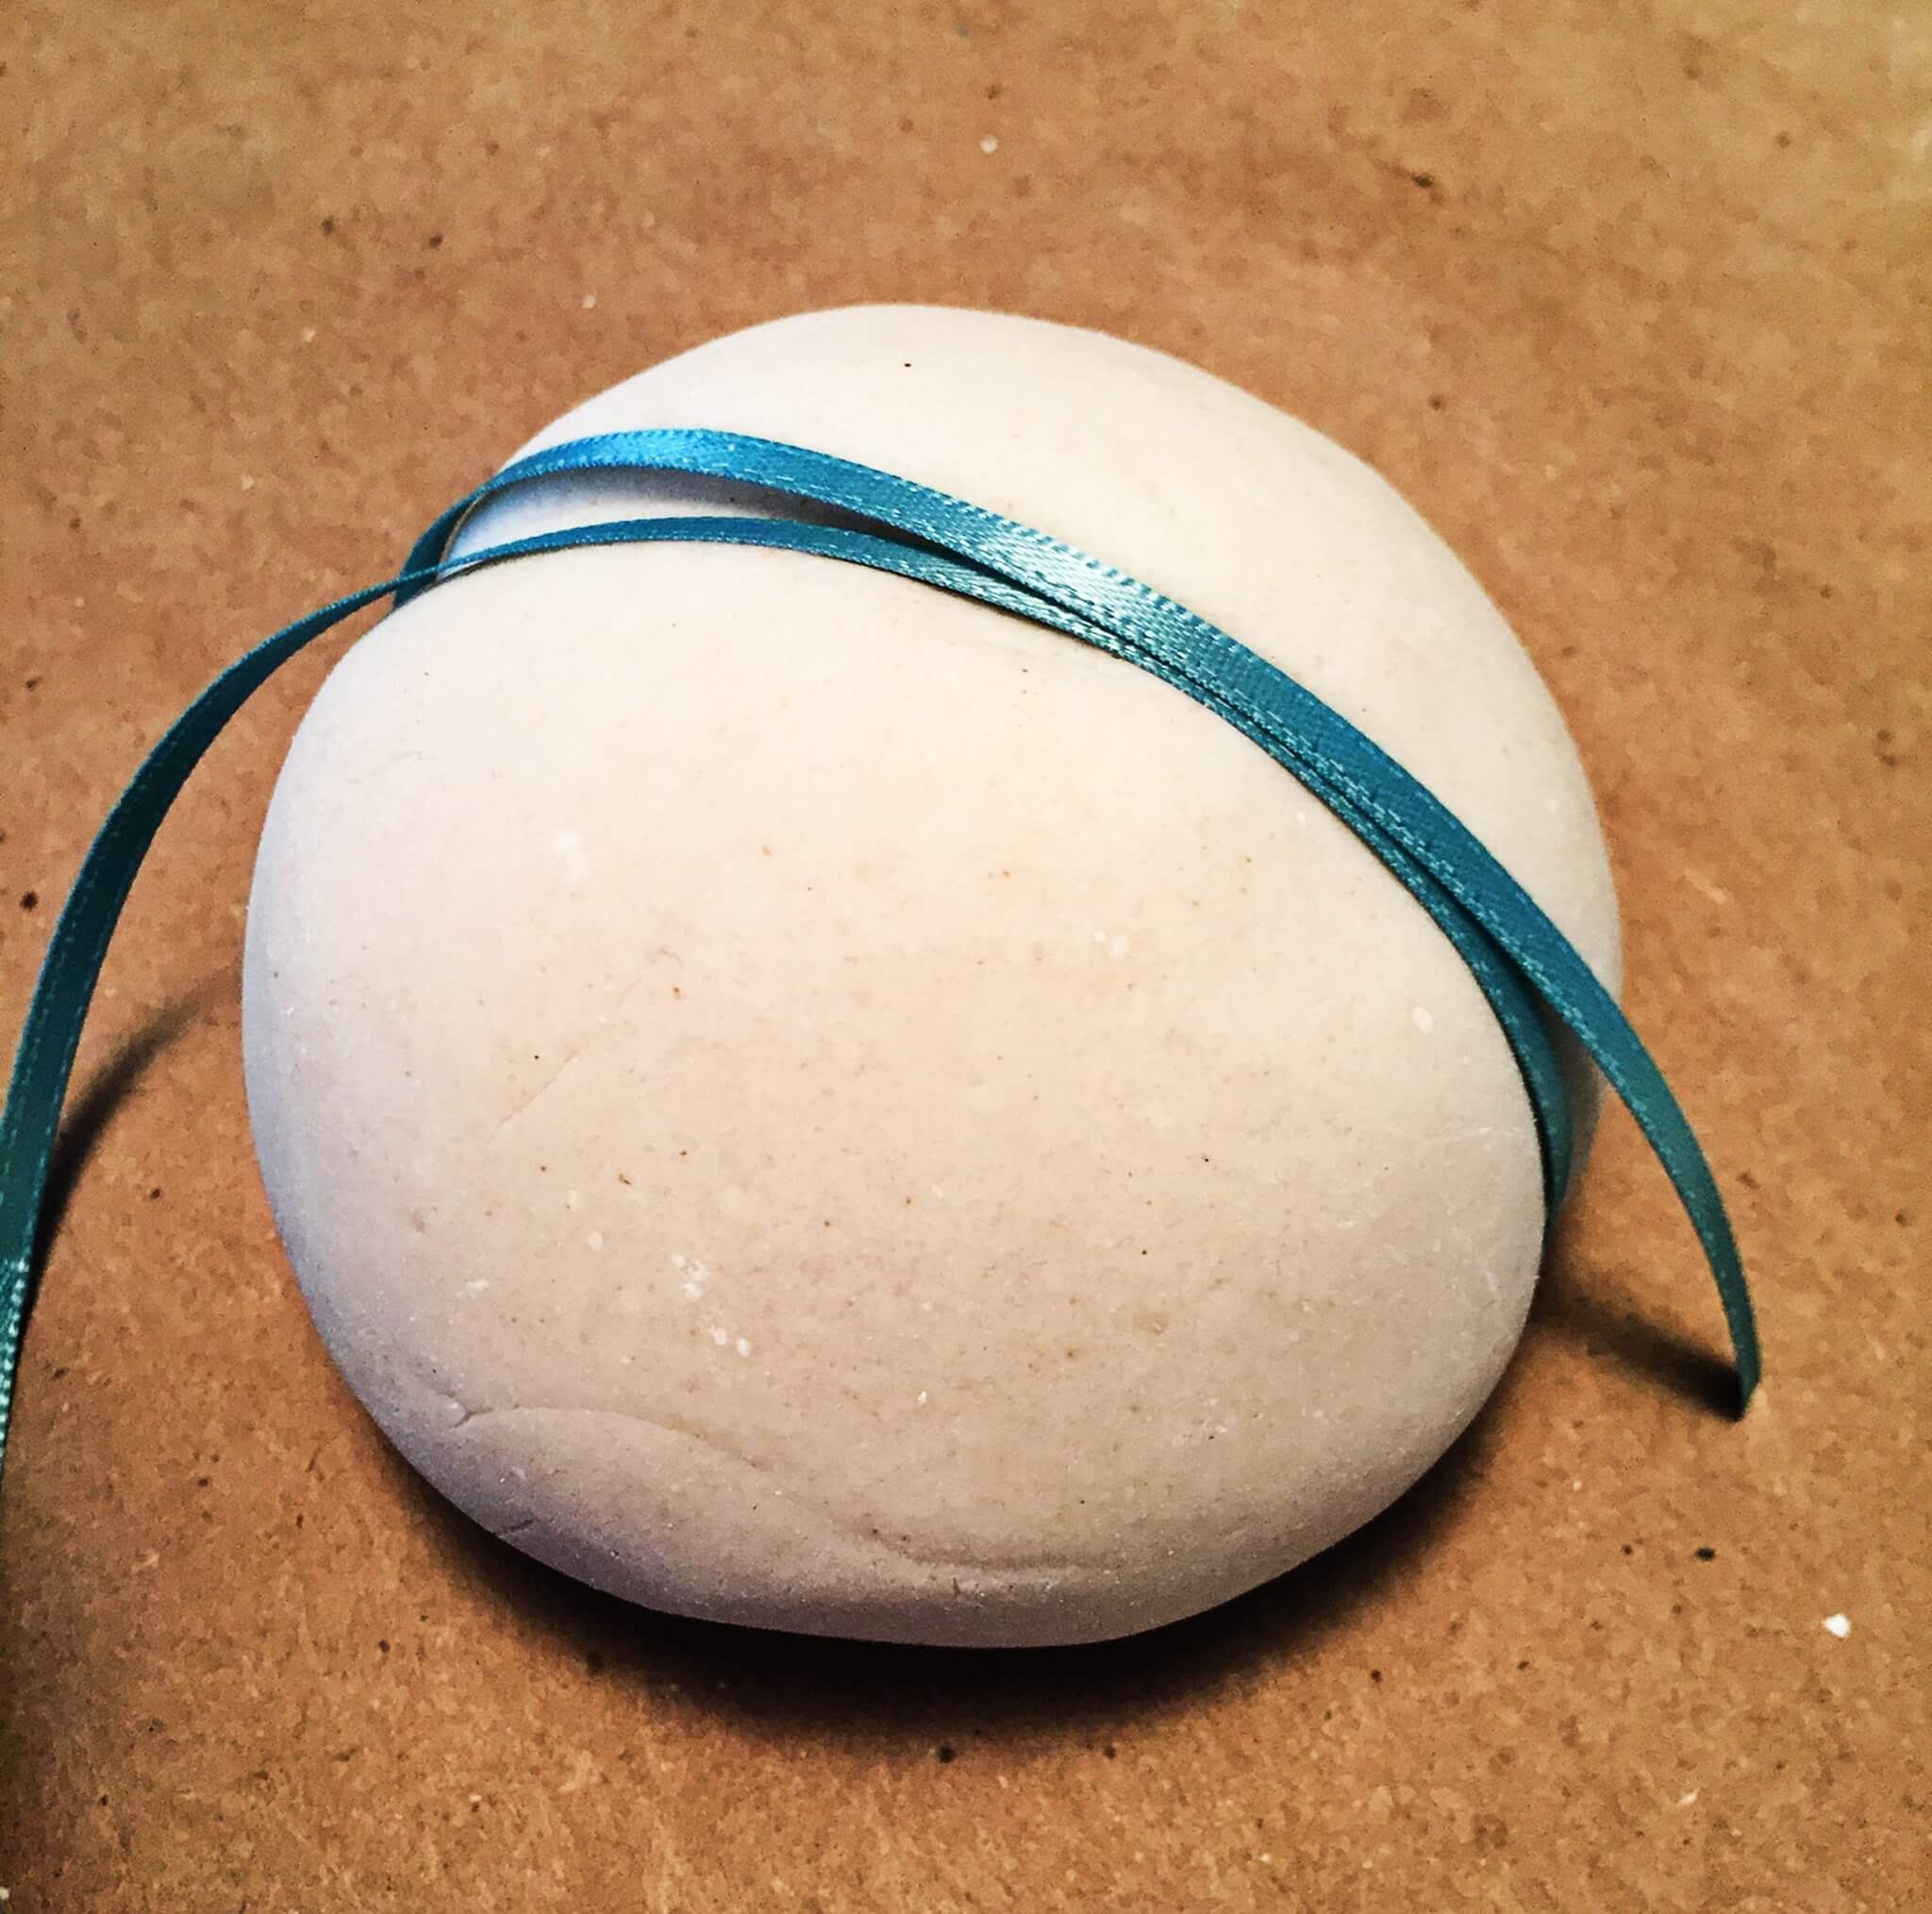
When all the ridges are formed, press a hole in the top to make room for the stem when the pumpkin is complete.
Bake the pumpkin on a cookie sheet in a 250-degree oven until it is hardened for approximately two hours.
Allow the pumpkin to cool completely and then paint it with orange acrylic paint.
Complete it with a stick piece on the top for the stem and add it to your tabletop decorations.
You can use these pumpkins with your Halloween decorations and then transfer them to your fall centerpieces if you desire.
Halloween Salt Dough Ghosts
You must have ghouls, goblins, and ghosts sitting next to the Halloween candy and treats, so invite the kids over for a craft party and let them create some salt dough ghosts to decorate the house. This is one of the easiest salt dough craft ideas for kids of any age.
You will need:
- Salt dough
- Toothpicks
- Acrylic paints
Instructions:
Start by rolling the dough into a ball and then roll it and stretch it like a snake on the table.
Pull the dough apart into smaller snakes and stand it up on the cookie sheet. If you smack it down gently it will help to form the bottom of the ghost.
Using your fingers, pinch the top into a smaller part for the head, spread out the bottom to look like a dress and use your fingers to press it down. Before baking, poke eye holes using a toothpick.
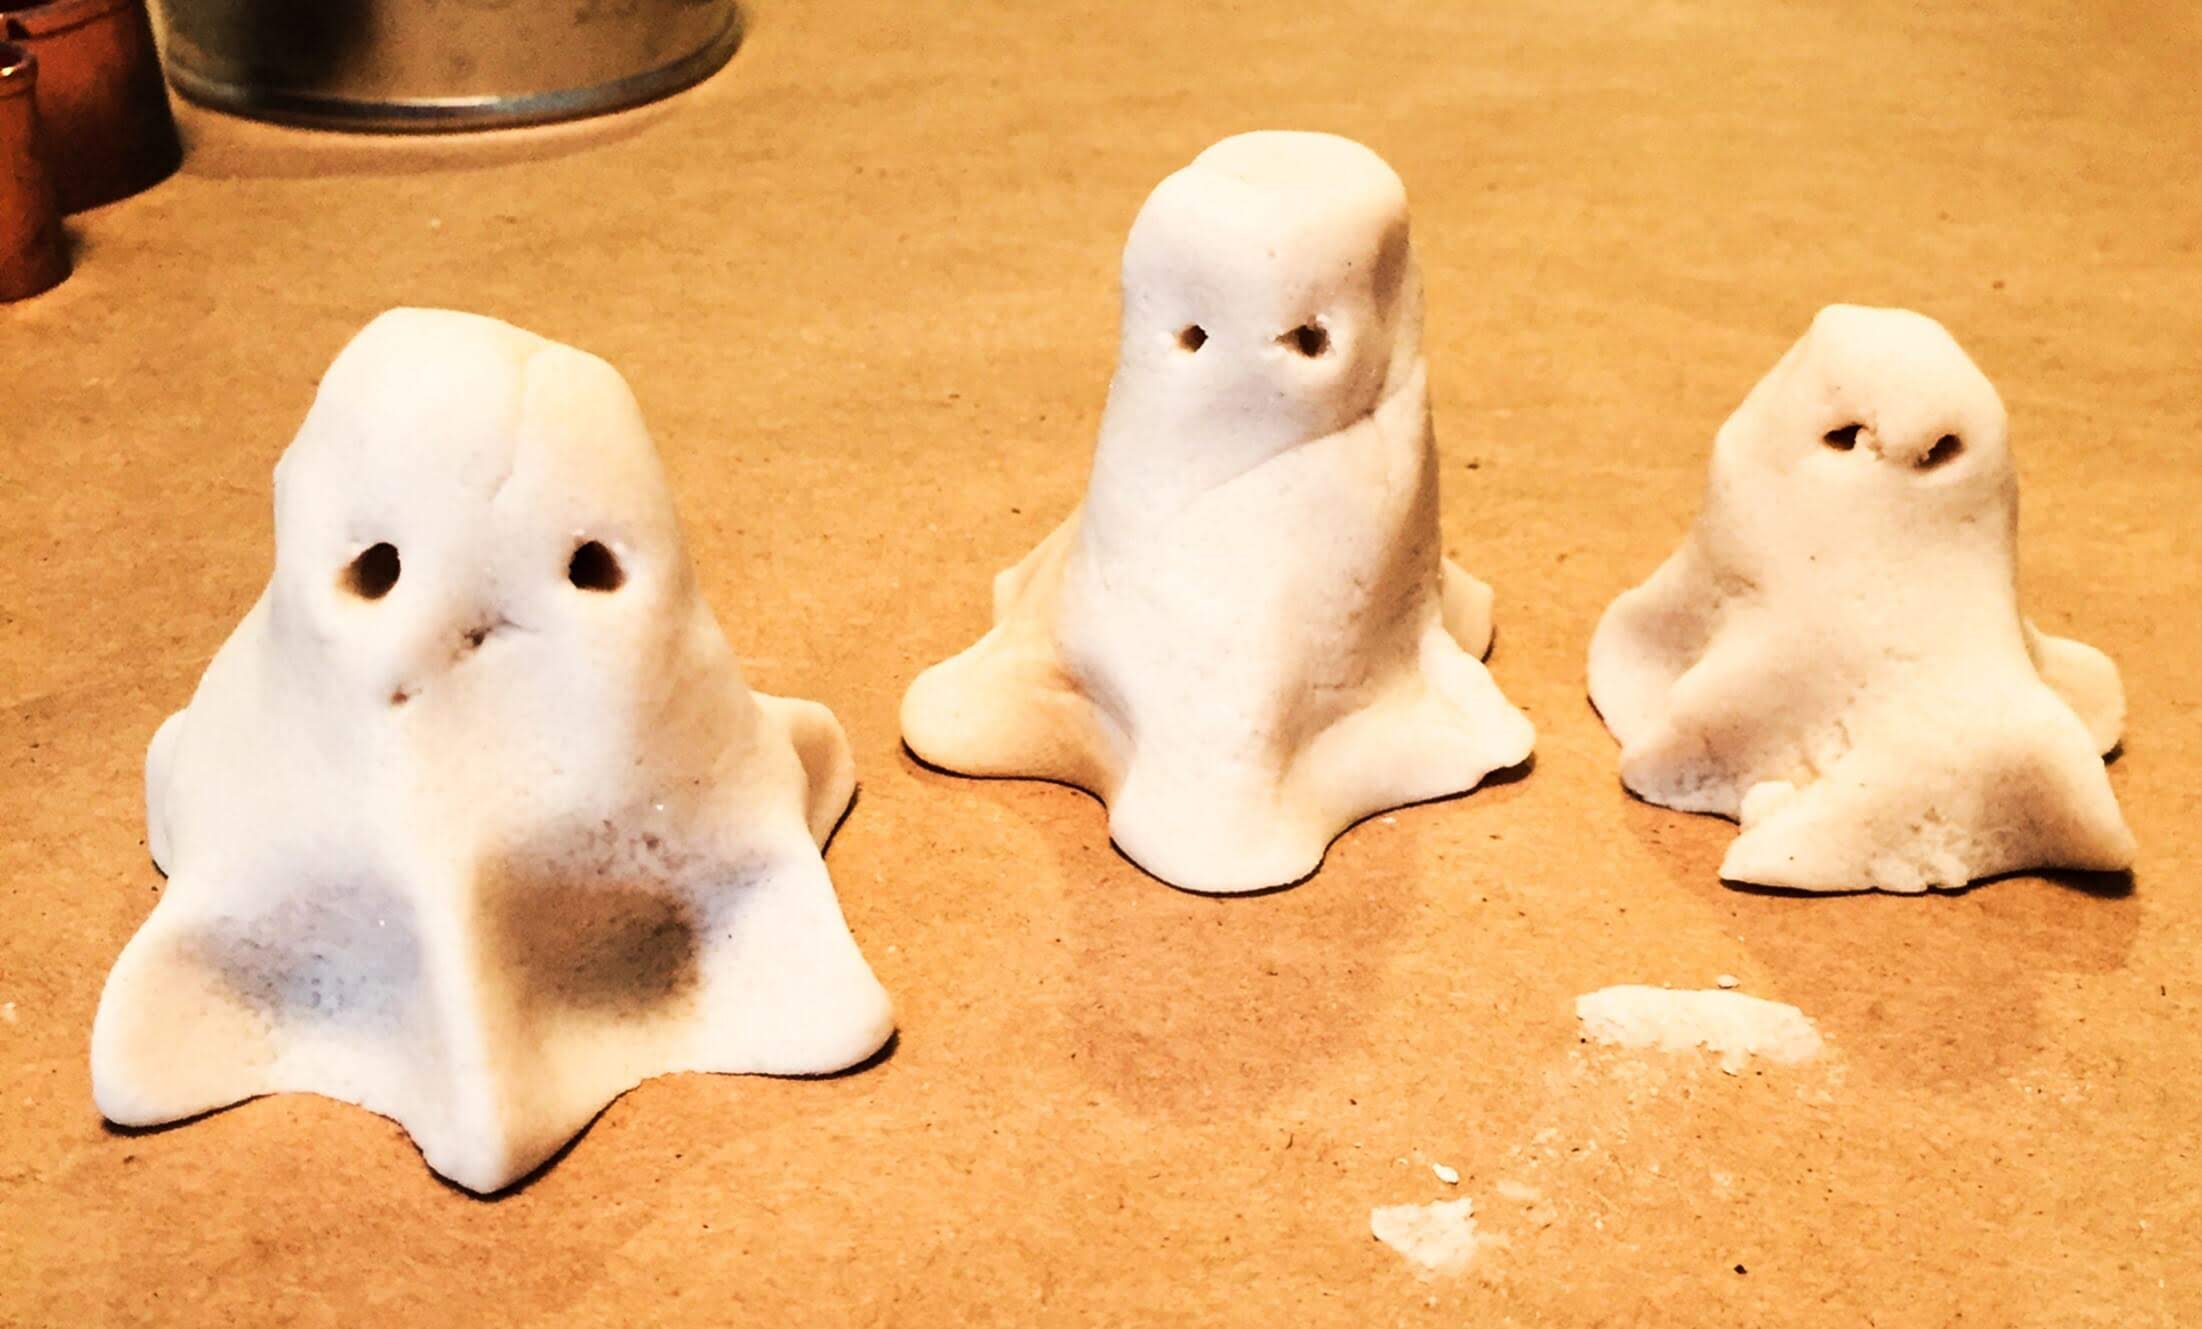
You can have fun with these ghosts making all different sizes and shapes. They’re easy for little hands to mold and it will allow the kids to use their imaginations in so many different ways.
Once they are formed, bake them at 250-degrees until they are hardened and no longer wet. It could take up to two-and-a-half hours depending on the sizes of the ghosts.
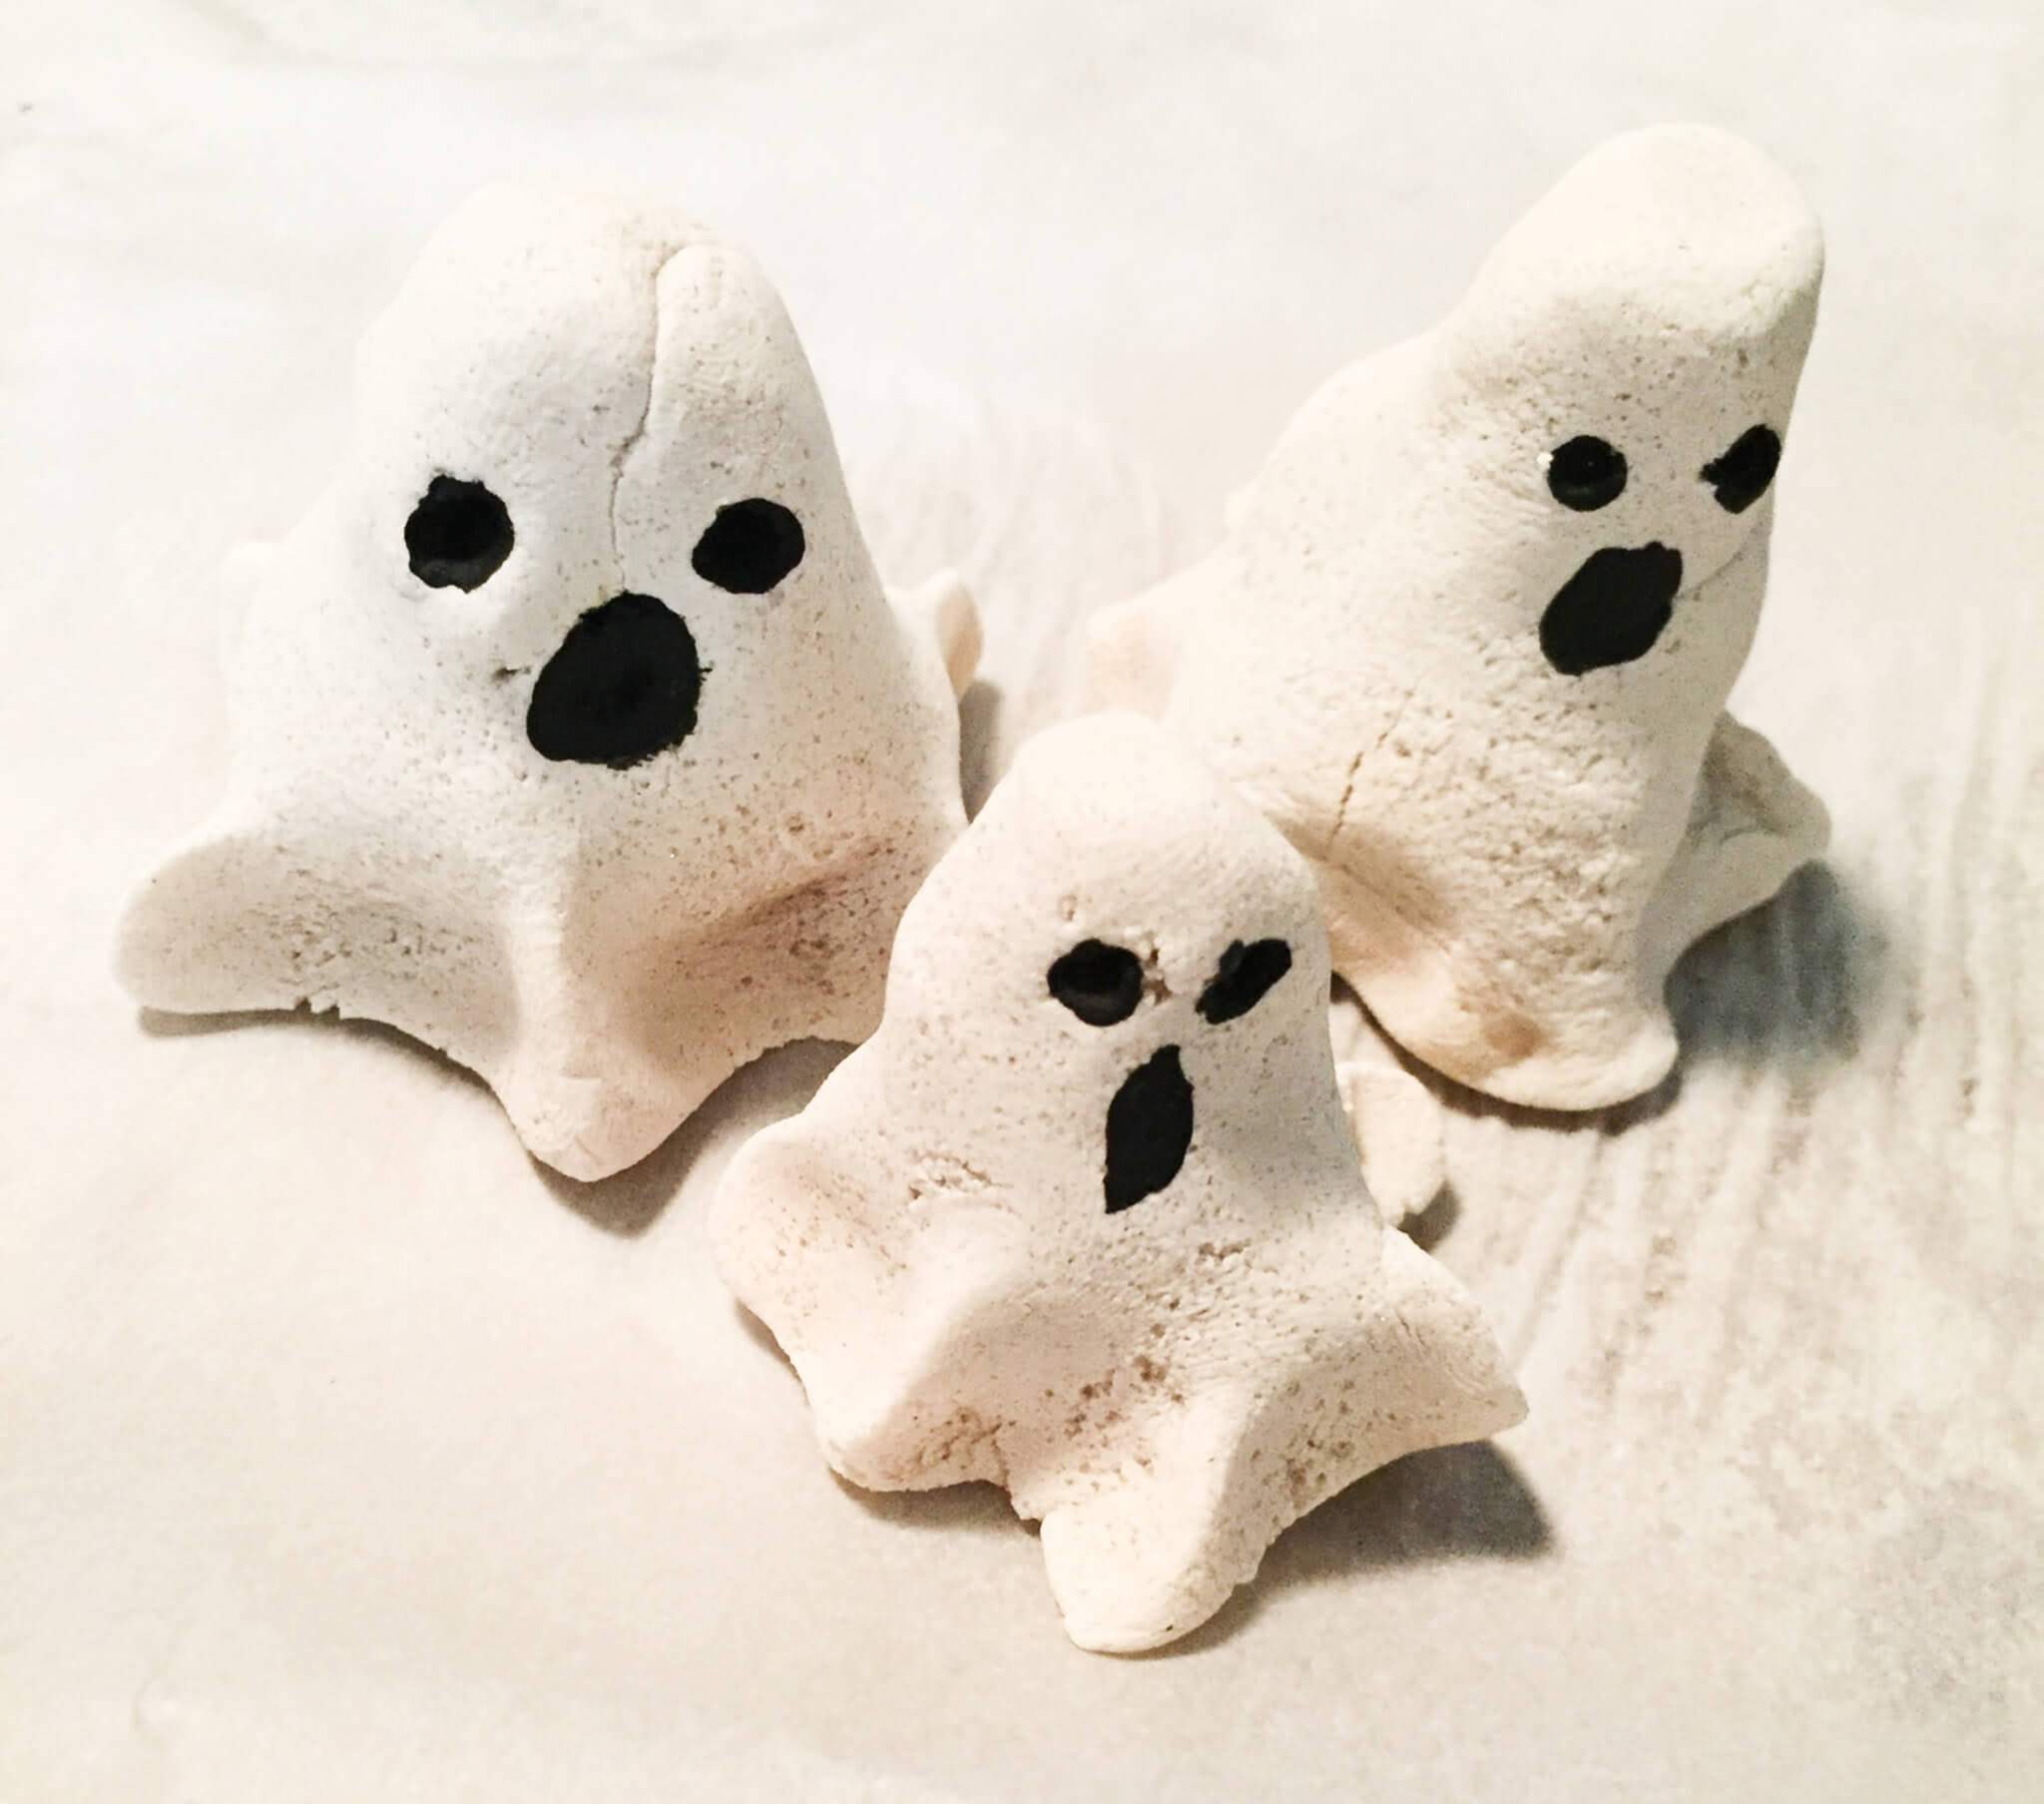
When they are completely cool, paint them with white acrylic paint and use a toothpick dipped in black paint to finish the eyes and mouths.
These salt dough ghosts make great group projects and they are the best sleepover activities.
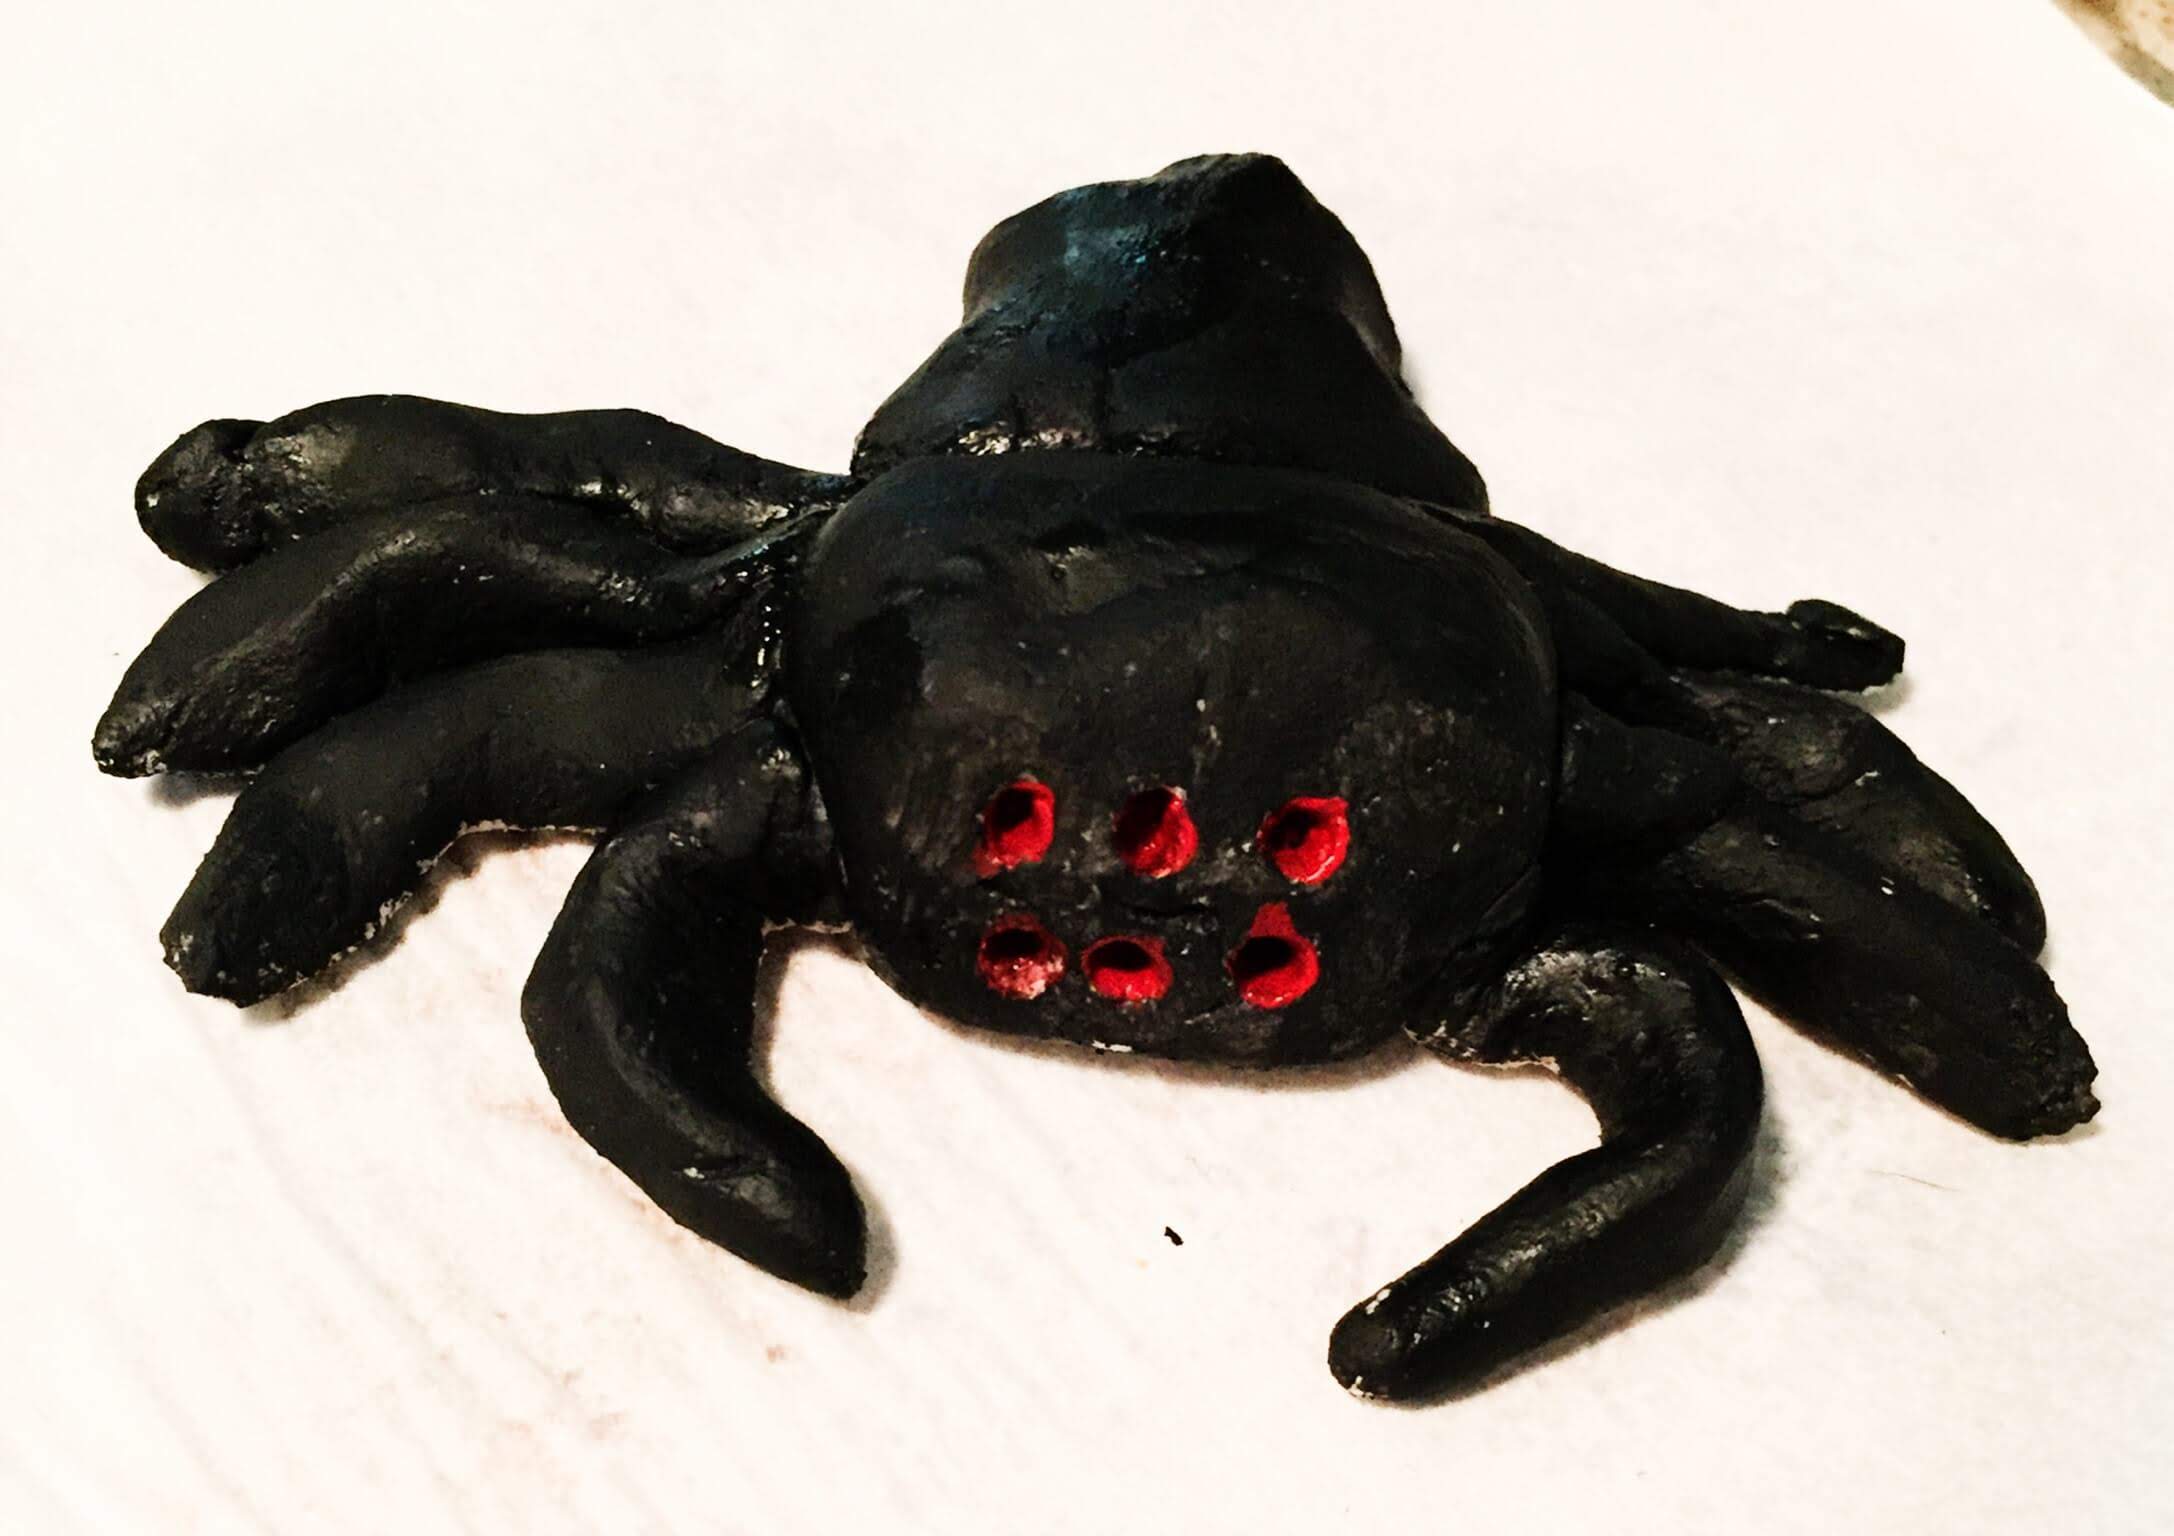
Halloween Salt Dough Spiders
Spiders are ugly which makes them the perfect insect to decorate every Halloween party. These creepy crawlers are not as easy as the ghosts, but they are still a lot of fun to create and you will find the older kids will enjoy making these salt dough Halloween decorations as much as the younger ones enjoy the ghosts.
You will need:
- Salt dough
- Toothpicks
- Acrylic paint
- Instructions:
Start by forming two balls, one smaller than the other to make the body.
Press the two balls together, using a drop of water if needed to help them stick.
Next, you will need to make eight little legs, four for each side. You can do this by shaping them into skinny worm shapes.
Stick the legs to each side of the body, again using a drop of water if necessary.
Once the spider is together, you will need to use the toothpick to make the six eye sockets.
You can make several spiders of different sizes if you want to make a creepy scene.
Bake the spiders in the oven at 250-degrees until they are hardened and no longer wet.
After they are completely cooled, paint them black or brown using acrylic paints. Dip a toothpick in red acrylic and finish the eyes.
This is another great project to keep the kids entertained at a sleepover or on a rainy day.
3D Salt Map Recipes
Geography isn’t a subject everyone loves, but it can be when you make it fun. Gather up the group and get their minds working while creating some salt dough maps. This is a fun activity for large groups, small groups, and it even makes the perfect activity for homeschoolers.
Creating a 3D Salt Dough Map of Florida
If you’ve never made a 3D map before, you might want to start with the state of Florida because it’s one of the easier ones on the map.
You will need:
- Salt dough
- Rolling pin
- Toothpick
- Florida state template
- Cardboard
- Tape
- Cardboard knife
- Small paring knife
- Acrylic paints
Instructions:
Start by printing out the state map template. Tape it to a piece of cardboard and an adult should cut it out using the cardboard knife.
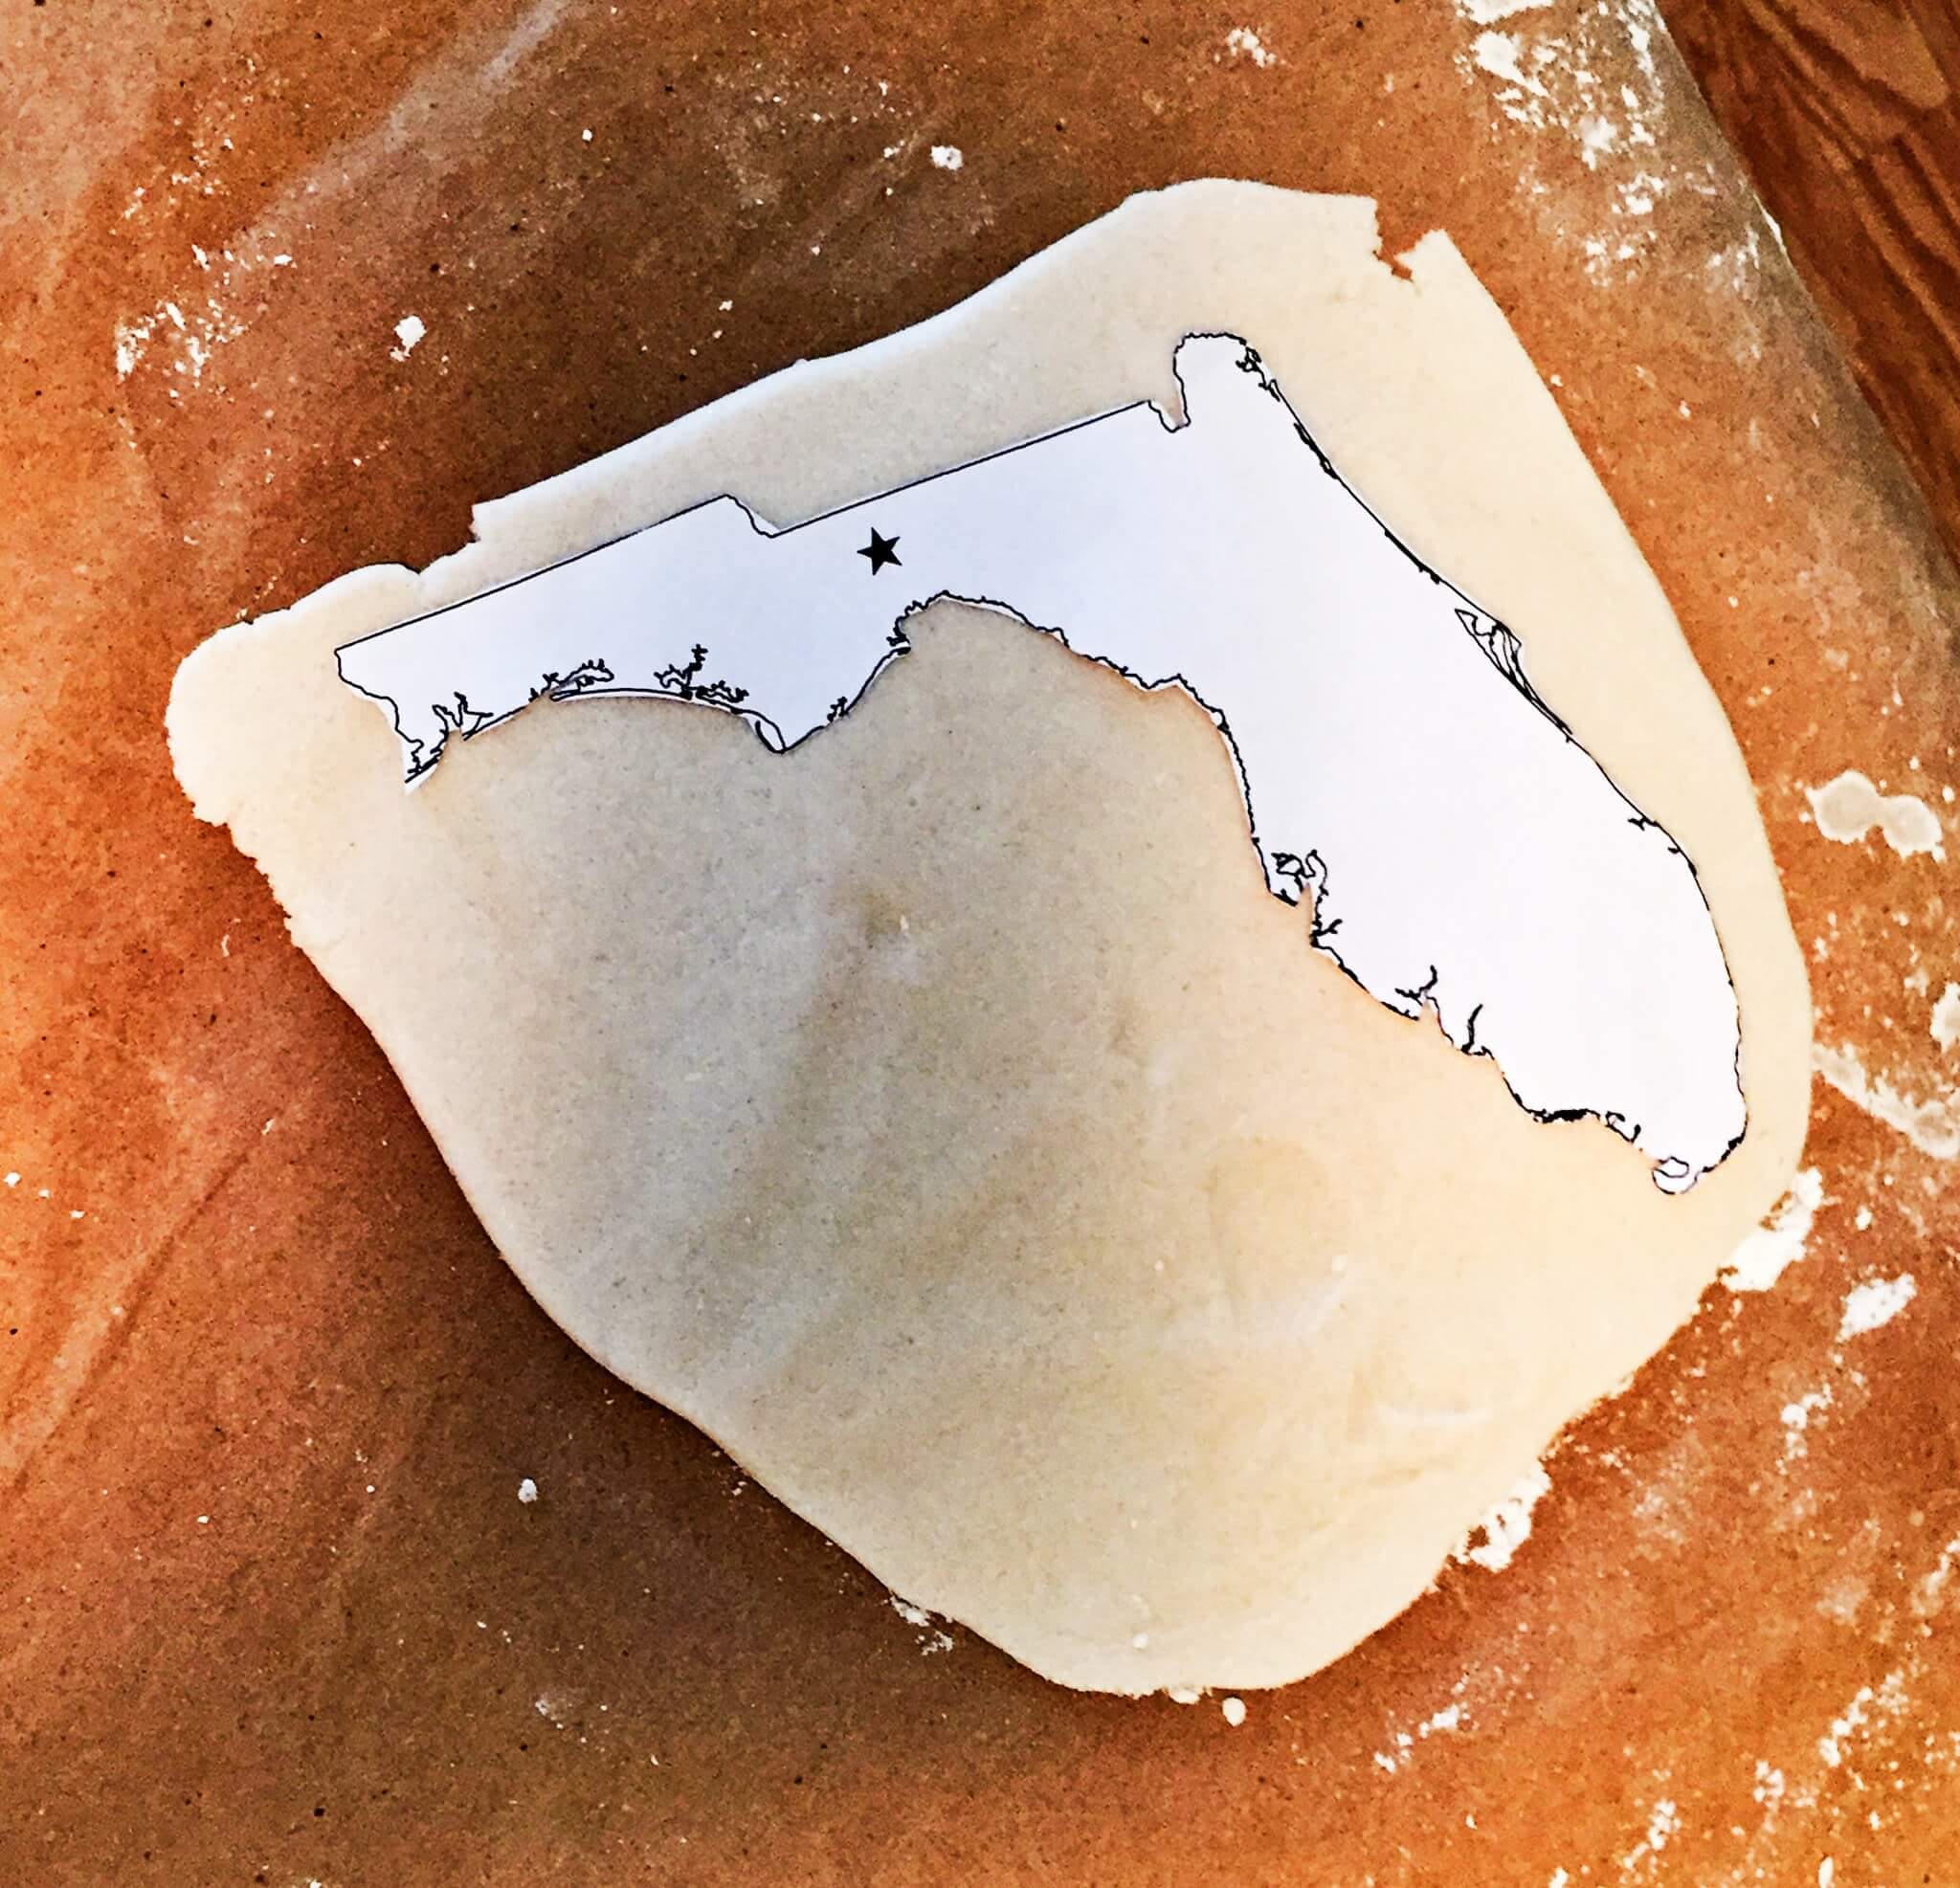
Using the rolling pin, flatten the salt dough onto parchment paper and place the cardboard cutout on the top. An adult should cut out the template around the dough.
Once the dough is cut into the shape of the state, use a toothpick to cut out detailed sections where the water should be.
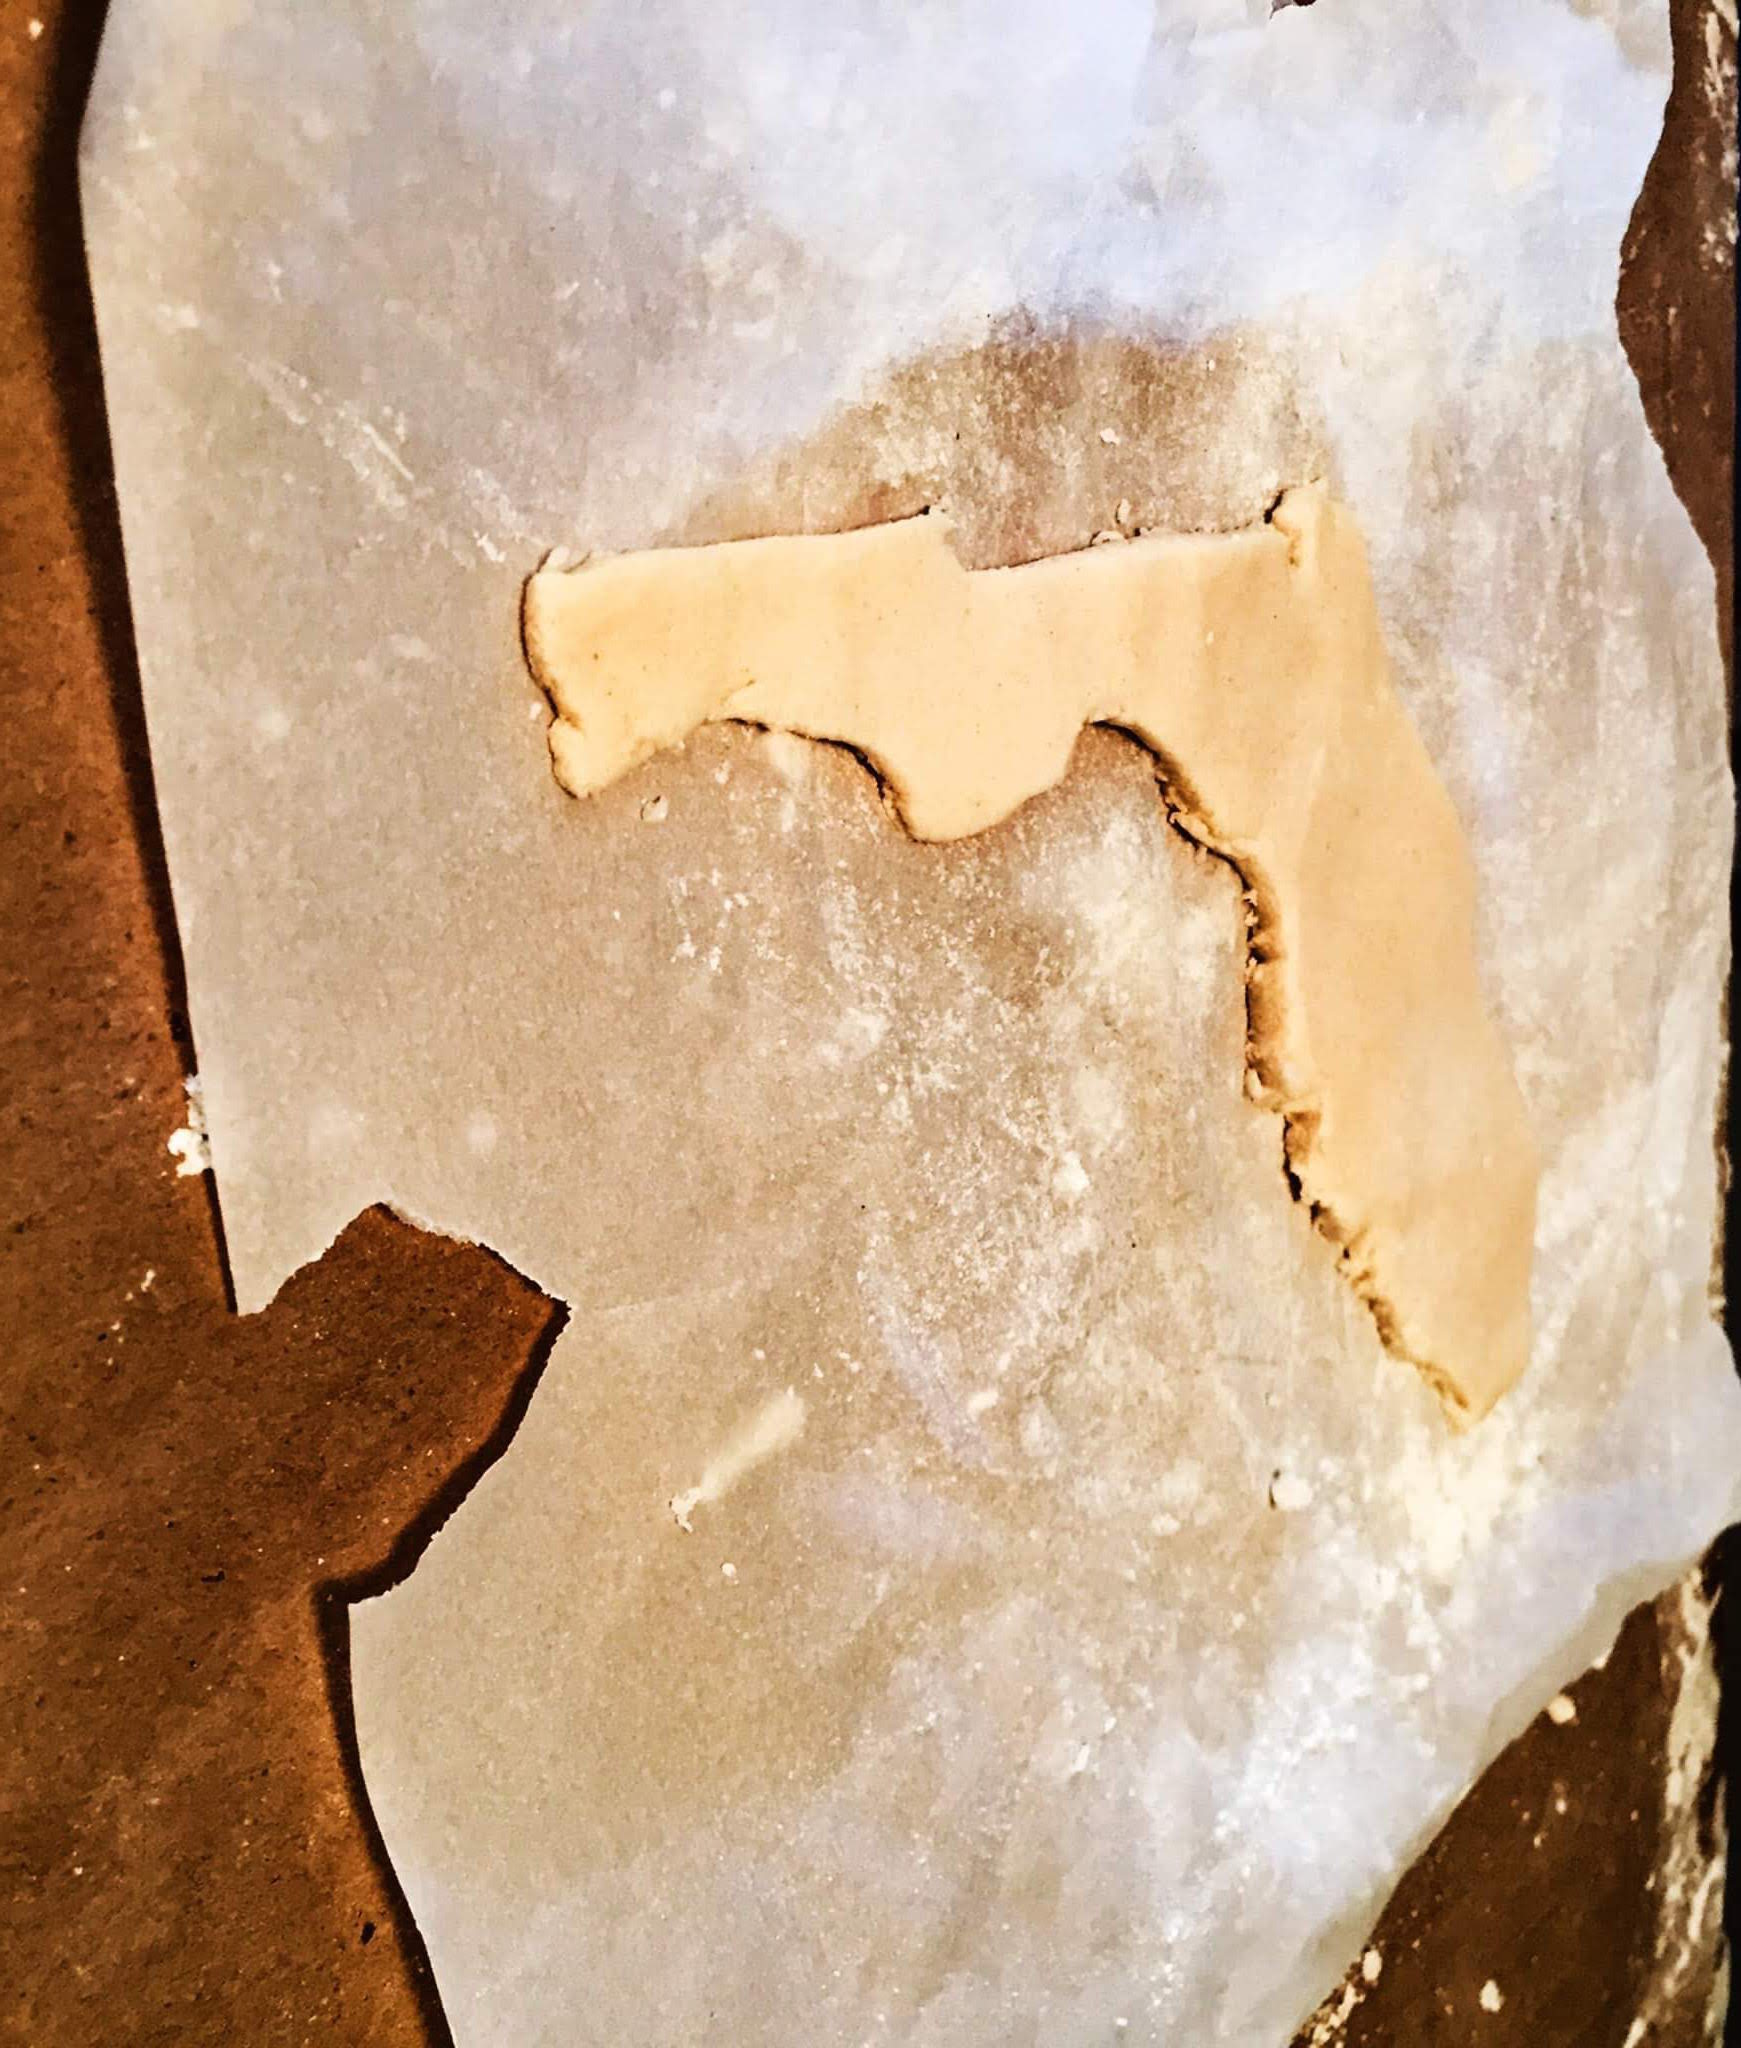
Next, using smaller pieces of leftover dough, raise the elevations on the map.
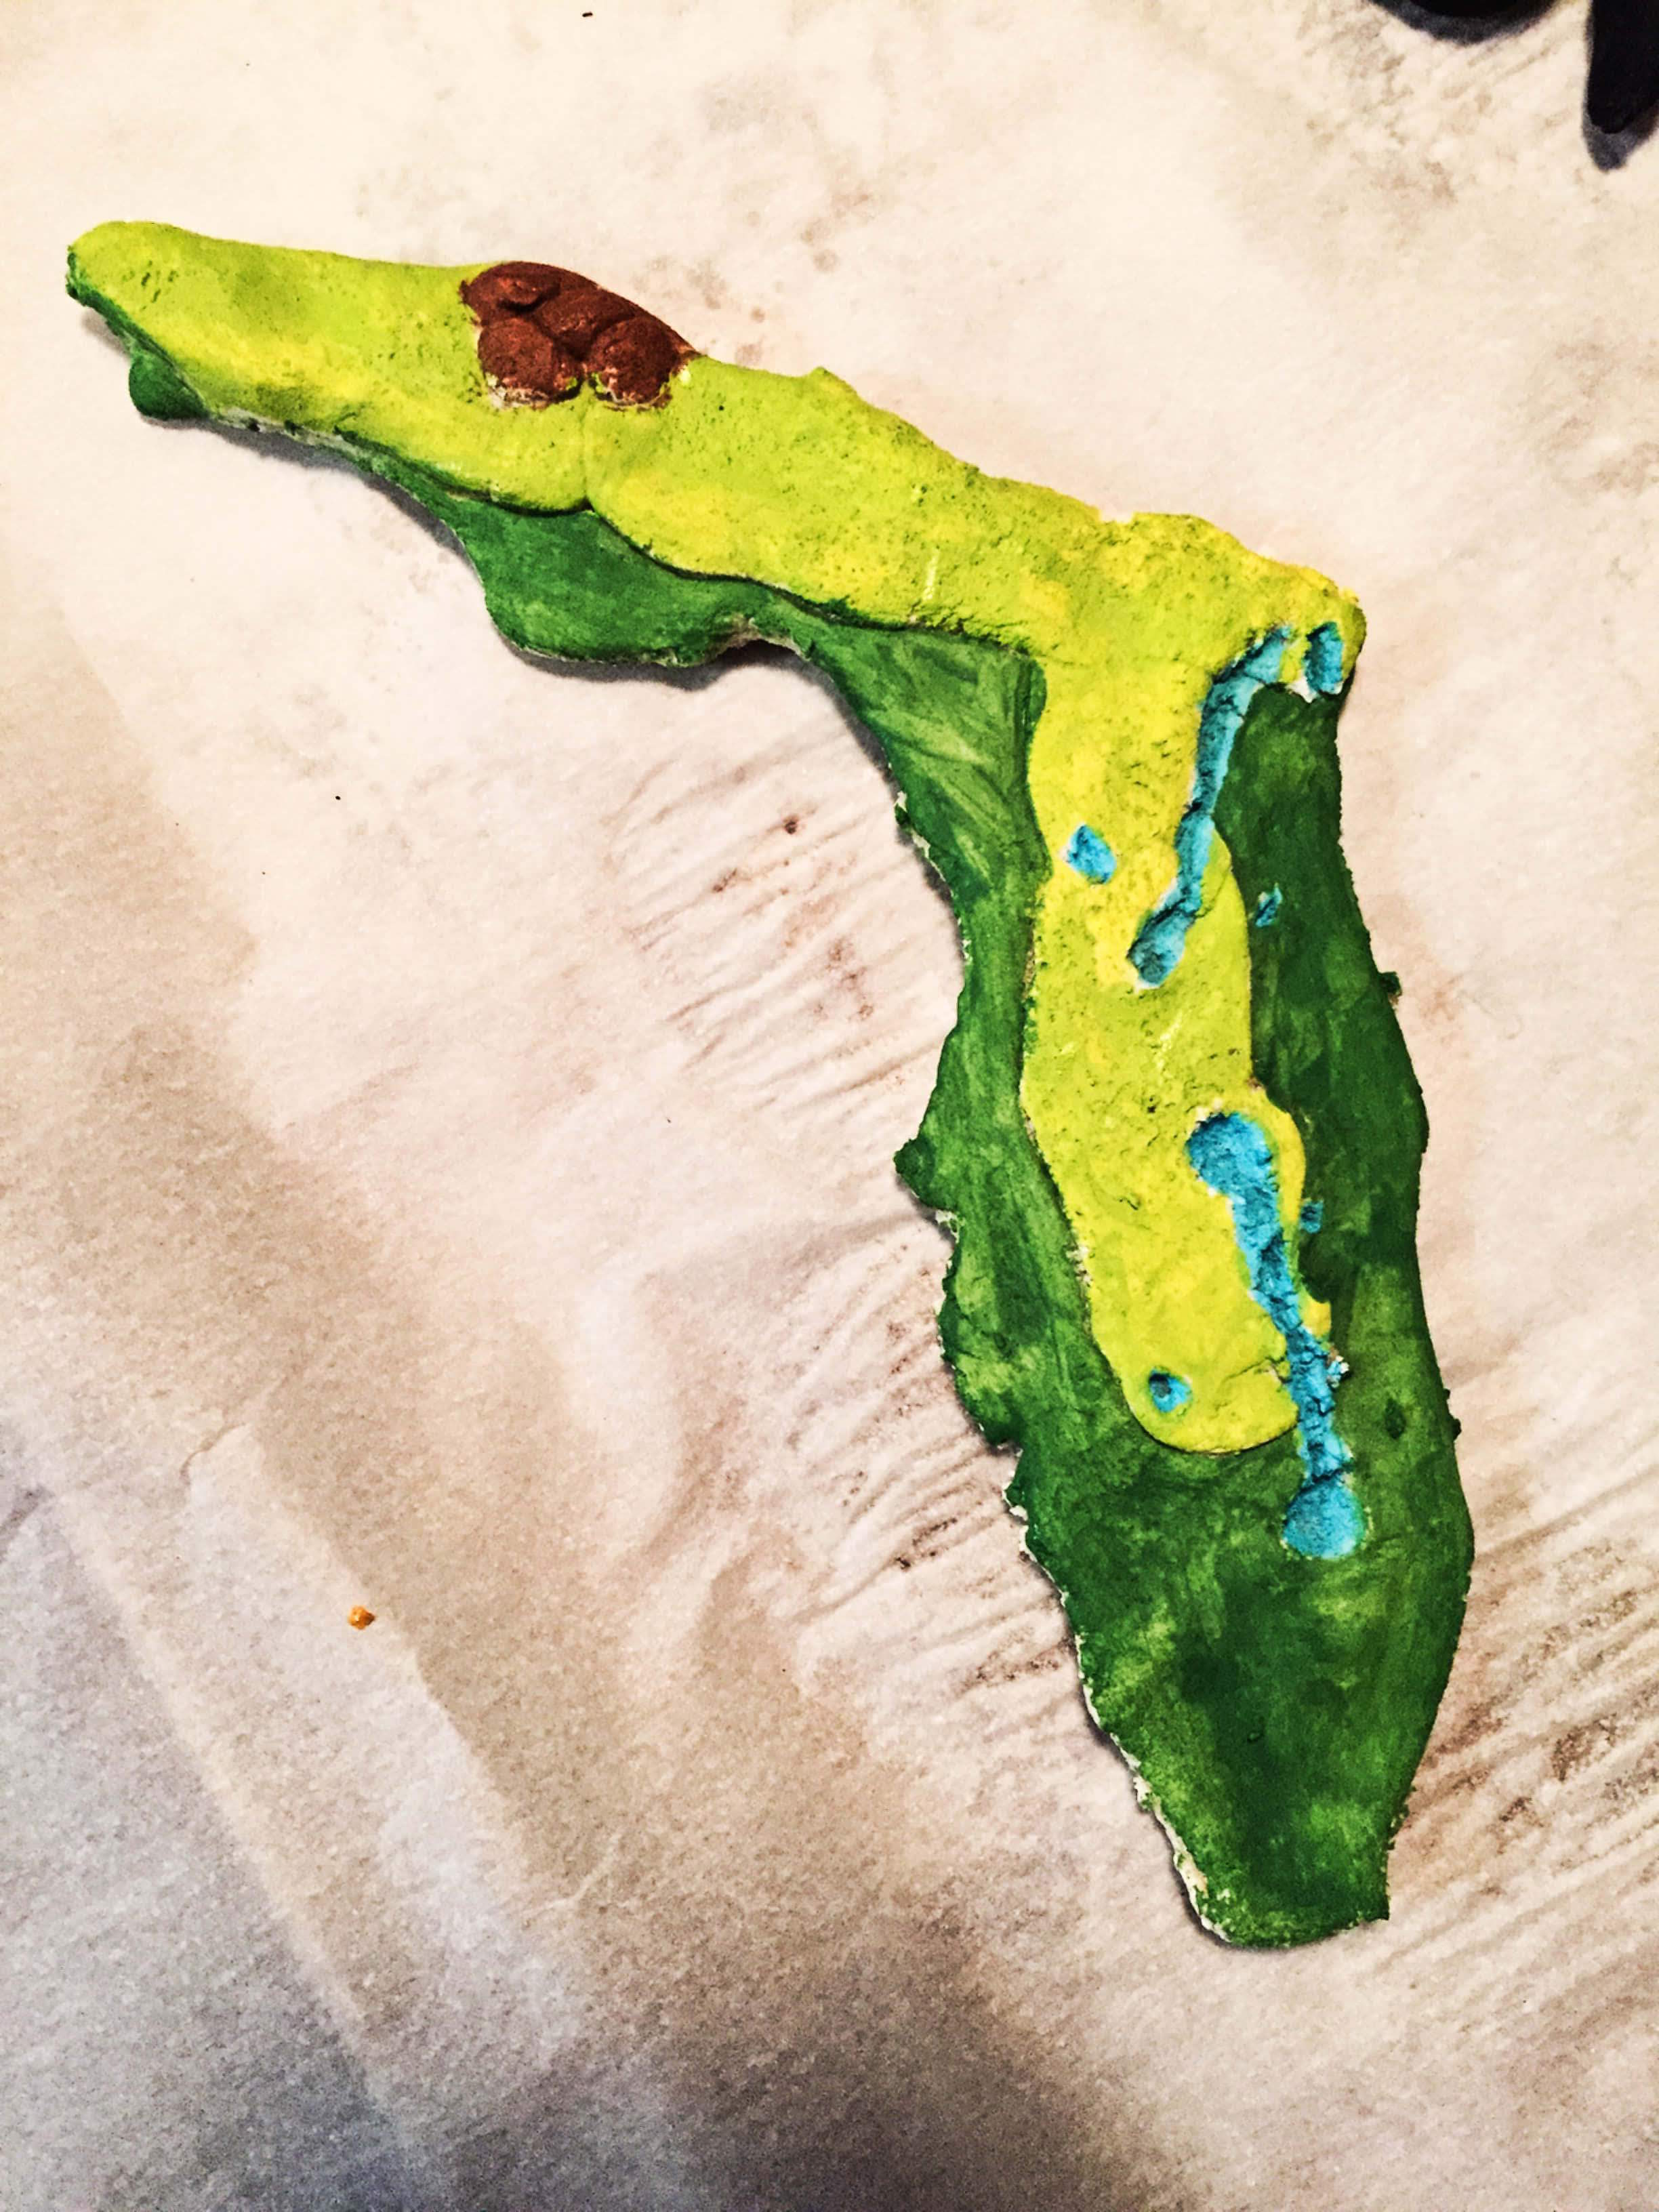
After the map is detailed, you will bake it in the oven at 250-degrees until it is hardened and partially brown.
When the map is completely cool, use blue acrylic paint to fill in the water and different shades of greens and browns where needed. You can use a topographical map to complete the details and find the proper colors.
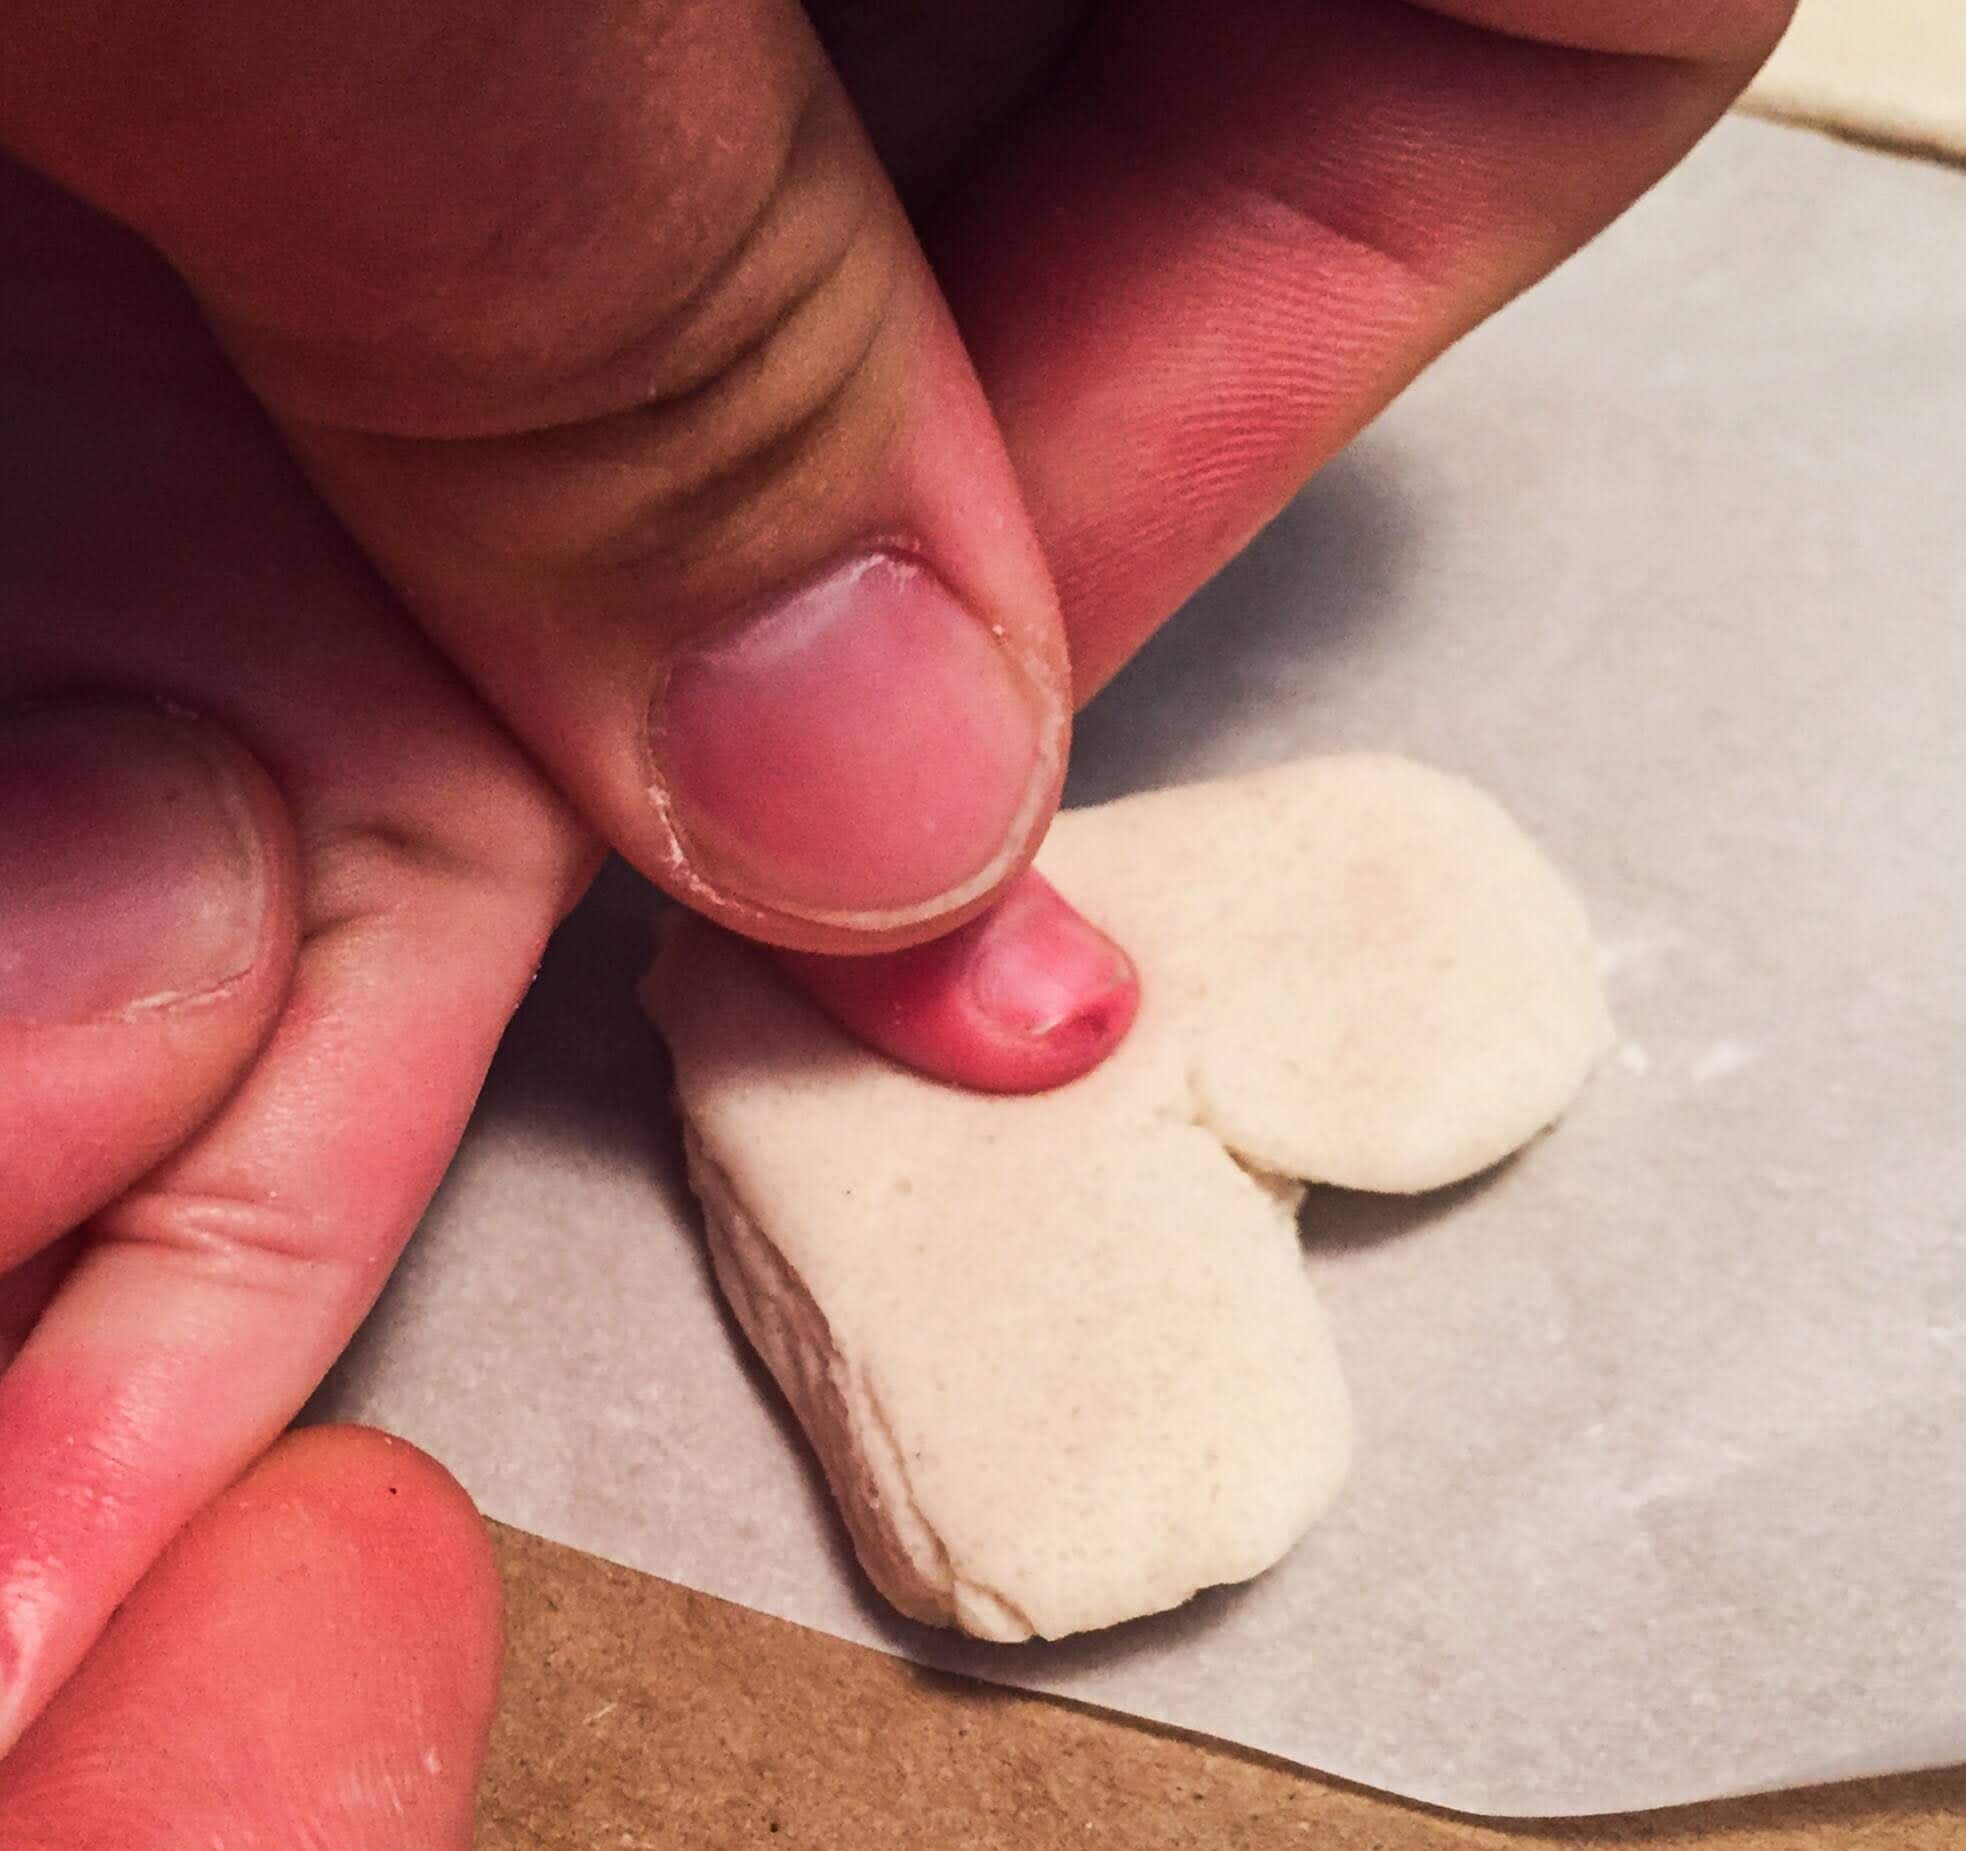
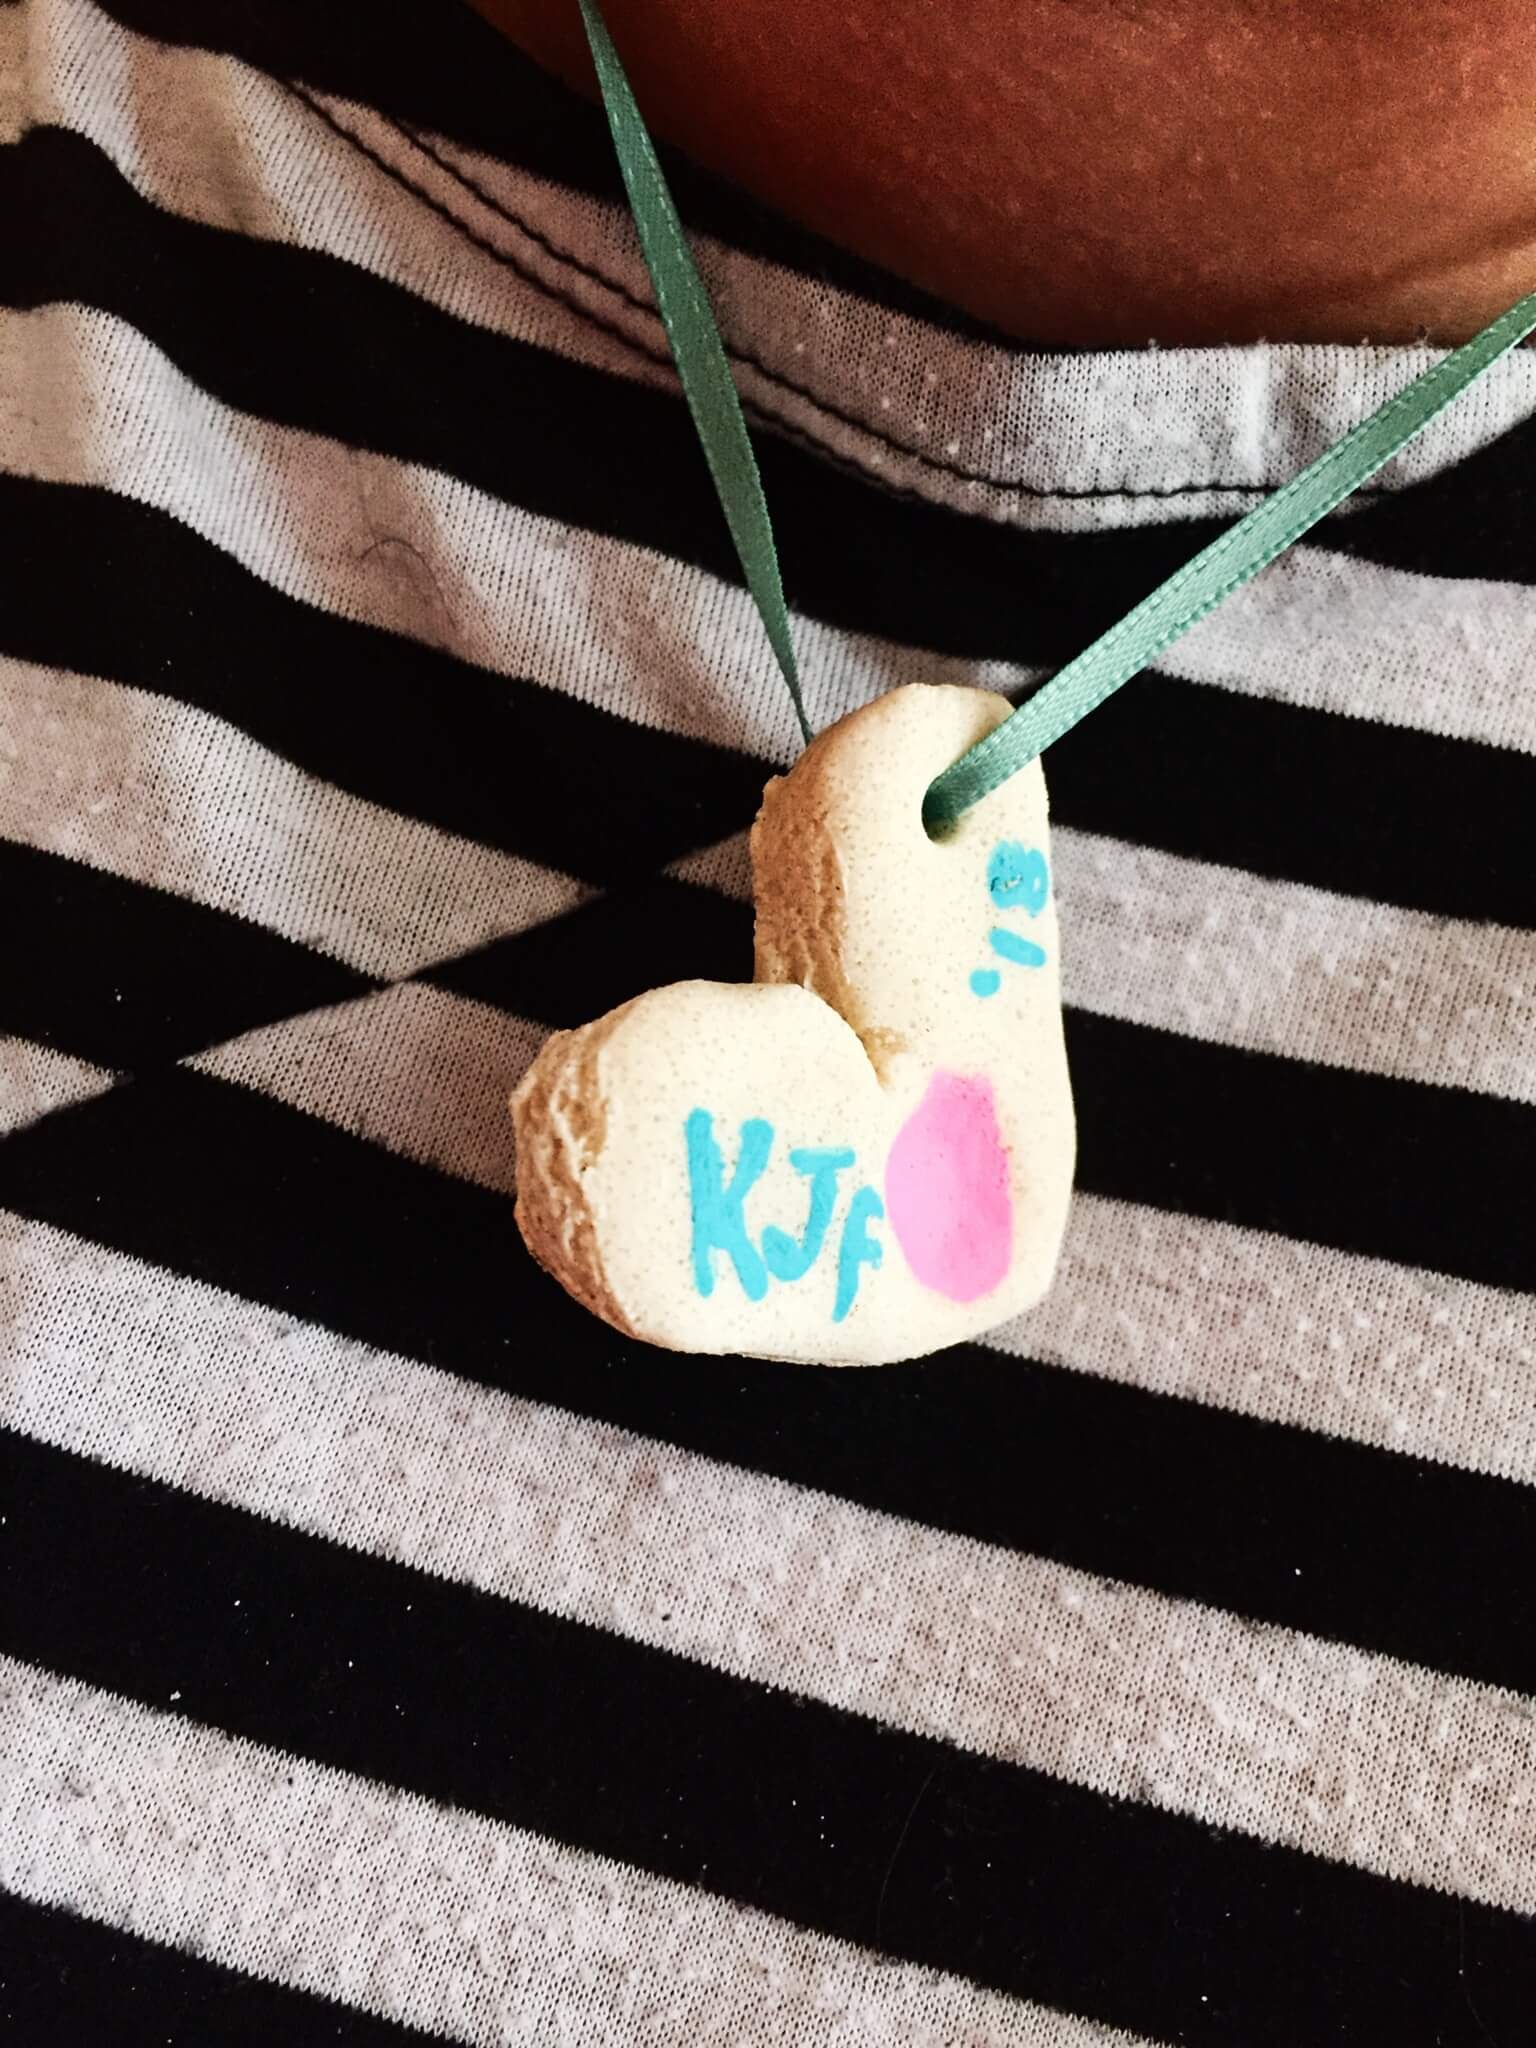
Fingerprint Necklace DIY Salt Dough
Another great keepsake that will make the perfect Grandparent gift is the fingerprint necklace DIY salt dough. While there are many different recipes, this one is the easiest to make.
You will need:
| Salt dough | Rolling pin |
| Small heart shaped cookie cutter that will allow enough room on one side for a fingerprint. | Tiny straw (the kind that comes in a juice box is perfect) |
| Ribbon | Acrylic paints, glitter, etc. |
Instructions:
Using the rolling pin, flatten the dough out to your consistency.
Cut out the dough with the cookie cutter.
Using the tiny straw, poke a hole in the top so you can put the ribbon through later for a necklace.
Press your child’s finger down on one side of the heart to form a fingerprint. It works best if you roll the finger from one side to the other.
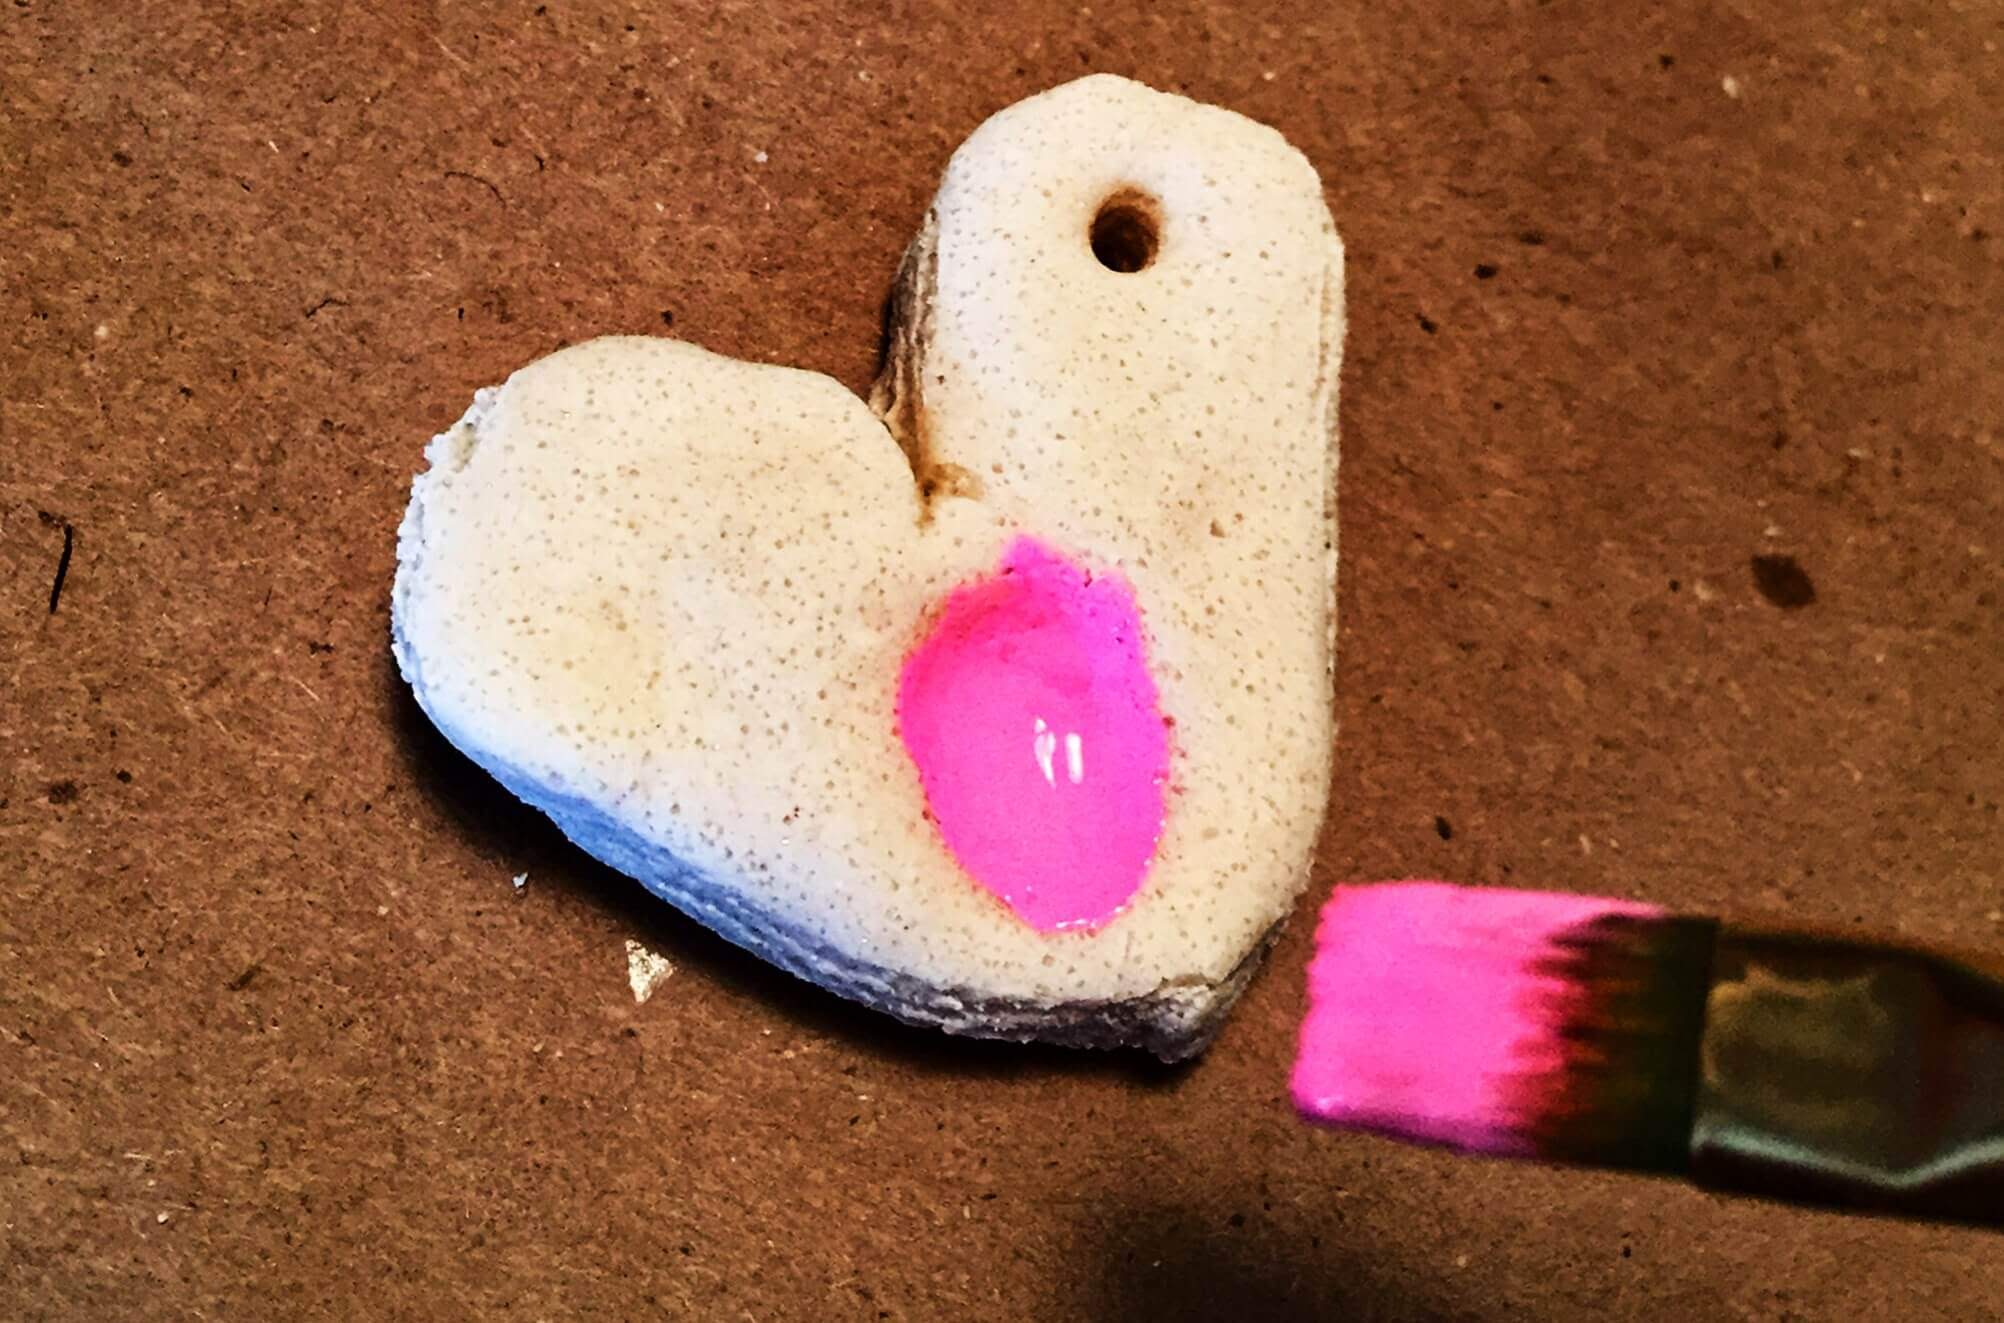
Put the heart on the cookie sheet and bake it at 250-degrees until it is hardened and no longer wet.
When it’s completely cooled, decorate the heart using acrylic paints, glitter, or whatever embellishments you would like to add. For a special touch, use a thin marker or paint brush and put your child’s name, initials, birthdate, or the year the necklace was made.
This is an excellent group project for the kids to make for Mom or Grandma on Mother’s Day.
Decorating Salt Dough
Once you’ve finished your creations and they are cooled, you can decorate them using paints, markers, glitter, and sometimes other craft items such as tiny pom poms and googly eyes can be used.
You can put a lot of detail into your creations or you can make them simple, it depends on the creation itself and who is making it.
When you’re doing your salt dough crafts with kids you will want to consider their ages and comprehension level. Obviously, the smaller children will do best with the simpler projects.
You will want to be sure your area is thoroughly covered; a roll of brown craft paper works great and goes a long way. Be sure and look for paint that comes in containers easy for smaller hands to handle.
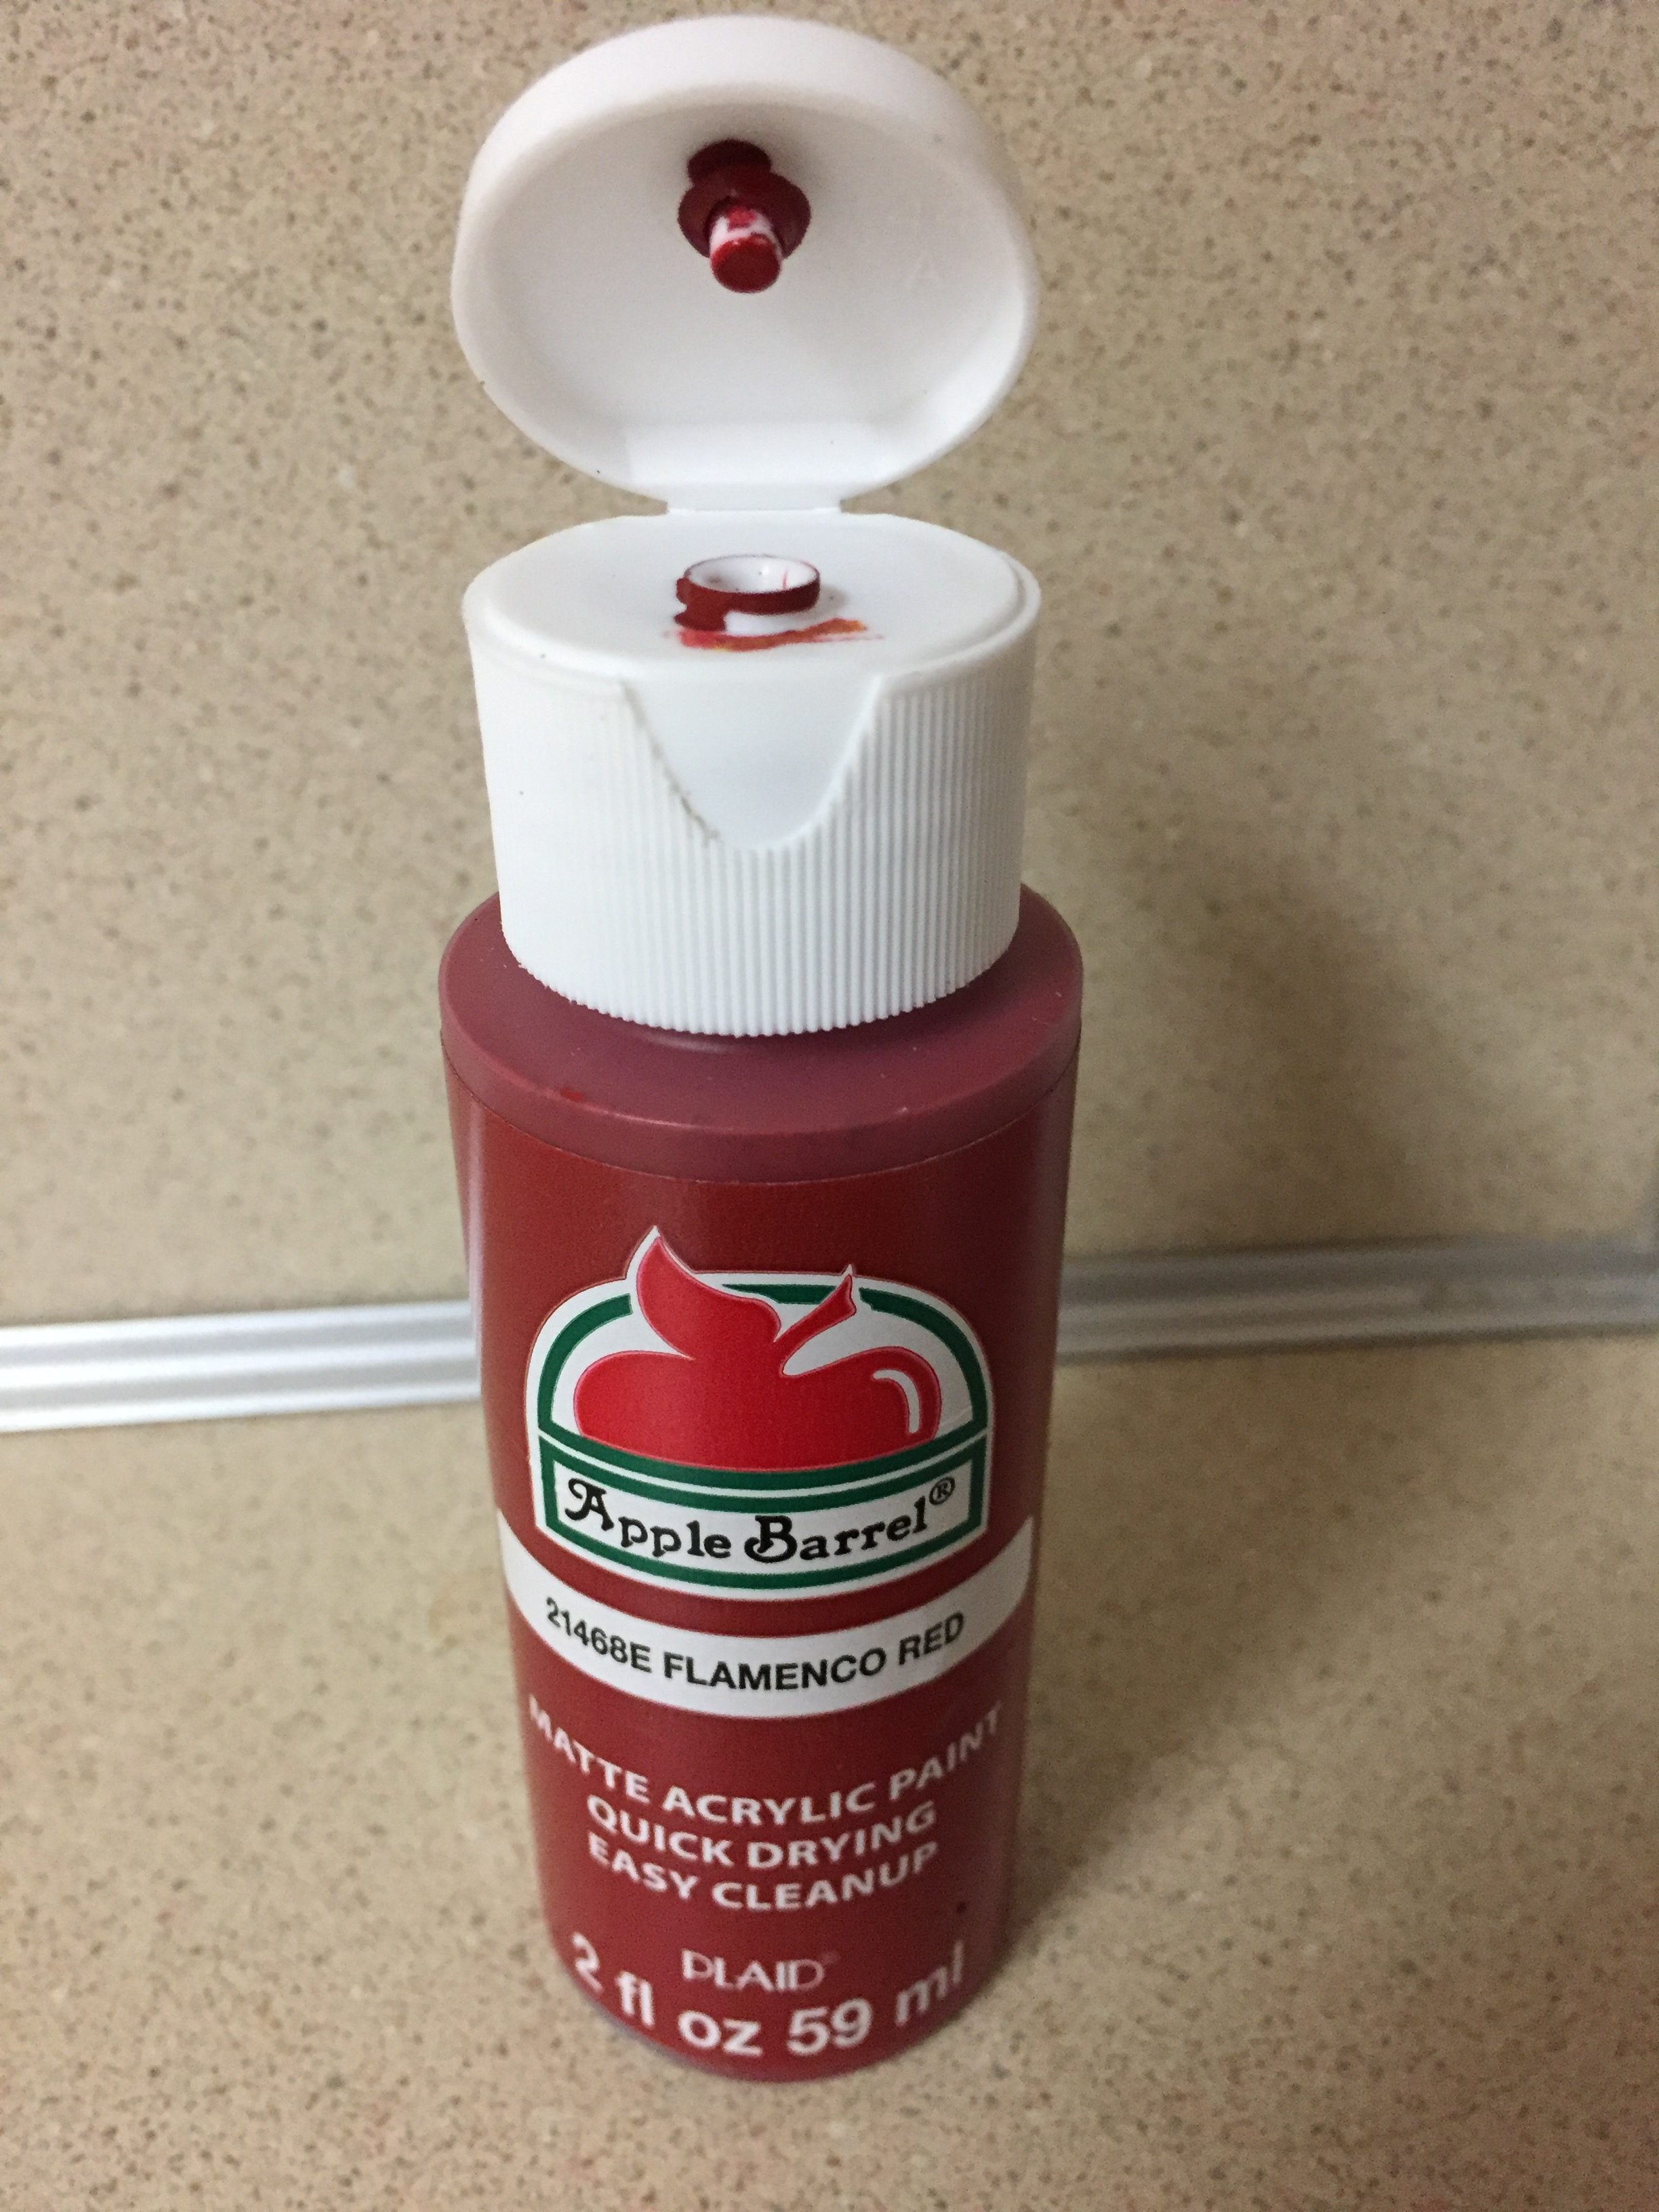
What Kind of Paint to Use on Salt Dough
You can use simple acrylic paints that are used with ordinary craft projects. Most of the craft acrylics come in easy to squeeze bottles that can be poured onto a pallet or a paper plate in small amounts so that they are not overused or spilled.
It’s easy to find these paints and they are inexpensive to purchase. Look for them at any craft store or your local box store where the arts and craft supplies are found.
These paints are non-toxic and wash off with soap and water, so you won’t have the need for worry when it comes to making hand and footprints or when their little arms accidentally meet with the paint brush.
Why Did my Salt Dough Puff Up?
Salt dough is just that, it is dough, so the odds it will puff up or rise is a possibility if you don’t do it properly.
Be sure you are baking your creations at a lower temp than you would normally use for baking your edible treats. It will also take an extremely long time for them to harden, but this will assure a lesser chance of the dough rising.
Periodically check on your salt dough crafts while they are baking to avoid overcooking, and if you want to be sure they won’t rise, you can air dry them, but plan for a much longer wait time for them to dry.
Thicker salt dough projects are more likely to rise faster than the thinner ones, so keep that in mind when you are molding thicker ornaments.
How to Preserve Salt Dough and Ornaments
After all the hard work of perfecting your ornaments, you will want to be sure and preserve them for enjoyment year after year, you can even preserve the dough for several days in between molding it into new creations.
The following tips on how to preserve salt dough ornaments will help to provide you with years of enjoyment:
- Store your ornaments in an airtight, hard-shelled container rather than to use a sealable food storage bag. If you are stacking them together, place a sheet of wax paper between the layers to avoid them from sticking together.
- Avoid storing them in the garage where the temperatures are not controlled like they would be in the house, not to mention those pesky critters who will mistake your tree ornaments for cookies.
- Keep in mind that if your ornaments are scented they will transfer their scents to the other items in the container, so consider storing your scented ones separate from the others.
- Be careful when stacking them with your other decorations so they don’t become crushed under a heavy pile.
- Consider storing each of them in an individual container of their own and then placing them all in a larger container with a special label.
Tips and Tricks for Making Salt Dough Creations
There are some additional tips and tricks you might want to consider when making your salt dough creations.
- Although salt dough looks yummy, it is NOT EDIBLE, but don’t worry it won’t hurt anyone if eaten. It’s extremely salty and tastes just like the sand at the beach.
- Using parchment paper while rolling out your dough will save your life and time. Consider placing the paper on your cookie sheets while baking them as well.
- Salt dough can be air dried as an alternative to baking it in the oven, but you will see better results when drying your creations in the oven.
- Be sure your salt dough crafts are completely cooled before decorating them. It’s best to allow them to dry overnight if possible.
- If your dough is too sticky you can add more flour, just don’t overdo it or the dough will become too dry and then you will find yourself needing to add more water, so the process might become endless.
- Using a coat or two of polyurethane on a completed creation is an excellent way of assuring a long lasting life for your ornaments.
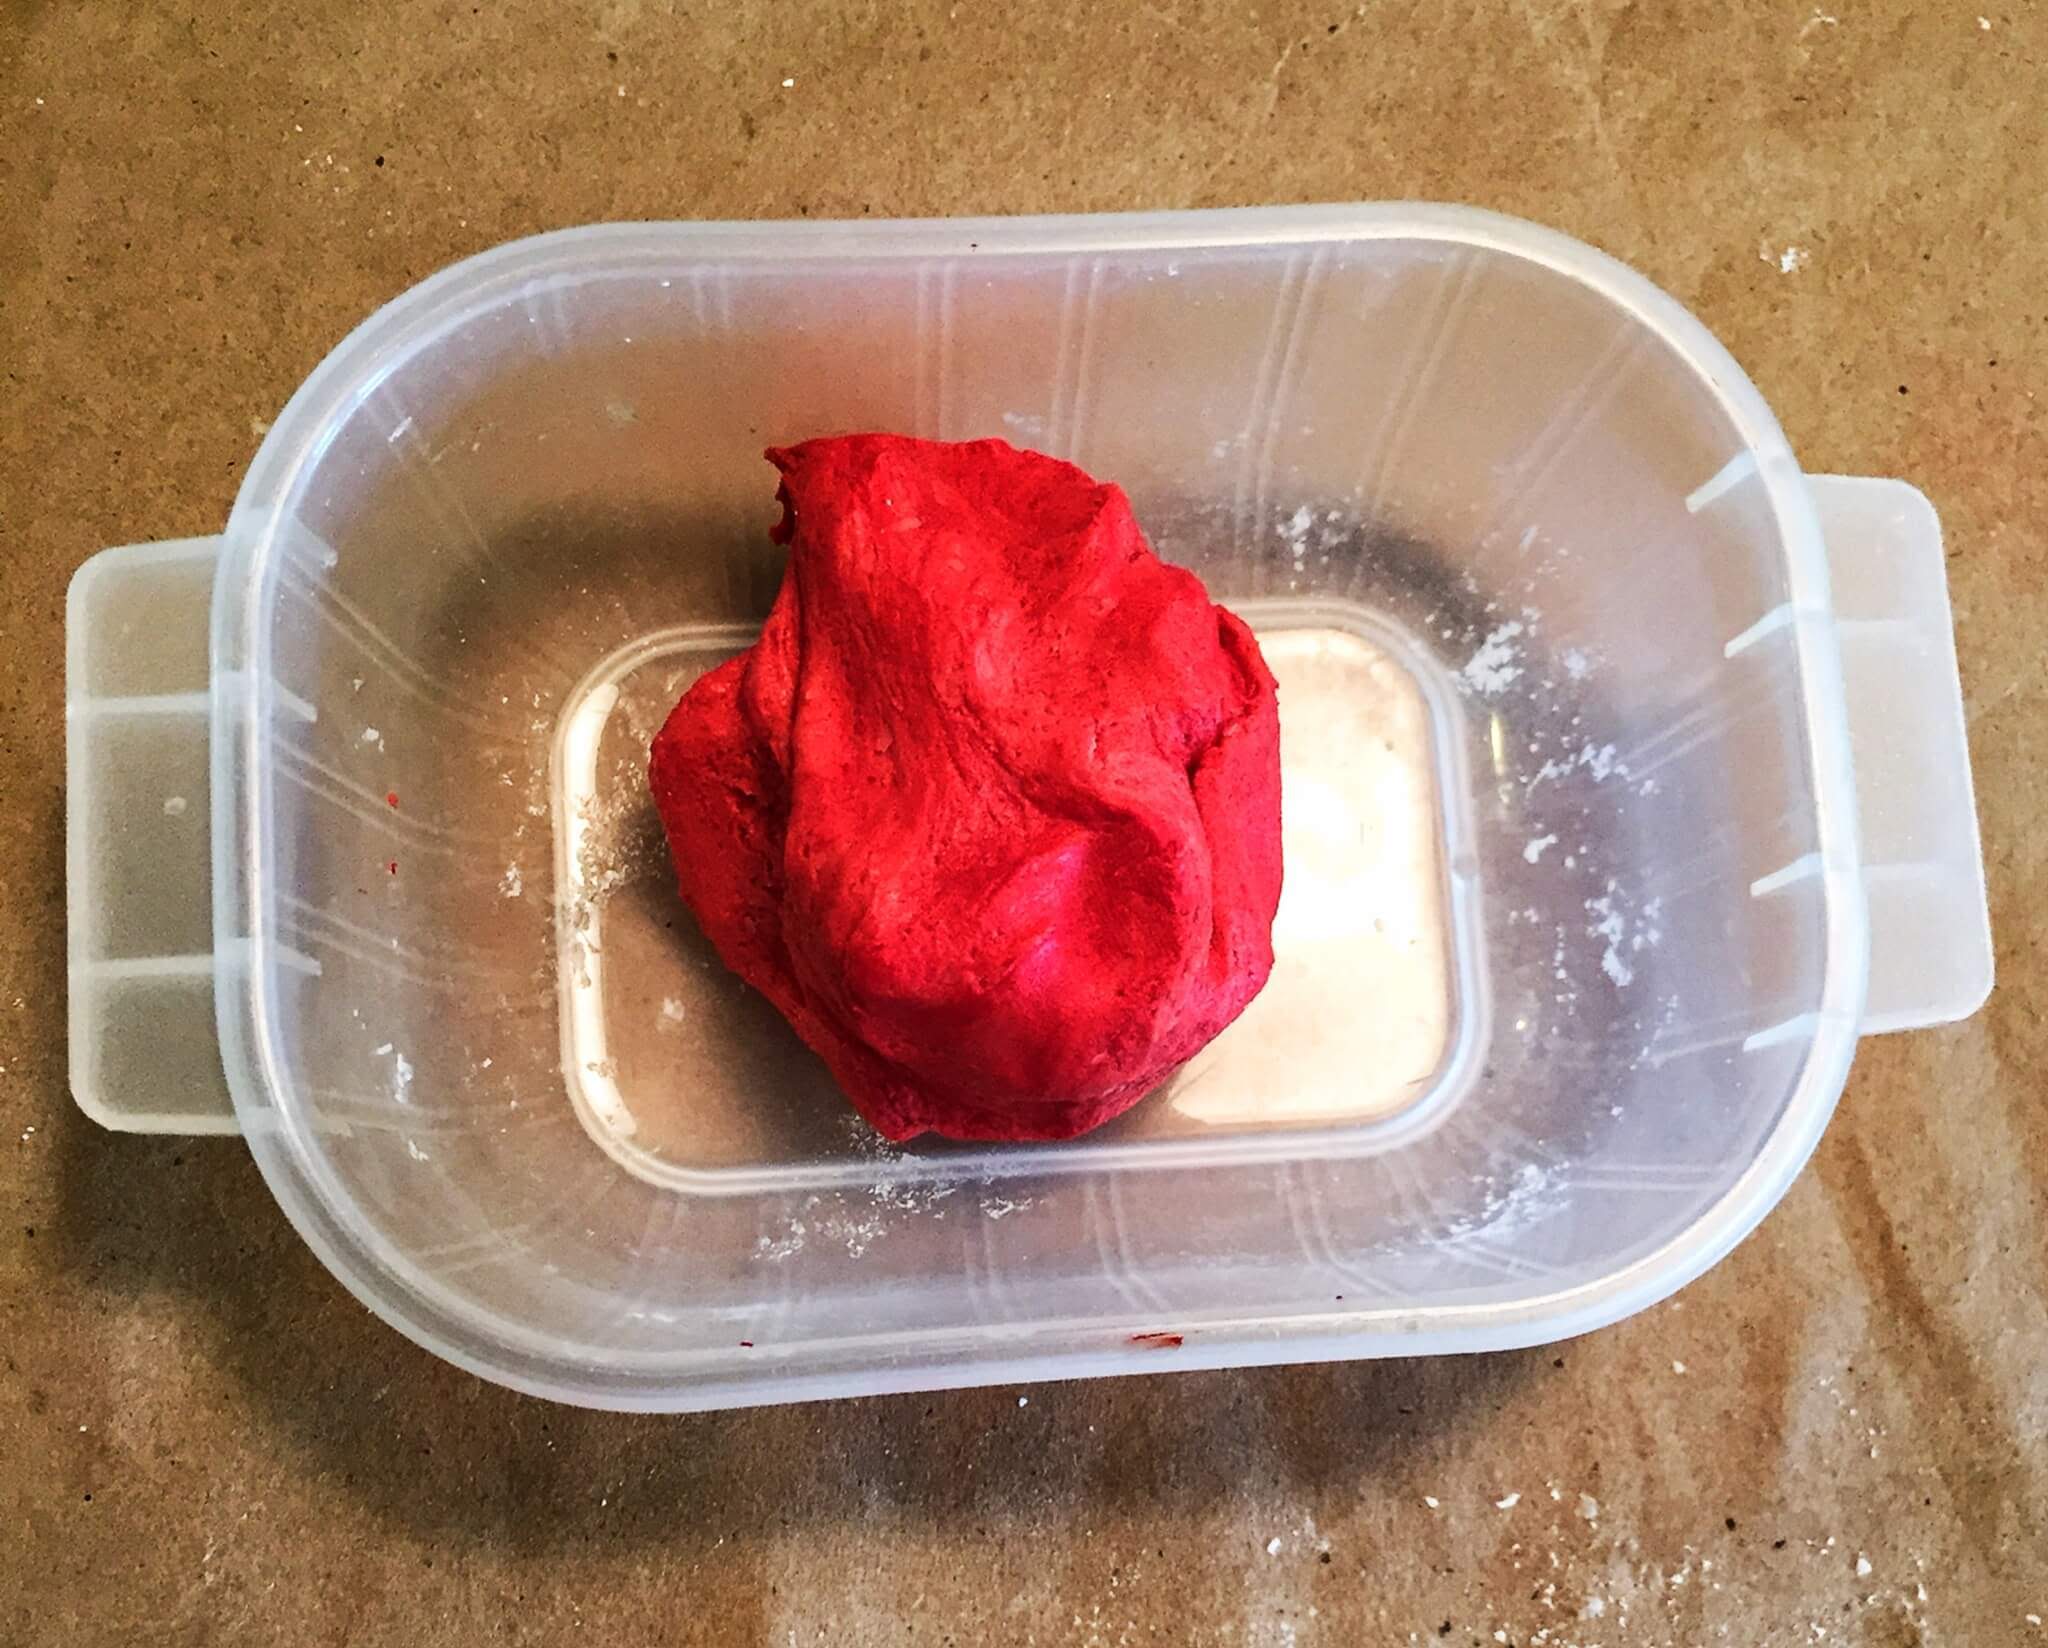
- If you prefer, you can easily add food coloring to the dough when you mix it. This can be a great alternative to using paints, especially when you are sharing the craft with toddlers who would rather just mold the dough like clay.
- For a more festive touch, add some scents such as vanilla, cinnamon, or pine.
- If you are giving the ornaments as gifts, consider purchasing an airtight container that you can also give to the receiver for storing their ornament.
There you have it, a list of easy salt dough recipes and crafts for kids. Enjoy the time you have bonding with your kids while they are young enough to enjoy your company!
Make sure you check out some of our summer arts and crafts ideas as well as our farm themed games and activities.
