Teaching kids how to make yarn dolls is easy and fun!
This traditional craft idea is great for the classroom or at home with the family.
The other great thing about making yarn dolls is that it’s inexpensive to do!
Creating the Yarn Doll

✓ Yarn
✓ A piece of sturdy cardboard or a book.
✓ Scissors
✓ Choice of decorations (google eyes, contrasting yarn, ribbon, beads, etc.)
Directions
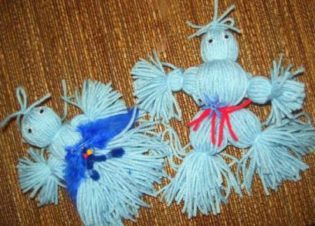
Yarn Doll Body
- Begin by taping or simply holding an end of the yarn at the bottom of your wrapping board/book. Loop the yarn loosely around the book lengthwise.
- Keep wrapping the yarn around the book. On the last wrap, end the yarn at the bottom of the book.
- Carefully slip a piece of yarn around 10″ long under the yarn at the top of the board; tie it in a tight knot. Slip the tied yarn off of the book. At times it is easier for me to slide the yarn (while holding it tightly) off of the board. Tie it when it comes off the board.
Note:
- The more times you wrap, the thicker the doll will be. The ‘Video Box Sample’ is wrapped 95 times.
- The thickness of the yarn used–determines the fullness of the doll.
- How tall you make your dolls will determine how many times you wrap the body. If you want to make your doll larger or smaller, experiment until you find satisfying proportions. Depending on size–you’ll usually need 80 to 200 wraps.
- Do not stretch the yarn while you are wrapping. When you remove the yarn from the cardboard or book, it will “shrink” and resume its un-stretched state.
The Yarn Doll Head
Siding down tightly–tie another piece of string about an inch or more down (depending on the length of doll) below the top knot to create a tight, round head.
The Arms
Directions
- Pull out a few loops on each side the be the doll’s arms.
- In the middle section of yarn, tie a string tightly where you’d like her/his waist to be.
- Tie the arms at the “wrists” and trim the looped yarn ends.
Bottom Half of the Yarn Doll
Directions
- Evenly clip the loops at the bottom of the doll.
- If you want a girl-you now have a ‘skirt’. If you want a boy–split the skirt in the center into 2 parts from the waist down. Tie them off as you did the arms. If legs are long enough, you could also braid them.
- Decorate as desired…I gave this doll a flop of hair. This ‘hair-do’ was made by wrapping yarn around a width of two fingers. Slide it off the fingers–tie in the center–tie at the top of the head. Snip the loops for a fringe of hair!
Conclusion
Thank you for stopping by and learning how to make a yarn doll. We hope it has inspired you to teach the children at home or in the classroom to make yarn dolls! W
You may also be interested in these other yarn craft ideas.

